Monday, June 28, 2021

 Sweet Ice Cream for my
July, 2021 Creative
Therapy Classes

I am offering this darling birthday themed card for my July 6th and 10th, 2021 Creative Therapy classes. I CASEd this card from Julie Petrie's Pinterest post, and you can see her card Herepost of April 21, 2021. 
When you come to class, or if you buy my "Kits-to-Go", all the pieces will be cut out for you.  For details about my 'Kits-to-Go", click Hereand see class description for details. 
The Sweet Ice Cream bundle is so easy to use, and one can put together cards quickly.

Recipe:

  • The base is an 8 1/2 x 5 1/2 piece of Bermuda Bay, scored at 4 1/4.
  • The Flirty Flamingo layer is 5 1/4 x 4.
  • The Basic White layer is 5 x 3 3/4, and is embossed with the Mortar & Brick 3D Folder.
  • The scallops on the 5 x 2 Pattern Party DSP are made with one of the Scalloped Contours Dies.  The top of the DSP is adhered to the Basic White with adhesive and the bottom of the DSP is adhered with dimensionals.  Gives the effect of an awning.
  • The ice cream cone is stamped with Cinnamon Cider.  The ice cream flavors are Flirty Flamingo, Granny Apple Green and Bermuda Bay.  All are stamped on Basic White and punched with the Ice Cream Cone Builder punch.  I adhered all together with adhesive, then used Mini-Dimensionals to adhere all to the card front.
  • The words are stamped with Tuxedo Memento Black ink, and Flirty Flamingo on a 3 1/8 x 2 piece of Basic White.  The edges are sponged with Flirty Flamingo.   
  • All done! Remember to decorate your envelope!!

Should you want to order any of the supplies I used to make this card, please just click Right Here to place your in my on-line store, or you can click on the 2021-22 catalog right here on my blog.
I hold monthly adult card-making classes in my home at 555 Williamsdale Road, Graham, NC 27253, and if you would like to attend, please let me know.
For details, see my class schedule right here on my blog or on my Stampin' Up! website, found Here.
Thank you for stopping by and have a great day.
~Linda

Friday, June 25, 2021

 Peaceful Moments , Brilliant Butterflies and Pearlescent Specialty Paper 

I was inspired to make this card after watching Anna Helman's video on YouTube, and you can see her video Here.
Anna made a slimline card, and I chose a A-2 card. Still the beautiful paper and butterfly dies.
Recipe:
  • The base is an 8 1/2 x 5 1/2 piece of Pale Papaya, scored at 4 1/4.
  • The Soft Suede layer is 5 1/4 x 4.
  • The Pearlescent layer is 5 x 3 3/4 and is embossed with the Tasteful Textile folder.
  • The words, from Peaceful Moments, are stamped with Soft Suede ink and cut out with the 1 5/8" die from the Layering Circle Dies.  Some Pale Papaya sheer ribbon is added under the circle before adhering it to the card.
  • The butterflies are made with the Pearlescent paper and the Brilliant Wings dies.
  • Some Basic Pearls are added to finish this beautiful card.
  • All done! Remember to decorate envelope !!
Should you want to order any of the supplies I used to make this card, please just click Right Here to place your in my on-line store, or you can click on the 2021-22 catalog right here on my blog.
I hold monthly adult card-making classes in my home at 555 Williamsdale Road, Graham, NC 27253, and if you would like to attend, please let me know.
For details, see my class schedule right here on my blog or on my Stampin' Up! website, found Here.
Thank you for stopping by and have a great day.
~Linda

Tuesday, June 22, 2021

 Shaving Cream Technique for my June Hostess Club Projects

Pansy Patch Stamp Set; Shaded Spruce, Crushed Curry and Basic White Cardstock; Shaded Spruce, Evening Evergreen and Crushed Curry Ink Refills and Tuxedo Memento Black for the words.
Plentiful Plants Stamp Set; Shaded Spruce, Granny Apple Green and Basic White Cardstock; Granny Apple Green, Evening Evergreen & Cinnamon Cider Ink Refills & Tuxedo Memento Black for the words.
Sunny Sentiments Stamp Set; Night of Navy, Balmy Blue and Basic White Cardstock; Night of Navy, Balmy Blue and Highland Heather Ink Refills and Tuxedo Memento Black for the words.

For my June 26, 2021 Hostess Club Meeting, everyone will make two cards using the Shaving Cream technique. This technique is so much fun, messy, and everyone will get different results.  There are tons of YouTube videos showcasing this technique, and I kept googling until I found one I liked.

Recipe:
  • The bases are 8 1/2 x 5 1/2, scored at 4 1/4.
  • The next layers are 5 1/4 x 4.
  • The clouds and "jagged edges" are cut out with the Basic Borders dies and Basic White cardstock.
  • The next layers are 5 x 3, and are the bases for the 4 7/8 x 2 7/8 Basic White shaving cream layer.
  • The Basic White pieces on which the words are stamped with Tuxedo Memento Black ink and the bases under this Basic White are cut out with two of the Hippo and Friends dies.
  • All done! Remember to decorate envelope !!
Should you want to order any of the supplies I used to make this card, please just click Right Here to place your in my on-line store, or you can click on the 2021-22 catalog right here on my blog.
I hold monthly adult card-making classes in my home at 555 Williamsdale Road, Graham, NC 27253, and if you would like to attend, please let me know.
For details, see my class schedule right here on my blog or on my Stampin' Up! website, found Here.
Thank you for stopping by and have a great day.
~Linda

Friday, June 18, 2021

 The July Paper Pumpkin
by Stampin' Up!
The Adventure Begins

Life is full of big adventures that are best experienced together! This month’s The Adventure Begins Paper Pumpkin Kit helps you celebrate those exciting new chapters in the most creative of ways with enough supplies to create twelve motivating cards—plus coordinating envelopes—all featuring the exciting colors of nature.


Like the still moments before a great adventure, the kit’s designs contain a quiet energy that hint at all the grand possibilities of what is yet to come. Share this kit with your family and friends about to embark on a new journey and make connections while you explore and discover new levels of your creativity!


New Crafting Technique

It’s time for a new adventure in your creative journey. This month’s kit features a new layering technique that is impressive, but still very doable. You’ve got this!

Versatility

The Adventure Begins Paper Pumpkin Kit contains enough supplies to create twelve inspiring cards and coordinating envelopes, but don’t let that stop your creativity! If you can dream up something else with this month’s kit, the sky is your limit!

ABOUT THE KIT


  • Contains enough supplies to create twelve cards and coordinating envelopes.
  • Card size: 4-1/4” x 5-1/2” (10.8 x 14cm)
  • Envelope size: 4-1/2” x 5-3/4” (11.4 x 14.6 cm)
  • Comes with a Stampin’ Spot plus an exclusive Stamp Set.
  • Includes inspirational sentiments and adventure-themed imagery featuring these nature-inspired coordinating colors: Basic Black, Basic White, Bermuda Bay, Crushed Curry, Early Espresso, Flirty Flamingo, Garden Green, Granny Apple Green, Mango Melody, Night of Navy.

SUBSCRIPTION INFORMATION

Subscribe to the July 2021 Paper Pumpkin Kit between 11 June and 10 July at paperpumpkin.com!

Note: Supplies may be limited toward the end of the subscription period.
Please let me know if there is anything I can do for you, or if you need assistance to subscribe.


~~~~~~~~~~~~~~~~~~~~~~~~~~~~~~~~~~~~~~
Also, I hold monthly adult card-making classes in my home at 555 Williamsdale Road, Graham, NC 27253, and if you would like to attend, please let me know.
For details, see my class schedule right here on my blog or on my Stampin' Up! website, found Here.
Thank you for stopping by and have a great day.
~Linda

Sunday, June 13, 2021

 Plentiful Plants &
Perfect Plants Dies 

Another fun card I offered for my June 8th and 12th, 2021 Creative Therapy classes.

Recipe:
  • The base is an 8 1/2 x 5 1/2 piece of Garden Green, scored at 4 1/4.
  • The Cinnamon Cider layer is 5 1/4 x 4.
  • The Bloom where you are Planted DSP is 4 x 4 and I cut it at an angle.
  • The Pale Papaya strip is 4 1/4 x 1/2.
  • The Basic White is 4 1/2 x 2 3/4.
  • The vine is stamped on the white with Garden Green ink, and the words are stamped with Tuxedo Memento Black ink.
  • The pieces of cardstock in the pot are cut out with Garden Green and Soft Succulent, and one of the Perfect Plant dies.
  • The pot is stamped with Cinnamon Cider ink on Basic White and cut out with a Perfect Plant die.
  • The plant hanger is cut out with Crumb Cake.
  • I slipped a piece of Linen Thread thru the hole in the top of the plant hanger, draped it over the back of the cardstock, and used clear tape to secure it, then adhered the Basic White to the card front.
  • All done, and remember to decorate your envelope.

Should you want to order any of the supplies I used to make this card, please just click Right Here to place your in my on-line store, or you can click on the 2021-22 catalog right here on my blog.
I hold monthly adult card-making classes in my home at 555 Williamsdale Road, Graham, NC 27253, and if you would like to attend, please let me know.
For details, see my class schedule right here on my blog or on my Stampin' Up! website, found Here.
Thank you for stopping by and have a great day.
~Linda

Friday, June 11, 2021

 Ride the Range & the Open Range dies for my June, 2021 Creative Therapy Classes

I am offering this cute masculine themed card for my June 8th and 12th, 2021 Creative Therapy classes.
I saw Brian King's card on Pinterest, and decided to CASE it, well kinda-sorta, for my classes.  It seems like I am in the need of masculine thank you cards more often than not.  You can see his card Here, post of May 8, 2021.  
The stamp set is just $21.00 and the Open Range Dies are on sale for just $14.50, that's a savings of 50%.  The sale is until June 30, 2021, and only while supplies last.  WOW, what a deal, right?

Recipe:
  • The base is an 8 1/2 x 5 1/2 piece of Crumb Cake, scored at 4 1/4.
  • The Early Espresso layer is 5 1/4 x 4.
  • The next Crumb Cake layer is 5 x 3 3/4, and is embossed with the Tasteful Textile 3D Folder.
  • The next Early Espresso layer is  4 1/4 x 3 1/4.
  • The Pool Party piece is 4 1/8 x 2, and the words are stamped with Tuxedo Memento Black ink.
  • The Soft Succulent piece is 4 1/8 x 2 and the wave is made using one of the Open Range Dies.
  • The windmill is cut with Basic Black, the fence with Early Espresso, and the clouds with Basic White.  The horse and rider and the cows are stamped on Basic White with black ink, colored with Watercolor Pencils and a Blender Pen, and everything is cut out with the Open Range Dies.
  • All done! Remember to decorate your envelope!!

Should you want to order any of the supplies I used to make this card, please just click Right Here to place your in my on-line store, or you can click on the 2021-22 catalog right here on my blog.
I hold monthly adult card-making classes in my home at 555 Williamsdale Road, Graham, NC 27253, and if you would like to attend, please let me know.
For details, see my class schedule right here on my blog or on my Stampin' Up! website, found Here.
Thank you for stopping by and have a great day.
~Linda

Tuesday, June 8, 2021

 Sunny Thoughts, Days to Remember & Pattern Party Designer Series Paper

A fun card using Sunny Sentiments, Days to Remember and some Pattern Party Designer Series Papers, (DSP)
I really like this sketch because you can use any DSP, and almost any words. So easy.

Recipe:
  • The base is an 8 1/2 x 5 1/2 piece of Gray Granite, scored at 4 1/4.
  • The Garden Green layer is 5 1/4 x 4.
  • The four DSP are 1 1/4", and the long DSP piece is 1 1/4 x 2 1/2.
  • The Flirty Flamingo is 3 3/4 x 2 1/2 and is the base for the 3 5/8 x 2 3/8 Basic White on which the words are stamped with Tuxedo Memento Black ink.
  • The Real Red hearts and the Granny Apple Green little flowers are from the Days to Remember stamp set.
  • Three Elegant Faceted Dots are added to the corner of the Basic White piece.
  • All done! Remember to decorate your envelope!!

Should you want to order any of the supplies I used to make this card, please just click Right Here to place your in my on-line store, or you can click on the 2021-22 catalog right here on my blog.
I hold monthly adult card-making classes in my home at 555 Williamsdale Road, Graham, NC 27253, and if you would like to attend, please let me know.
For details, see my class schedule right here on my blog or on my Stampin' Up! website, found Here.
Thank you for stopping by and have a great day.
~Linda

Saturday, June 5, 2021

 Bamboo Beauty Slim-Line Card

Another beautiful card made by my sweet friend and SU demonstrator, Wendie Jamison. She does such beautiful work, I like to share her talents.

Recipe:

  • The base is an 8 1/4 x 7 piece of Mossy Meadow scored at 3 1/2.
  • The Smoky Slate layer is 8 x 3 1/4.
  • The Basic White layer is 7 3/4 x 3 and stamped with images from Bamboo Beauty with Mossy Meadow ink.
  • After stamping the images, Wendie wrapped some of the Metallic Mesh Ribbon around the top two layers.
  • The 3 1/2 x 2 5/8 layer of Mossy Meadow is the base for the 3 1/8 x 2 piece of Basic White on which the words are stamped with Mossy Meadow ink.
  • To finish the card, Wendie added some Rhinestone Basic Jewels.
  • All done, remember to decorate your envelope.
Should you want to order any of the supplies I used to make this card, please just click Right Here to place your in my on-line store, or you can click on the 2021-22 catalog right here on my blog.
I hold monthly adult card-making classes in my home at 555 Williamsdale Road, Graham, NC 27253, and if you would like to attend, please let me know.
For details, see my class schedule right here on my blog or on my Stampin' Up! website, found Here.
Thank you for stopping by and have a great day.
~Linda

Thursday, June 3, 2021

 Sweet Strawberry Bundle for my June, 2021 Creative Therapy Classes

I am excited to offer this fun strawberry card for my June 8th and 12th, 2021 Creative Therapy classes.

Recipe:
  • The base is an 8 1/2 x 5 1/2 piece of Mint Macaroon, scored at 4 1/4.
  • The Basic Black layer is 5 1/4 x 4.
  • The Basic White layer is 5 x 3 3/4.
  • The Poppy Parade layer is 4 7/8 x 3 5/8.
  • The 4 3/4 x 3 1/2 piece of True Love Designer Series Paper (DSP) is cut out with a Scalloped Contour Die. (The DSP is available until June 30, 2021 or while supplies last).
  • The 3 x 1 piece of Old Olive cardstock is the base for the 2 7/8 x 7/8 piece of Basic White on which the words are stamped with Tuxedo Memento Black ink.
  • The strawberries are stamped on Basic White with Merry Merlot and Poppy Parade ink and punched with the Strawberry Builder punch.
  • The strawberry stems are stamped with Tuxedo Memento Black ink on Old Olive cardstock, and also punched with the Strawberry Builder punch.
  • The stems are glued to the strawberries with glue dots.
  • All done! Remember to decorate your envelope!!

Should you want to order any of the supplies I used to make this card, please just click Right Here to place your in my on-line store, or you can click on the 2021-22 catalog right here on my blog.
I hold monthly adult card-making classes in my home at 555 Williamsdale Road, Graham, NC 27253, and if you would like to attend, please let me know.
For details, see my class schedule right here on my blog or on my Stampin' Up! website, found Here.
Thank you for stopping by and have a great day.
~Linda

Tuesday, June 1, 2021

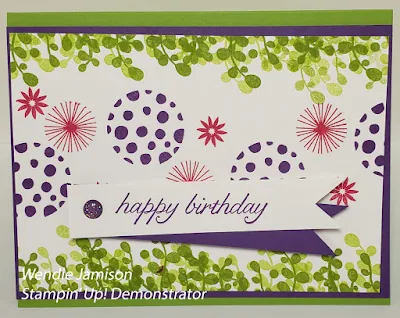
 Circle Celebration
for a fun birthday card

Granny Apple Green, Gorgeous Grape, Basic White cardstock

Granny Apple Green, Night of Navy, & Basic White cardstock
More fun cards made by my sweet friend and SU demonstrator, Wendie Jamison.  She does such beautiful work, I just had to share.
This set is in the Occasions Mini, and is available only until June 2, 2021 or while supplies last.  If you would like to order Circle Celebration, see below for a link to my on-line store, or let me know.

Recipe:

  • The bases are 8 1/2 x 5 1/2  scored at 4 1/4.
  • The next layers are 5 1/4 x 4.
  • The Basic White layers are 5 x 3 3/4 and stamped with the coordinating colors of ink plus Melon Mambo.
  • All done! Remember to decorate your envelope!!
Should you want to order any of the supplies I used to make this card, please just click Right Here to place your in my on-line store, or you can click on the 2021-22 catalog right here on my blog.
I hold monthly adult card-making classes in my home at 555 Williamsdale Road, Graham, NC 27253, and if you would like to attend, please let me know.
For details, see my class schedule right here on my blog or on my Stampin' Up! website, found Here.
Thank you for stopping by and have a great day.
~Linda