Friday, September 29, 2023

 Brightest Glow & Snowflake Magic DSP for my October 2023 Creative Therapy Classes
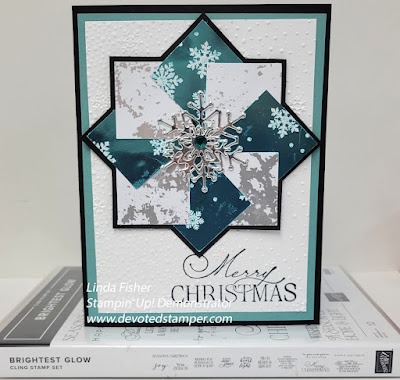
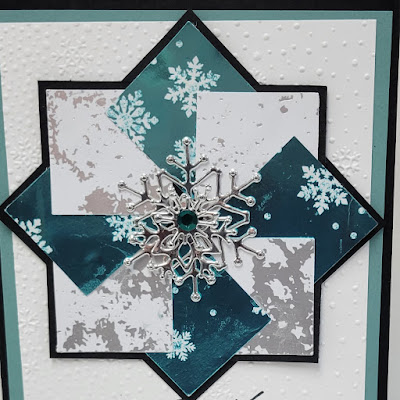
Oh, my goodness, the Snowflake Magic Specialty Paper is Beautiful!  It is so popular, SU is out of stock right now, and is due back in inventory the week of October 9, 2023.  I will be ordering more, for sure. 
 
Recipe:

  • The base is an 8 1/2 x 5 1/2 piece of Basic Black, scored at 4 1/4.
  • The Lost Lagoon layer is 5 1/4 x 4.
  • The 5 x 3 3/4 layer of Basic White is first stamped with Tuxedo Memento Black ink and a stamp from Brightest Glow, then embossed with the Snowflake Sky 3D folder.
  • The two Basic Black squares are 2 7/8 x 2 7/8 and are glued to the card front.
  • I cut eight 1 1/4" squares from the Snowflake Magic Specialty Paper and glued them starting with the white snowflake piece in the right corner of the horizontal square. I glued the darker snowflake piece under the white and kept going to the bottom and to the left.  If this doesn't make any sense, please visit YouTube and search Stampin' Up! Pinwheel Cards or check out Lisa Curcio's video Here
  • I cut 4 snowflakes from the Chic Dies and Silver Foil.  I adhered these with glue dots.
  • The center jewel is from the Adhesive Backed Sequins Trio.
  • All done and remember to decorate your envelope.
Should you want to order any of the supplies I used to make this card, please just click Right Here or you can click on the 2023-24 catalog right here on my blog.
I hold monthly adult card-making classes in my home at 555 Williamsdale Road, Graham, NC 27253. My next set of classes are November 7th and 11th, 2023, and if you would like to attend, see my class schedule and the deadline of October 28, 2023 to register right here on my blog or on my Stampin' Up! website, found Here.
Thank you for stopping by and have a great day.~
Linda-

Tuesday, September 26, 2023

  Brightest Glow Stamps, Irresistible Blooms Dies & Something Fancy Dies 

The One Horse Open Sleigh Designer Series Papers (DSP) is so beautiful, I find myself reaching for it more often than not.
Here are two cards made by my wonderful and very supportive team.  

Recipe:

  • The bases of Cherry Cobbler or Crumb Cake is 8 1/2 x 5 1/2 scored at 4 1/4.
  • The next Lost Lagoon or Misty Moonlight layers are 5 1/4 x 4. 
  • I cut two 4 7/8 x 3 1/2 pieces of the One-Horse Open Sleigh DSP and added them to the Lost Lagoon or Misty Moonlight layers.
  • The 5 x 3 3/4 Basic White layers are embossed with the Snowflake Sky folder, then I used a die from Irresistible Blooms to cut the circle opening.  I added this to the card front with Multipurpose Liquid Glue, and I added three Opaque Opal Rounds to the circle.
  • The words are stamped with VersaMark on Basic White and heat embossed with Black Embossing Powder and cut out with a Something Fancy Die.  I added this to the card front with dimensionals.
  • All done and remember to decorate your
Should you want to order any of the supplies I used to make this card, please just click Right Here or you can click on the 2023-24 catalog right here on my blog.
I hold monthly adult card-making classes in my home at 555 Williamsdale Road, Graham, NC 27253. My next set of classes are October 10th & 14th, 2023, and if you would like to attend, see my class schedule and the deadline of October 1, 2023 to register right here on my blog or on my Stampin' Up! website, found Here.
Thank you for stopping by and have a great day.~
Linda-

Friday, September 22, 2023

  Timeless Arrangement Bundle for my October 2023 Classes

Another anything you want it to be card for my October 10th and/or 14th October 2023 classes.  

Recipe:

  • The Highland Heather base is 8 1/2 x 5 1/2 scored at 4 1/4.
  • The Starry Sky layer is 5 1/4 x 4.
  • The Basic White layer is 5 x 3 3/4 and is stamped with Highland Heather and Starry Sky inks.
  • The Starry Sky stitched circle is cut using the 2nd and 3rd from the largest of the Stylish Shapes dies.
  • The leaves and stems are cut from Old Olive, Highland Heather, and Fresh Freesia.
  • The words are stamped with Starry Sky ink on Fresh Freesia, and all are cut out with the Timeless Arrangements dies.
  • All done and remember to decorate your envelope.
Should you want to order any of the supplies I used to make this card, please just click Right Here or you can click on the 2023 Holiday Mini Catalog, or the 2023-24 Annual Catalog right here on my blog.
I hold monthly adult card-making classes in my home at 555 Williamsdale Road, Graham, NC 27253. My next set of classes are October 10th & 14th, 2023, and if you would like to attend, or want information on my kits-to-go, see my class schedule and the deadline of October 1, 2023, to register right here on my blog or on my Stampin' Up! website, found Here.
Thank you for stopping by and have a great day.~
Linda-

Saturday, September 16, 2023

  Autumn Leaves Bundle

This card can be anything you want it to be.  
I saw this idea on Pinterest and traced it back to Mary Deatherage's post of August 8, 2023, and you can see her card Here.  I did add another layer or two, couldn't' help myself.  

Recipe:

  • The bases are 8 1/2 x 5 1/2 scored at 4 1/4.
  • The next Very Vanilla layers are 5 3/8 x 4 1/8. 
  • The Copper Clay or Moody Mauve layers are 5 1/8 x 3 7/8.
  • The next Very Vanilla layers are 4 7/8 x 3 5/8 and embossed with the Distressed Tile 3D folder.
  • I cut two 6 x 5/8 pieces of All About Autumn DSP for each card and added them to the embossed Very Vanilla layers with liquid glue.
  • I cut 4 1/4 x 3 pieces of All About Autumn DSP, adhered them to the upper right-hand corners on the embossed Very Vanilla layers with liquid glue, and trimmed off the edges of all with my amazing SU Paper Snips.
  • I cut a 3 3/4" piece of the Natural Ribbon and adhered it to the Vanilla with adhesive.  Next, I folded a piece of the Copper or Moody Mauve ribbon and adhered it to the Natural Ribbon.
  • I cut out two large leaves for each card.  Pretty Peacock and Copper Clay, and Pretty Peacock and Moody Mauve (hint: cut the Copper Clay and Moody Mauve leaves out of the 5 1/8 x 3 7/8 layers, saves paper).  Emboss the leaves with the Distressed 3D tile folder.
  • The vanes for the leaves are cut out with adhesive sheets and Gold Foil and Distressed Gold Specialty Paper. By adding the adhesive sheets to the foils, it was so easy to adhere the vanes to the leaves.  No mess either!!!
  • The words are stamped on Very Vanilla with Pretty Peacock and/or Moody Mauve inks and cut out with a die from the Autumn Leaves Dies.  I adhered these with Dimensionals.
  • To finish off my cards I added three 2023-25 In-Color Dots.
  • All done and remember to decorate your envelope.
Should you want to order any of the supplies I used to make these cards, please just click Right Here or you can click on either of the catalogs right here on my blog.
I hold monthly adult card-making classes in my home at 555 Williamsdale Road, Graham, NC 27253. My next set of classes are October 10th & 14th, 2023, and if you would like to attend, see my class schedule and the deadline of October 1, 2023 to register right here on my blog or on my Stampin' Up! website, found Here.
Thank you for stopping by and have a great day.~
Linda-

Wednesday, September 13, 2023

 Mr. & Mrs. Bag of Bones, a Halloween Anniversary

Happy Anniversary to Mr. & Mrs. Bag of Bones.
Stampin' Up! has offered many cute Halloween stamp sets over the years, and for me, this is by far the cutest ever, and I am not even a fan of Halloween. Go figure!!!

Recipe:

  • The Pumpkin Pie base is 8 1/2 x 5 1/2 scored at 4 1/4.
  • The Starry Sky layer is 5 1/4 x 4.
  • The next layer of Them Bones DSP is 5 x 3 3/4, and the fence is part of the DSP.  No need to cut a fence, already there!!!
  • I cut Mr. & Mrs. Bones and the kitty from Them Bones DSP and used Bag of Bones dies.
  • Mr. & Mrs. Bones hats are cut with Starry Sky cardstock.  The hearts from Real Red, and the Bats from Basic Black.
  • The graveyard headstones are cut from Them Bones DSP and my amazing SU scissors.
  • The words, from a very old set, are stamped on a piece of Pumpkin Pie with Versamark, sprinkled with white embossing powder, and heat embossed.  Then cut out with the smallest of the Deckled Frames Dies and added with dimensionals.
  • All done and remember to decorate your envelope.
Should you want to order any of the supplies I used to make this card, please just click Right Here or you can click on the 2023-24 catalog right here on my blog.
I hold monthly adult card-making classes in my home at 555 Williamsdale Road, Graham, NC 27253. My next set of classes are October 10th & 14th, 2023, and if you would like to attend, see my class schedule and the deadline of October 1, 2023 to register right here on my blog or on my Stampin' Up! website, found Here.
Thank you for stopping by and have a great day.~
Linda-

Sunday, September 10, 2023

 Season of Chic & Sparkling Snowflakes Winter Snowflake Card

I enjoyed making this snowflake winter card.  So much fun, so little time.

Recipe:

  • The base is an 8 1/2 x 5 1/2 piece of Azure Afternoon scored at 4 1/4.
  • Adhere a 5 3/8 x 4 1/8 piece of Silver Cardstock to the base with your favorite glue.
  • The Basic White layer is 5 1/2 x 4 1/4 and is cut with the second to the largest of the Deckled Rectangle Dies.  Adhere to the Silver.
  • The next Basic White and Vellum Cardstock layers are cut out with the third from the largest Deckled Dies.
  • Randomly stamp the Basic White Cardstock with the snowflake die from Season of Chic with Versamark.  Sprinkle the snowflakes with white embossing powder and melt with a Heat Tool.  
  • Cover the entire white piece of snowflakes with Balmy Blue ink and a Blending Brush.
  • Adhere the Vellum to the embossed Basic White with glue dots or liquid glue.
  • Wrap some Azure Blue 3/8" ribbon (from the Sheer Ribbon Combo Pack) around these two pieces.  I added a bow with glue dots and adhered this combo to the card.
  • The words, from Sparkling Snowflakes are stamped on a 2 1/2 x 1 1/4 piece of Basic White, and I repeated the same technique as the vellum pieces then I cut it out with the smallest of Deckled Dies.  I added this piece to a 2 1/2 x 1 piece of Silver Cardstock.
  • I cut out three silver snowflakes using a die from the Chic Dies and placed them on the card front with glue dots.
  • All done and remember to decorate your envelope.
Should you want to order any of the supplies I used to make this card, please just click Right Here or you can click on the 2023-24 catalog right here on my blog.
I hold monthly adult card-making classes in my home at 555 Williamsdale Road, Graham, NC 27253. My next set of classes are October 10th  & 14th, 2023, and if you would like to attend, see my class schedule and the deadline of October 1, 2023 to register right here on my blog or on my Stampin' Up! website, found Here.
Thank you for stopping by and have a great day.~
Linda-

Wednesday, September 6, 2023

 Night Devine for my September 2023 Creative Therapy Classes

Another offering for my September 2023 Creative Therapy Classes. This card was so easy to design because I copied it from the 2023 Holiday Mini from Stampin' Up!   

Recipe:

  • The base is an 8 1/2 x 5 1/2 piece of Boho Blue, scored at 4 1/4.
  • The Copper Clay layer is 5 1/4 x 4.
  • The O Holy Night DSP is 5 x 3/4.
  • All the pieces on the card front are cut out with the Night Divine Dies.  I used Crumb Cake, Night of Navy, Copper Clay, and Very Vanilla.
  • The words are heat embossed with white powder on the DSP.
  • An adhesive-backed Star Trinket is added to the center of the star.
  • Three Rhinestone Basic Jewels are added.
  • All done and remember to decorate your envelope.
Should you want to order any of the supplies I used to make this card, please just click Right Here or you can click on the 2023-24 catalog right here on my blog.
I hold monthly adult card-making classes in my home at 555 Williamsdale Road, Graham, NC 27253. My next set of classes are October 10th and 14th, 2023, and if you would like to attend, see my class schedule and the deadline of September 30, 2023 to register right here on my blog or on my Stampin' Up! website, found Here.
Thank you for stopping by and have a great day.~
Linda-

Sunday, September 3, 2023

 Bag of Bones Bundle for my September 2023 Creative Therapy Classes

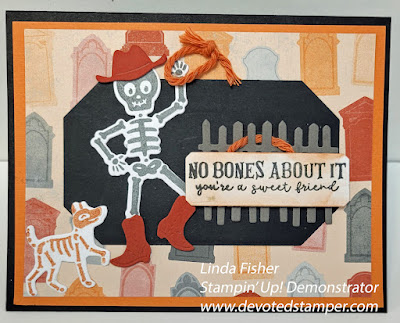
I am offering this Halloween card at both of my September 2023 Creative Therapy Classes.  Most of the products I used is from the 2023 Holiday Mini from Stampin' Up!
As a demonstrator I was able to pre-order the Bag of Bones bundle, and oh boy, is this set fun or what!!  Yepper, I smile looking at the cute little skeltons.  The 2023 Holiday Mini catalog items are available for sale beginning September 6, 2023.

Recipe:

  • The base is an 8 1/2 x 5 1/2 piece of Basic Black, scored at 4 1/4.
  • The Pumpkin Pie layer is 5 1/4 x 4.
  • The Them Bones DSP is 5 x 3/4.
  • I used a 4 1/4 X 2 1/2 piece of Basic Black and a Countryside Corners die to cut the piece under the fence and Mr. Skully Bones. 
  • I stamped Mr. Skully Bones on Basic White with Basic Gray ink.  His hat and boots are Cajun Craze.  The fence is Pebbled Path.  The dog is stamped with Cajun Craze ink on Basic White, and all are cut out with the Bag of Bones dies.  The words, from Bag of Bones are stamped with Tuxedo Memento Black ink on Basic White and cut out with the second from the smallest Countryside Corners die.
  • The yarn is also new from the Holiday Mini catalog.
  • All done and remember to decorate your envelope.
Should you want to order any of the supplies I used to make this card, please just click Right Here or you can click on the 2023-24 catalog right here on my blog.
I hold monthly adult card-making classes in my home at 555 Williamsdale Road, Graham, NC 27253. My next set of classes are October 10th and 14th, 2023, and if you would like to attend, see my class schedule and the deadline of September 30, 2023 to register right here on my blog or on my Stampin' Up! website, found Here.
Thank you for stopping by and have a great day.~
Linda-