html

Hi and welcome to my blog, I hope you enjoy your experience with me today. Linda Fisher

Thursday, December 30, 2021

 Eden's Garden Bundle, Sweet as a Peach & Amaryllis Abloom

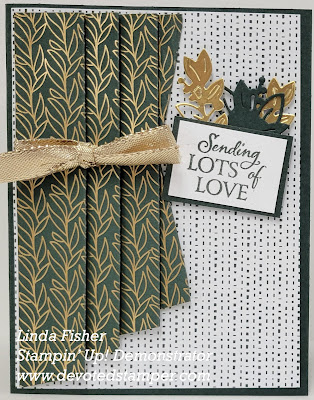
I made this Tied Back Curtain card after watching Beth Rush's video. I can see myself making lots and lots of this type of card with many of the DSP packs I have. So fun.
You can see her video Here, post of November 1, 2021, and also visit her at www.bethspapercuts.com.  

Recipe:
  • The bases are 8 1/2 x 5 1/2 pieces of Evening Evergreen scored at 4 1/4.
  • The Ever Eden DSP layers are 5 1/4 x 4.
  • The words on the top card are from the Sweet as a Peach stamp set, and the words from the bottom card are from the Holiday Mini catalog as a host set, Amaryllis Abloom.  It is available until January 3, 2022, or while supplies last.  You actually do not need three stamp sets to complete these cards.  The words in the Eden's Garden set are great.  The words I used were for a couple of wonderful ladies.
  • I cut some gold leaves from the Beautiful Leaves dies and placed them behind the oval on the top card.
  • The rest of the card and the curtain instructions are available on Beth's YouTube video.
  • All done!!  Now, how easy is that.  And remember to decorate your envelope.
Should you want to order any of the supplies I used to make these cards, please just click Right Here to place your in my on-line store, or you can click on the 2021-22 catalog right here on my blog.
I hold monthly adult card-making classes in my home at 555 Williamsdale Road, Graham, NC 27253, and if you would like to attend, please let me know.
For details, see my class schedule right here on my blog or on my Stampin' Up! website, found Here.
Thank you for stopping by and have a great day.
~Linda

Monday, December 27, 2021

 Beauty of Tomorrow Suite, Sweet as a Peach & Special Moments Stamps

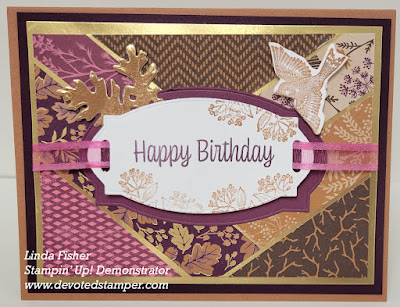
Loving this technique.  Not sure that is what you would call a paper piecing pattern, and in any case, it was fun making these cards.
The top card uses words from a stamp set, Special Moments, that will be available, for free, with a $100.00 order from January 4, 2022 until February 28, 2022.

Recipe:
  • I began by scoring an 8 1/2 x 5 1/2 piece of Cinnamon Cider at 4 1/4, then adhering a 5 1/4 x 4 piece of Blackberry Bliss to this base.  Set aside.
  • Next lay pieces of Blackberry Beauty DSP in a random pattern on a 5 x 3 3/4 piece of Gold Foil, leaving a space between each piece of DSP so the foil shows.  My pieces are either 7/8" wide or 1" wide, and long enough to reach a little past the edges of the foil.  I made the corner pieces by measuring and "eyeballing".  Not an exact science, and still pretty close to my goal.
  • Next I trimmed the blackberry DSP/foil covered piece to measure 4 3/4 x 3 1/2.
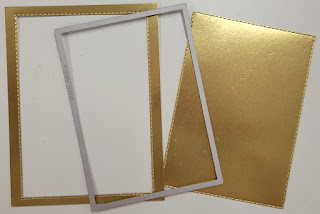
  • I took another 5 1/4 x 4 piece of gold foil and cut the center out with the second from the largest Rectangle Stitched Dies. 

I saved the inside foil piece for another time. (If you do not have the Stitched Rectangle dies, then you can use your Paper Trimmer to cut 1/4" from the edge on all four sides).  I then glued my Blackberry Beauty DSP/Foil piece to this cut out foil layer.  Note: by cutting out the inside of the 5 1/4 x 4 foil layer, you have less bulk on your card, and you have a 5 x 3 1/2 piece of foil to use on another project. "I'm not cheap, I'm frugal". Just sayin'.
  • I used my Hippo & Friends dies, Rich Razzleberry and Basic White to cut out the pieces for my sentiments. I stamped the words in Blackberry Bliss, and the little flower and bird in Cinnamon Cider.
  • I adhered the Rich Razzleberry die cut to the card front with Tombow Multipurpose glue.
  • Next I adhered four dimensionals in the corners of the back of the already stamped Basic White cutout, threaded some Polished Pink ribbon through this piece, leaving enough ribbon on each end to wrap under each side of the card. Turn the card piece over, to adhere the ribbon to the back side of this piece.
  • Next glue these two pieces to the Blackberry Bliss/Cinnamon Cider combination.
  • I added a couple of gold foil leaves (from the Beautiful Leaves dies, to the front, and I popped up the bird with two mini-dimensionals.
  • All done!! Now, how easy is that. And remember to decorate your envelope.
Should you want to order any of the supplies I used to make these cards, please just click Right Here to place your in my on-line store, or you can click on the 2021-22 catalog right here on my blog.
I hold monthly adult card-making classes in my home at 555 Williamsdale Road, Graham, NC 27253, and if you would like to attend, please let me know.
For details, see my class schedule right here on my blog or on my Stampin' Up! website, found Here.
Thank you for stopping by and have a great day.
~Linda

Sunday, December 19, 2021

    Word Wishes Dies and
 Peaceful Place DSP 

I am on a quest to make many easy Christmas cards that take very little time.  This one definitely fits into my plan.  Doesn't even use a stamp set, except for the inside.

Recipe:
  • The base is an 8 1/2 x 5 1/2 piece of Pacific Point, scored at 4 1/4.
  • The Real Red layer is 5 1/4 x 4.
  • The Gray Granite layer is 5 x 3 3/4.
  • The Peaceful Place DSP layer is 4 3/4 x 3 1/2.
  • The words are cut out with the Cut and Emboss Machine, Red Foil and the Word Wishes dies.  I used an adhesive sheet on the back of the Red Foil, so the words had glue on the back of them.  
  • The snowflake is from the Wonderful Snowflake pack.
  • All done!!  Now, how easy is that.  And remember to decorate your envelope.
Should you want to order any of the supplies I used to make this card, please just click Right Here to place your in my on-line store, or you can click on the 2021-22 catalog right here on my blog.
I hold monthly adult card-making classes in my home at 555 Williamsdale Road, Graham, NC 27253, and if you would like to attend, please let me know.
For details, see my class schedule right here on my blog or on my Stampin' Up! website, found Here.
Thank you for stopping by and have a great day.
~Linda

Thursday, December 16, 2021

 Well Defined and
Beauty of the Earth D
SP

A Christmas card using some Beauty of the Earth DSP.  So quick and easy.

Recipe:
  • The base is an 8 1/2 x 5 1/2 piece of Merry Merlot, scored at 4 1/4.
  • The Balmy Blue layer is 5 1/4 x 4 and is embossed with the Timeworn folder.
  • The first Misty Moonlight layer is 5 1/8 x 1 7/8 and is the base for the 5 x 1 5/8 piece of Beauty of the Earth DSP.
  • The next Misty Moonlight layer is 3 7/8 x 1 1/8 and is the base for the 3 5/8 x 1 piece of Basic White.  This piece has been embossed with the Wintry folder and sponged with Misty Moonlight ink.
  • The Merry Merlot layer is 3 1/8 x 2 1/2 and is the base for the 3 x 2 3/8 piece of Beauty of the Earth DSP.  
  • The Basic White piece is 2 3/4 x 2 1/8 and is stamped with Merry Merlot ink.
  • All done!!  Now, how easy is that.  And remember to decorate your envelope.
Should you want to order any of the supplies I used to make this card, please just click Right Here to place your in my on-line store, or you can click on the 2021-22 catalog right here on my blog.
I hold monthly adult card-making classes in my home at 555 Williamsdale Road, Graham, NC 27253, and if you would like to attend, please let me know.
For details, see my class schedule right here on my blog or on my Stampin' Up! website, found Here.
Thank you for stopping by and have a great day.
~Linda
Monday, December 13, 2021

  Angels of Peace and
Whimsy & Wonder DSP

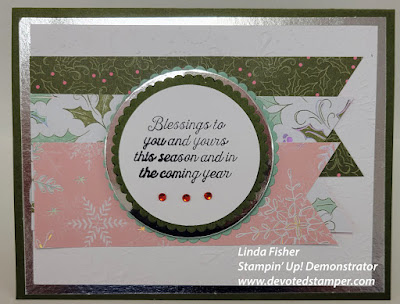
I used Angels of Peace (for the words) and some Whimsy & Wonder DSP to make this Christmas card.  Who needs red and green when you have some Christmas pink DSP, right??

Recipe:
  • The base is an 8 1/2 x 5 1/2 piece of Mossy Meadow, scored at 4 1/4.
  • The Silver Foil Specialty layer is 5 1/4 x 4.
  • The Basic White layer is 5 x 3 3/4 and is embossed with the Wintry folder.
  • The three pieces of Whimsy & Wonder DSP are 5 x 1 3/4, 4 3/4 x 1 3/4, and 4 1/2 x 2, and the pointy flags at the end of each DSP piece is made with my handy-dandy Paper Snip Scissors.
  • The Mint Macaron, Silver Foil, Mossy Meadow and Basic White circles are made using the Layering Circle dies.  The words are stamped with Tuxedo Memento Black ink.
  • Three little Red Rhinestone gems are added.
  • All done!! Remember to decorate your envelope.
Should you want to order any of the supplies I used to make this card, please just click Right Here to place your in my on-line store, or you can click on the 2021-22 catalog right here on my blog.
I hold monthly adult card-making classes in my home at 555 Williamsdale Road, Graham, NC 27253, and if you would like to attend, please let me know.
For details, see my class schedule right here on my blog or on my Stampin' Up! website, found Here.
Thank you for stopping by and have a great day.
~Linda
Friday, December 10, 2021

 Peaceful Cabin and
Peaceful Place DSP 
Enjoying this wonderful cabin set from the 2021-22 Holiday Mini Catalog from Stampin' Up!
This all-purpose bundle goes away January 3, 2022, or while supplies, and this set is a real keeper.  See below to order one for your very own. 

Recipe:
  • The base is an 8 1/2 x 5 1/2 piece of Real Red, scored at 4 1/4.
  • The Silver Foil Specialty Pack layer is 5 1/4 x 4. 
  • The Peaceful Place DSP layer is 5 x 3 3/4.
  • The cabin is cut out with the Cut & Emboss machine, Basic White cardstock, and one of cabin dies.
  • The trees are cut out with Silver Foil Specialty Paper, Old Olive cardstock, and the cabin dies.
  • A small piece of Daffodil Delight cardstock is adhered behind the window of the cabin.  I wanted a little bit of light in my cabin, no dark cabins for me!!!
  • The words are stamped on Basic White with Real Red ink and cut out with one of the Tasteful Touches dies.  (Great dies, for sure.)
  • All done!!  Now, how easy is that.  And remember to decorate your envelope.
Should you want to order any of the supplies I used to make this card, please just click Right Here to place your in my on-line store, or you can click on the 2021-22 catalog right here on my blog.
I hold monthly adult card-making classes in my home at 555 Williamsdale Road, Graham, NC 27253, and if you would like to attend, please let me know.
For details, see my class schedule right here on my blog or on my Stampin' Up! website, found Here.
Thank you for stopping by and have a great day.
~Linda

Monday, December 6, 2021

Holly Jolly Christmas &
 Whimsy & Wonder DSP

This beautiful Christmas Card was sent to me by my sweet friend, Wendie.  Love the color combination.

Recipe:
  • The base is an 8 1/2 x 5 1/2 piece of Mint Macaron, scored at 4 1/4.
  • The Polished Pink layer is 5 1/4 x 4. 
  • The Whimsy & Wonder DSP layers are 5 x 2 3/4 and 5 x 1.
  • The words are stamped in Polished Pink ink on Basic White and backed with Silver Glimmer paper.
  • All done!!  Now, how easy is that.  And remember to decorate your envelope.
Should you want to order any of the supplies I used to make this card, please just click Right Here to place your in my on-line store, or you can click on the 2021-22 catalog right here on my blog.
I hold monthly adult card-making classes in my home at 555 Williamsdale Road, Graham, NC 27253, and if you would like to attend, please let me know.
For details, see my class schedule right here on my blog or on my Stampin' Up! website, found Here.
Thank you for stopping by and have a great day.
~Linda