html

Hi and welcome to my blog, I hope you enjoy your experience with me today. Linda Fisher

Saturday, November 28, 2020

  Poinsettia Petals Bundle

My sweet friend, Wendie, made this beautiful Christmas Card, and I wanted to share her talents with you.  
Thank you Wendie.
Recipe:
  • The base is an 8 1/2 x 5 1/2 piece of Real Red scored at 4 1/4.
  • The Very Vanilla layer is 5 1/4 x 4. 
  • The Poinsettia Place DSP is 5 x 3 3/4, and cut from corner to corner.
  • The poinsettia is made using the beautiful Red Velvet Paper and the Poinsettia dies.  One of the Beaded Pearls is added to the center.  Gorgeous!!
  • The words, from Poinsettia Petals are stamped with Versamark and heat embossed with Gold embossing powder.
  • Some embroidered ribbon is wrapped around the Very Vanilla layer, and the three little Metallic Pearls are strategicly added. .
  • All done!!!
Should you want to order any of the supplies I used to make this card, please just click Right Here to place your order in my on-line store, or you can click on the 2020-21 catalog right here on my blog. 
I hold monthly adult card-making classes in my home at 555 Williamsdale Road, Graham, NC 27253, and if you would like to attend, please let me know.
For details, see my class schedule right here on my blog or on my Stampin' Up! website, found Here.
Thank you for stopping by, and have a great day,
    ~Linda

Wednesday, November 25, 2020

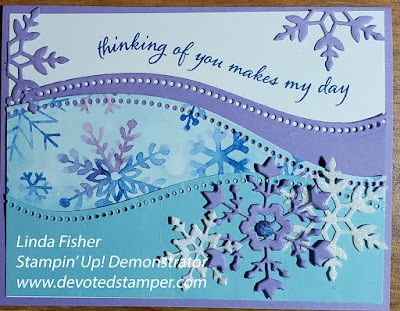
 Quite Curvy &  Snowflake Splendor DSP

The Quite Curvy Bundle is so much fun to use, and versatile as well.  Designed for a variety of special occasions, this bundle includes everything you need to create one-of-a-kind cards and scrapbook pages. 

Recipe: (building from base)
  • The base is an 8 1/2 x 5 1/2 piece of Highland Heather, scored at 4 1/4.
  • The Whisper White, Highland Heather, Balmy Blue and Snowflake Splendor DSP layers are each 5 1/4 x 2 and cut with one of the Quite Curvy dies.
  • I used my Stamparatus to line up the words with Night of Navy ink before I cut the white cardstock.
  • The snowflakes are cut with the So Many Snowflake dies and Highland Heather cardstock & Balmy Blue Glimmer paper. 
  • A Blue Adhesive Backed Gem is added to the center of the snowflake. 
  • All done and remember to decorate your envelope.
Should you want to purchase any of the supplies I used to make this card, I would be honored if you chose me as your demonstrator, and placed your order in my on-line store, HERE. Or, you can click on the 2020-21 catalog right here on my blog.
I hold adult classes in my home at 555 Williamsdale Road, Graham, NC 27253, and if you would like to attend, please let me know.  For details, see my class schedule right here on my blog, or HERE on my Stampin' Up! website.
Thank you for stopping by, and have a great day,
    ~Linda

    Monday, November 23, 2020

      Beautiful Friendship, Plaid Builder Dies & the Faux Tile Technique

    Another card I made, with the Plaid Builder dies, (with the assistance from my sweet friend, Wendie).  I can't seem to stop using these dies, or maybe, I just don't want to, not sure which.😊

    Glenda Caulkins has "how to" video on her YouTube channel, and you can see it Here.


    Recipe: (building from base)
    • The base is an 8 1/2 x 5 1/2 piece of Cherry Cobbler, scored at 4 1/4.
    • The Pear Pizzazz layer is 5 1/4 x 4.
    • The Whisper White is 5 x 3 3/4, and stamped with Cherry Cobbler, Rococo Rose, and Pear Pizzazz inks.
    • The top plaid layer is Gold Foil and cut out with one of the dies from Plaid Builder.
    • The words, from Good Morning Magnolia, are stamped with Tuxedo Memento Black ink, on a Whisper White piece, that has been cut out with a Stitched So Sweetly die.  This piece is backed with a 2 3/8 x 1 3/8 piece of Cherry Cobbler.
    • All done and remember to decorate your envelope.
    Should you want to purchase any of the supplies I used to make this card, I would be honored if you chose me as your demonstrator, and placed your order in my on-line store, HERE. Or, you can click on the 2020-21 catalog right here on my blog.
    I hold adult classes in my home at 555 Williamsdale Road, Graham, NC 27253, and if you would like to attend, please let me know.  For details, see my class schedule right here on my blog, or HERE on my Stampin' Up! website.
    Thank you for stopping by, and have a great day,
      ~Linda

      Friday, November 20, 2020

       Poinsettia Petals

      My sweet friend, Wendie, made this beautiful card for me, and I just had to share.
      If you check out Tina Zinck's YouTube channel, Here, you can see how to make a card like this one.
      Recipe: (building from base)
      • The base is an 8 1/2 x 5 1/2 piece of Gray Granite scored at 4 1/4.
      • The Whisper White layer is 5 1/4 x 4.
      • The piece of In Good Taste Designer Series Paper is 5 x 3 3/4.
      • The 3 x 3 piece of Whisper White is the base for the Poinsettia.
      • The 4 x 1 1/4 piece of Gray Granite, which is punched on each end with the Lovely Labels Pick-a-Punch, is the base for the words. 
      • The words are stamped with Versa Mark on a 3 1/8 x 7/8 piece of Whisper White and heat embossed with Silver powder.
      • Bling is adhered to the center of the flower, and on each end of the punched piece.
      • All done and remember to decorate your envelope.
      Should you want to purchase any of the supplies I used to make this card, I would be honored if you chose me as your demonstrator, and placed your order in my on-line store, HERE. Or, you can click on the 2020-21 catalog right here on my blog.
      I hold adult classes in my home at 555 Williamsdale Road, Graham, NC 27253, and if you would like to attend, please let me know.  For details, see my class schedule right here on my blog, or HERE on my Stampin' Up! website.
      Thank you for stopping by, and have a great day,
        ~Linda

        Wednesday, November 18, 2020

         Snowflake Wishes 

        I used the Snowflake Wishes Suite to make this card, and boy, did I have a good time.  So much fun, and now, lots of time.

        Recipe: (building from base)
        • The base is an 8 1/2 x 5 1/2 piece of Gorgeous Grape, scored at 4 1/4.
        • The Highland Heather layer is 5 1/4 x 4 and is embossed with the Winter Snow folder.
        • The four pieces of silver foil are 7/8" wide. The longest piece is 4 1/4, and the shortest piece is 3 1/2, and the tails of all the pieces are made with the Triple Banner Punch. The DSP on top of the foil is 3/4” wide, and the length of each piece is 1/8” shorter than the foil piece.
        • The snowflakes are cut with Balmy Blue Glimmer Paper, and Shimmery White cardstock.
        • Three little Blue Adhesive-Backed Gems are the centers for the snowflakes.
        • The 3 3/8 x 1 piece of silver foil is the base for the 3 1/4 x 7/8 piece of Whisper White, which has been stamped with the words from Snowflake Wishes and Night of Navy ink, then the edges are sponged with navy ink.
        • All done and remember to decorate your envelope.
        Should you want to purchase any of the supplies I used to make this card, I would be honored if you chose me as your demonstrator, and placed your order in my on-line store, HERE. Or, you can click on the 2020-21 catalog right here on my blog.
        I hold adult classes in my home at 555 Williamsdale Road, Graham, NC 27253, and if you would like to attend, please let me know.  For details, see my class schedule right here on my blog, or HERE on my Stampin' Up! website.
        Thank you for stopping by, and have a great day,
          ~Linda

          Friday, November 13, 2020

                           Wrapped in Christmas,   Warm Hugs, Poinsettia Petals & Christmastime is Here DSP

          My sweet friend, Helen, made a similar card, and brought it with her to class. I was so impressed by her design and talent, I just had to CASE, (Copy And Share Everything), hence, the card you see here.  Thank you Helen, for your kindness & generosity.
          Recipe:
          • The base is an 11 x 4 1/4 piece of Cherry Cobbler scored at 5 1/2.
          • The Gold Foil layer is 5 1/4 x 4. 
          • The Christmastime is Here DSP is 3 3/4 x 2 & 3 3/4 x 3.
          • The Gold Foil strip across the front is 3 3/4 x 1/2, and the Mossy Meadow strip over the foil is 3 3/4 x 3/8.
          • The words, from Wrapped in Christmas, are stamped with Versamark on a piece of Petal Pink, and heat embossed with Gold embossing powder. The piece of Gold Foil and the Petal Pink are cut out with two Hippo & Friends Dies.
          • For the inside, cut an 11 x 2 piece of Cherry Cobbler, score it at 2 3/4, 5 1/2, and 8 1/4, then adhere each end to the top and bottom of the inside of the card..
          • The four pieces of gold foil (for the inside) are 2 3/4 x 2.
          • The four pieces of Mossy Meadow, over the gold, are 2 5/8 x 1 7/8.
          • The four pieces of Petal Pink are 2 1/2 x 1 3/4 and are stamped with Cherry Cobbler & Mossy Meadow ink and Warm Hugs, Wrapped in Christmas and Poinsettia Petals stamp sets.
          • All done!!!
          Should you want to order any of the supplies I used to make this card, please just click Right Here to place your order in my on-line store, or you can click on the 2020-21 catalog right here on my blog. 
          I hold monthly adult card-making classes in my home at 555 Williamsdale Road, Graham, NC 27253, and if you would like to attend, please let me know.
          For details, see my class schedule right here on my blog or on my Stampin' Up! website, found Here.
          Thank you for stopping by, and have a great day,
            ~Linda

          Wednesday, November 11, 2020

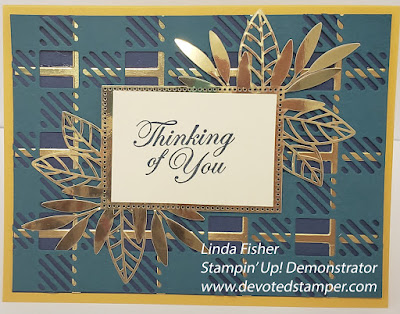
            Good Morning Magnolia, Plaid Builder Dies & Forever Gold Laser-Cut Paper

          I really, really, really like my new Plaid Builder Dies.  So many color combinations to create, and many occasions.  So worth the cost.

          Recipe: (building from base)
          • The base is an 8 1/2 x 5 1/2 piece of Bumble Bee scored at 4 1/4.
          • The Night of Navy layer is 5 1/4 x 4.
          • The Gold Foil and Pretty Peacock pieces are cut out with the Plaid Builder dies, and adhered to the Night of Navy with Tombow Multipurpose glue.
          • Adhere the Night of Navy combination to the Bumble Bee base.
          • The Forever Gold Laser-Cut Specialty Paper is adhered with dimensionals (to the rectangle only, not the leaves).
          • The 2 1/4 x 1 1/2 piece of Very Vanilla is stamped with words from Good Morning Magnolia in Pretty Peacock ink, and adhered to the gold with glue dots.
          • All done and remember to decorate your envelope.
          Should you want to purchase any of the supplies I used to make this card, I would be honored if you chose me as your demonstrator, and placed your order in my on-line store, HERE. Or, you can click on the 2020-21 catalog right here on my blog.
          I hold adult classes in my home at 555 Williamsdale Road, Graham, NC 27253, and if you would like to attend, please let me know.  For details, see my class schedule right here on my blog, or HERE on my Stampin' Up! website.
          Thank you for stopping by, and have a great day,
            ~Linda

            Monday, November 9, 2020

              Best Year, Plaid Builder Dies, & Brushed Metallic Foil Cardstock

            It was so easy to make this beautiful and mostly masculine card with the Plaid Builder Dies, Brushed Metallic Foil Cardstock, and Champagne Foil Sheets.
            These Plaid Builder dies are so much fun, really they are!!!  
            Recipe: (building from base)
            • The base is an 8 1/2 x 5 1/2 piece of Early Espresso, scored at 4 1/4.
            • The Very Vanilla layer is 5 1/4 x 4 and is cut out with one of the larger Stitched Rectangles Dies, and the final size is 5 1/8 x 3 3/4.
            • I started out with 5 x 4 pieces of Champagne Foil, and a piece of Brushed Bronze & a piece of Brushed Metallic Gold and cut each out with the Plaid Builder dies.
            • Then these three pieces are glued together with Tombow multipurpose liquid glue, and cut out with another Stitched Rectangle Die, and the final size is 4 3/4 x 3 3/8.  Then all were adhered to the Very Vanilla.
            • The 2 7/8 x 1 5/8 Early Espresso is the base for the Very Vanilla, on which the words, from Best Year, are stamped with Early Espresso ink.  The Vanilla is cut with a Stitched Rectangle Die, and the final size is 2 3/4 x 1 1/2.  I popped up the words with dimensionals.
            • All done and remember to decorate your envelope.
            Should you want to purchase any of the supplies I used to make this card, I would be honored if you chose me as your demonstrator, and placed your order in my on-line store, HERE. Or, you can click on the 2020-21 catalog right here on my blog.
            I hold adult classes in my home at 555 Williamsdale Road, Graham, NC 27253, and if you would like to attend, please let me know.  For details, see my class schedule right here on my blog, or HERE on my Stampin' Up! website.
            Thank you for stopping by, and have a great day,
              ~Linda

              Saturday, November 7, 2020

               Quite Curvy for my November, 2020 Creative Therapy Card Classes

              I am offering this Christmas card at my November, 3 & 7, 2020 classes. The Curvy Bundle is so great, easy to use, and can be altered for lots of occasions.
              Christy Fulk has a fantastic video in which she demonstrates how to use the Curvy dies, and you can see her video Here, post of October 6, 2020.

              Recipe: (building from base)
              • The base is an 8 1/2 x 5 1/2 piece of Shaded Spruce, scored at 4 1/4.
              • The Crumb Cake layer is 5 1/4 x 4 and is embossed with the Winter Snow folder.
              • I used the Stamparatus to align my images on Whisper White, then used a die from the Curvy Bundle to cut out my card.
              • The designer Series Paper is from the Classic Christmas pack, which is part of the bundle.
              • The ribbon is either the Real Red Sheer or the Double Stitched Satin Ribbon.
              • All done and remember to decorate your envelope.
              Should you want to purchase any of the supplies I used to make this card, I would be honored if you chose me as your demonstrator, and placed your order in my on-line store, HERE. Or, you can click on the 2020-21 catalog right here on my blog.
              I hold adult classes in my home at 555 Williamsdale Road, Graham, NC 27253, and if you would like to attend, please let me know.  For details, see my class schedule right here on my blog, or HERE on my Stampin' Up! website.
              Thank you for stopping by, and have a great day,
                ~Linda

                Thursday, November 5, 2020

                 Harvest Hellos for my November, 2020 Creative Therapy Classes

                Harvest Hellos is a stamp set that can be used for many occasions.  Fall, teachers, Halloween, birthday, get well, a thank you, and much more.  
                I am offering these cards at my November, 3 & 7, 2020 classes.  I'm excited to share.

                Recipe: (building from base)
                • The base is an 8 1/2 x 5 1/2 piece of Rich Razzleberry, scored at 4 1/4.
                • The Mango Melody layer is 5 1/4 x 4.
                • The Plaid Tidings DSP layer is 5 x 3 3/4.
                • The Cinnamon Cider piece is cut out with a Wild Rose die. 
                • The two small leaves are cut out with a Gathered Leaves Die and Old Olive and Shaded Spruce cardstock.
                • The large pumpkin, from Harvest Hellos, and the two small pumpkins, from Gather Together, are stamped with Mango Melody ink on Mango Melody cardstock. 
                • The large pumpkin is punched out with the Apple Builder Punch, and the smaller pumpkins are cut out with a die from the Gathered Leaves Dies.
                • The little Shaded Spruce leaf on the large pumpkin is from the Harvest Hellos set.  It is made by stamping Shaded Spruce ink on Shaded Spruce cardstock, and it is cut out with, what else, my handy-dandy Paper Snips.
                • The bow is made with some Braided Linen Thread.
                • The words, from Banner Year, are stamped with Rich Razzleberry ink on a 4 x 1/2 piece of Whisper White and the flags at each end are cut with my handy-dandy Paper Snips.
                • All done and remember to decorate your envelope.
                Should you want to purchase any of the supplies I used to make this card, I would be honored if you chose me as your demonstrator, and placed your order in my on-line store, HERE. Or, you can click on the 2020-21 catalog right here on my blog.
                I hold adult classes in my home at 555 Williamsdale Road, Graham, NC 27253, and if you would like to attend, please let me know.  For details, see my class schedule right here on my blog, or HERE on my Stampin' Up! website.
                Thank you for stopping by, and have a great day,
                  ~Linda