Wednesday, August 27, 2025

 Handmade Designs, Floral Delight DSP & the Sunflower Embossing Folder.

Another way to use paper scraps to make beautiful cards.

Recipe:
  • The bases of Balmy Blue or Crushed Curry cardstock are 8 1/2 x 5 1/2 and scored at 4 1/4.  
  • The Crushed Curry or Old Olive layers are 5 1/5 x 4.
  • The 5 x 3 3/4 Basic White layers are embossed with the Sunflower 3D Folder & sponged with a Blending Brush & Lemon Lolly ink.
  • The four 2 5/8 x 1 1/8 Balmy Blue or Old Olive rectangles are the bases for the four 2 3/4 x 1 1/4 pieces of Floral Delight DSP.
  • The words from Handmade Designs are stamped in Secret Sea ink and cut out with one of the Mini Pocket Envelope Dies.  This piece is added to a 2 1/4 x 1 1/4 piece of Balmy Blue or Old Olive.  This combination is added to the cards with dimensionals.  
  • I added mini Brushed Brass Butterflies.
  • All done and remember to decorate your envelope.
Should you want to order any of the supplies I used to make this card, please just click Right Here.

I hold monthly adult card-making classes in my home at 555 Williamsdale Road, Graham, NC 27253.  If you would like information about my October 7th & 11th, 2025 classes, please click right Here

Thank you for stopping by and have a great day.~
Linda


Thursday, August 21, 2025

I couldn't resist.....So I dug my Monstermaniacs Stamp Set out of storage!!!

My new Halloween stamp set from Stampin' Up! has not arrived yet, and I wanted to design a Halloween card, NOW.  
I saw a card similar to this one on Pinterest, and the only information I could find was, well, Nothing, Nada, Zero. So, here is my version.  I hope it brings a smile to your face.

Recipe:
  • The base of Granny Apple Green cardstock is 8 1/2 x 5 1/2 and scored at 4 1/4.  
  • The next layer of Basic Black is 5 1/4 x 4.
  • The 5 x 3 3/4 layer is stamped with Tuxedo Black ink and stamps from Monstermaniacs (retired).  I colored my monsters with my favorite SU Blends.
  • Next, I used the Large Alphabet Dies, (retired) to cut out the letter B in Basic Black.
  • I used two Layering Oval Dies (yes, they are retired as well), to cut out the letters O in Basic Black.  I used Mini-Dimensionals to add them to the card.
  • The words, "You're Spooktacular" is from Trick or Tweet.
  •  All done and remember to decorate your envelope.
Should you want to order any of the supplies I used to make this card, please just click Right Here.

I hold monthly adult card-making classes in my home at 555 Williamsdale Road, Graham, NC 27253.  If you would like information about my September 9th & 13th, 2025 classes and when the cut-off date to register is, please click right Here
Thank you for stopping by and have a great day.~
Linda

Friday, August 15, 2025

  Impressions Abloom for my August 2025 
Creative Therapy Class

Another fun and versatile card that I offered at my August 2025 Creative Therapy classes.
So much fun, so little time!!!!
Recipe:
  • The base of Old Olive cardstock is 11 x 4 1/4 and scored at 5 1/2.  
  • The Berry Burst layer is 5 1/4 x 4.
  • The Basic White layer is 5 x 3 3/4 and is embossed with the Subtle Dynamic Folder (retired).
  • The two pieces of Floral Impressions DSP is 4 x 3 and 3 1/2 x 2 1/2.
  • The leaves are cut out with Pecan Pie, Mossy Meadow, and Old Olive cardstock.
  • The flowers 
    • Are stamped with Berry Burst ink on Basic White.  
    • The center of the flowers is stamped with Pecan Pie.
    • The circles are made circle punches:
      • Old Olive: 2 1/2"
      • Night of Navy: 2 3/8"
      • Basic White: 2 1/4"
  • The words are from Memorable Blooms and stamped with black ink. 
  • All done and remember to decorate your envelope.
Should you want to order any of the supplies I used to make this card, please just click Right Here.

I hold monthly adult card-making classes in my home at 555 Williamsdale Road, Graham, NC 27253.  If you would like information about my September 9th & 13th 2025 classes, and the cut off date to register, please click right Here
Thank you for stopping by and have a great day.~
Linda

Tuesday, August 12, 2025

  Yuletide Village for my July 2025 Creative Therapy Class


I enjoy designing cards for all of my class attendees, and am planning to continue having classes.  I have however, have been using some of my SU products that I did not get a chance to use when they were current.  
If you like what I have made and do not have the stamps I used, I am sure any substitution will work.

Recipe:
  • The base of Cinnamon Cider (retired) cardstock is 8 1/2 x 5 1/2 and scored at 4 1/4.  
  • The next layer of Basic White is 5 1/4 x 4.
  • The 5 x 3 3/4 layer is stamped with Tuxedo Black ink and a stamp from Welcoming Woods (retired), then embossed with the Snowflake Sky folder.  This piece is added to the base with liquid glue.
  • The Dazzling Diamonds Glimmer Trees are cut out from the Regal Reindeer & The Horse & Sleigh Dies.  (all retired)
  • I used the retired stamp set, Yuletide Village to stamped the church, houses and trees with black ink on Basic White.  I cut these images out using my Brother Scan' n Cut machine. The houses and trees are colored with Cinnamon Cider, Crumb Cake, Old Olive and Soft Suede Blends. 
  • All done and remember to decorate your envelope.
Should you want to order any of the supplies I used to make this card, please just click Right Here.

I hold monthly adult card-making classes in my home at 555 Williamsdale Road, Graham, NC 27253.  If you would like information about my September 9th & 13th, 2025 classes and when the cut-off date to register is, please click right Here
Thank you for stopping by and have a great day.~
Linda

Friday, July 25, 2025

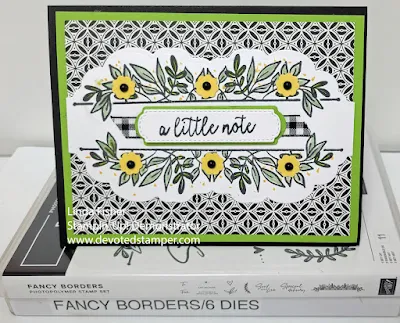
 Fancy Borders Bundle 
for my July 2025
Creative Therapy Class

New and not so new Stampin' Up! products are used to make this fun card.  See below for the dimensions and products.  

Recipe:
  • The base of Basic Black cardstock is 8 1/2 x 5 1/2 and scored at 4 1/4.  
  • The Granny Apple Green layer is 5 1/4 x 4.
  • The Pattern Party DSP is 5 x 3 3/4, (retired).
  • The 5 x 2 1/4 Basic White is cut out on both long sides with a Fancy Border Die and stamped with the large Fancy Border stamp with black ink.
  • The leaves are colored with Garden Green, Granny Apple Green, and Old Olive Blends.
  • I used the tip of a Daffodil Delight marker to make the dots after I colored the leaves.
  • I used snail to glue the 4" piece of Black & White checked ribbon to the card.
  • The Granny Apple Green die cut is from the retired Snow Time Dies.
  • The words, from Butterfly Gala (retired) are stamped on Basic White with black ink and cut out with a die from All Dressed Up, (also retired) and adhered with Mini-Dimensionals.
  • The little Daffodil Delight flowers are punched with an Itty Bitty Shapes punch and the centers are some retired black dots.
  • All done and remember to decorate your envelope.
Should you want to order any of the supplies I used to make this card, please just click Right Here.

I hold monthly adult card-making classes in my home at 555 Williamsdale Road, Graham, NC 27253.  If you would like information about my August 5th & 9th 2025 classes, please click right Here
Thank you for stopping by and have a great day.~
Linda

Friday, July 11, 2025

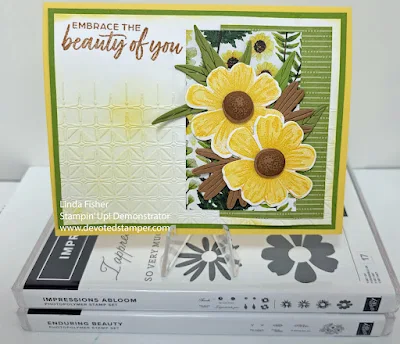
 Impressions Abloom & Enduring Beauty

Melissa Seplowitz, The Stamping Ninja, has some pretty designs on her blog, and I decided to CASE this one, and I did change the colors, you know, to make it mine.  You can see her card Here, post of April 11, 2025.
 
Recipe:
  • The base of Crushed Curry cardstock is 8 1/2 x 5 1/2 and scored at 4 1/4.  
  • The Old Olive layer is 5 1/4 x 4.
  • The 5 x 3 3/4 Basic White is embossed with the Glass & Gardens Folder and sponged with Daffodil Delight ink.
  • The two pieces of Floral Impressions DSP are 3 1/2 x 2 and 3 1/4 x 2.
  • The flowers, from Impressions Abloom, are stamped with Crushed Curry and Pecan Pie and cut out with the Impressions Abloom dies.
  • The leaves and stems behind the flowers are cut out with Old Olive and Pecan Pie cardstock.
  • The words, from Enduring Beauty, are stamped with Pecan Pie.
  • All done and remember to decorate your envelope.
Should you want to order any of the supplies I used to make this card, please just click Right Here.

I hold monthly adult card-making classes in my home at 555 Williamsdale Road, Graham, NC 27253.  If you would like information about my September 9th & 13th 2025 classes, and the the cut off date to RSVP, please click right Here
Thank you for stopping by and have a great day.~
Linda

Saturday, July 5, 2025

  Notes & Totes Teacher Appreciation Gift Box with Cute as Can Bee DSP

Last month I made this little treat tote/gift box for my grandson's end of the year teacher's gifts.  It was so much fun to make too.  I saw Jennifer Roque's excellent video on her blog and knew this was the perfect teacher's gifts.  You can see her video HERE, and get the printable PDF to make your own.  Thank you, Jennifer, for your generosity.

Recipe:
  • I used the Notes & Totes Bundle
  • Bubble Bath, Daffodil Delight and Basic White cardstock.  
  • The DSP was from the 6 x 6 Pack of Lighter than Air, (retired), and Cute as Can Bee.
Should you want to order any of the supplies I used to make this card, please just click Right Here, or please feel free to order directly from Jennifer.

I hold monthly adult card-making classes in my home at 555 Williamsdale Road, Graham, NC 27253.  If you would like information about my August 5th or 9th 2025 classes, please click right Here

Thank you for stopping by and have a great day.~
Linda