Sunday, April 30, 2017

Beautiful You and 
Fresh Fig Cardstock 

I seem to be finding lots of ways to use the stamp set, Beautiful You.  So glad SU is carrying this stamp set over to the new 2017-18 catalog.
I saw this sketch on Wanda Pettijohn's blog, Starlight Stamper, and decided CASE it, well, kinda, sorta.  You can see her card Here, post of 4/18/17.
I used our new Fresh Fig cardstock as the base, and also used the coordinating Fresh Fig classic ink for the words and for the dress.  I used one of the stamps from the set to "color" the dress on the left card, and the card on the right was colored with the ink pad and a blender pen.

The Lovely Lace embossing folder, the beautiful doilies, the Mint Macaron card stock and the Blooms & Bliss dsp are all retiring May 31, 2017.  All four of these supplies are available while supplies last. Just sayin'.

Recipe:
  • The base is a 5 1/2 x 8 1/2 piece of Fresh Fig, scored at 4 1/4.  
  • The Blushing Bride layer is 5 1/4 x 4.
  • The Mint Macaron card stock is 5 1/4 x 2.
  • The Blooms & Bliss dsp layer is 5 1/4 x 1 3/4.
  • The ovals are cut with the Big Shot and the Layering Oval Framelits dies.
  • The ladies are stamped with Archival ink.
  • The words are stamped with Fresh Fig ink.
  • All done, and don't forget to decorate your envelope.
If you have any questions, please let me know. 

I hold adult classes each month.  If you live near my home at 555 Williamsdale Road, Graham, NC 27253, and would like to attend any of my classes, please let me know.  For details, see my class schedule right here on my blog, or on my Stampin' Up! website found Here.

If you would like to place an order, head on over to my Stampin' Up! website Here, and click on the "shop now" tab, or click on the 2016-17 catalog right here on my blog.  

The word of the Lord is right and true; He is faithful in all He does.  Psalm 33:4

Thank you for stopping by, and I hope your day is so totally awesome that yesterday gets jealous!!!
    ~Linda

Friday, April 28, 2017

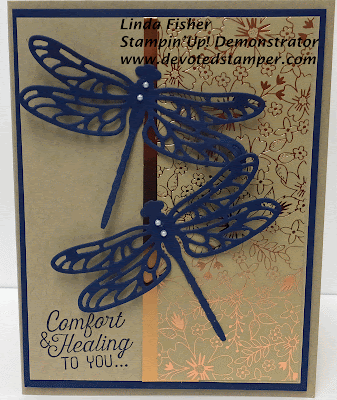
Affectionately Yours Speciality DSP and Detailed Dragonfly Thinblits Dies
It is so sad the Affectionately Yours Speciality Paper is retiring on May 31, 2017.  It is so gorgeous.  When I combined my SU Copper Foil with the DSP, the card actually talked to me and said, "WOW I'm gorgeous!!!".  Whoever heard of talking cardstock, right???
So glad though, that the Detailed Dragonfly thinlits dies are going to be in the new 2017-18 catalog.  
I am offering this card in all of my May 2, May 4, and May 6, 2017 classes.  When you come to class to make this card, your kit will include a set of two dragonflies, the paper all cut, and ready for you to design your own masterpiece.  What could be easier than that? Yeah!!!

Recipe:
  • The base is a 5 1/2 x 8 1/2 piece of Crumb Cake, scored at 4 1/4.  
  • Next the layer of Night of Navy is 5 1/4 x 4.
  • The next layer of Crumb Cake is 5 x 3 3/4.
  • The DSP is 5 x 1 3/4, and the Copper strip is 5 x 1/2.
  • The words are from Flourishing Phrases and stamped with Night of Navy ink.
  • All done, and don't forget to decorate your envelope.
If you have any questions, please let me know. 

I hold adult classes each month.  If you live near my home at 555 Williamsdale Road, Graham, NC 27253, and would like to attend any of my classes, please let me know.  For details, see my class schedule right here on my blog, or on my Stampin' Up! website found Here.

If you would like to place an order, head on over to my Stampin' Up! website Here, and click on the "shop now" tab, or click on the 2016-17 catalog right here on my blog.  

The word of the Lord is right and true; He is faithful in all He does.  Psalm 33:4

Thank you for stopping by, and I hope your day is so totally awesome that yesterday gets jealous!!!
    ~Linda
Wednesday, April 26, 2017

Water Color Wings & Fun Foam for my April 2017 Hostess Club Project
I like to offer fun and interesting techniques for all of my Hostess Club Ladies to experience, and I thought this would meet the criteria.  They are going to make their own stamps with fun foam.  
This technique has been around in the stamping world for a while, and Patty Bennett has very detailed instructions and a beautiful card (which I kinda-sorta CASEd) Here.  I did change up the colors, you know, to make it my own.
If you live near me in Graham, NC, and would like to visit my Hostess Club as a guest, please let me know. We meet from 6:00 to 8:00 p.m. the 4th Thursday evening of every month.

Recipe:
  • The base is a 11 x 4 1/4 piece of Bermuda Bay, scored at 5 1/2.  
  • The layer of Delightful Dijon is 5 3/8 x 4 1/8.
  • The layer of Basic Black is 5 1/8 x 4.
  • The Very Vanilla layer is 5 x 3 7/8.
  • The butterfly is stamped with Delightful Dijon and Cajun Craze on Very Vanilla and cut out with the Bold Butterflies Framelits Dies.
  • The layer over the stamped butterfly is cut out with the Butterflies Thinlits Dies and Basic Black cardstock.
  • The fun foam butterfly background is stamped with Bermuda Bay ink.
  • The words are from Oh So Succulent (retiring 5/31/17), and stamped with Tuxedo black ink.
  • All done, and don't forget to decorate your envelope.
If you have any questions, please let me know. 

I hold adult classes each month.  If you live near my home at 555 Williamsdale Road, Graham, NC 27253, and would like to attend any of my classes, please let me know.  For details, see my class schedule right here on my blog, or on my Stampin' Up! website found Here.

If you would like to place an order, head on over to my Stampin' Up! website Here, and click on the "shop now" tab, or click on the 2016-17 catalog right here on my blog.  

Be still in the presence of the Lord, and wait patiently for him to act.  Psalm 37:7

Thank you for stopping by, and I hope your day is so totally awesome that yesterday gets jealous!!!
    ~Linda

Sunday, April 23, 2017

A World of Thanks for my May 2017 classes
I admit I have not used this background stamp even though I just had to have it for a card way back when it was introduced in the catalog. Wondering if anyone else has stamp sets they have not used?????   

For this card the stamp set, A World of Thanks, the Botanical Builder, and the Hello You framelits are all retiring May 31, 2017.  All three of these supplies are available while supplies last. Just sayin'.

I am offering this card in all of my May 2, May 4, and May 6, 2017 classes.  When you come to class to make this card, your kit will include the flowers, and the "thanks", the paper all cut, and ready for you to design your own masterpiece.  What could be easier than that? Yeah!!!

Recipe:
  • The base is a 5 1/2 x 8 1/2 piece of Pear Pizzazz, scored at 4 1/4.  
  • The Soft Sky layer is 5 1/4 x 4.
  • The Whisper White layer is 5 x 3 3/4.
  • The flower is cut out with Pear Pizzazz, Soft Sky and Whisper White using the Botanical Builder Framelits Dies, on sale for 50% off the regular price of $33.00, only $16.50.  
  • The image is stamped with Soft Sky ink.
  • The "Thanks" is cut out with Island Indigo and the Hello You Thinlits Dies (retiring), and I used a Fine Tip glue pen to adhere it to the card.
  • All done, and don't forget to decorate your envelope.
If you have any questions, please let me know. 

I hold adult classes each month.  If you live near my home at 555 Williamsdale Road, Graham, NC 27253, and would like to attend any of my classes, please let me know.  For details, see my class schedule right here on my blog, or on my Stampin' Up! website found Here.

If you would like to place an order, head on over to my Stampin' Up! website Here, and click on the "shop now" tab, or click on the 2016-17 catalog right here on my blog.  

Do not add to or subtract from these commands I am giving you.  Just obey the commands of the Lord your God.  Deuteronomy 4:2

Thank you for stopping by, and I hope your day is so totally awesome that yesterday gets jealous!!!
    ~Linda

Thursday, April 20, 2017

Timeless Love for my  May 2017 classes
Pinterest is such a wonderful go-to site for me when I want to make a certain type of card and just don't know where to begin. I came across Jackie Bolhuis' card, and CASEd it, with an extra layer of gold foil.  You can see Jackie's card Here, post of August 8, 2015.  
Timeless Love, is retiring on May 31, 2017, so if you want it, you might think about purchasing it sooner than later. Just sayin'!!!😊
I am offering this, anything you want-it-to-be card in all of my May 2, May 4, and May 6, 2017 classes. It is so quick and easy, you are going to say "Linda's right, didn't take but 5 minutes, I think I'll make another".

Recipe:
  • The base is a 5 1/2 x 8 1/2 piece of Whisper White, scored at 4 1/4.  
  • The next layer of Gold Foil is 5 1/4 x 4.
  • The Whisper White layer is 5 x 3 3/4, and dry embossed with the Lovely Lace folder (retiring 5/31/17).
  • The next gold foil layer is 4 3/8 x 3 1/4, and the Whisper White on which the words are stamped is 4 1/8 x 3 1/8.
  • The words and flower images are stamped with Basic Black Archival ink.
  • All done, and don't forget to decorate your envelope.
If you have any questions, please let me know. 

I hold adult classes each month.  If you live near my home at 555 Williamsdale Road, Graham, NC 27253, and would like to attend any of my classes, please let me know.  For details, see my class schedule right here on my blog, or on my Stampin' Up! website found Here.

If you would like to place an order, head on over to my Stampin' Up! website Here, and click on the "shop now" tab, or click on the 2016-17 catalog right here on my blog.  

Glory in his holy name; let the hearts of those who seek the Lord rejoice.  Psalm 105:3

Thank you for stopping by, and I hope your day is so totally awesome that yesterday gets jealous!!!
    ~Linda

Tuesday, April 18, 2017

Carousel Birthday for my May 2017 Classes
The Carousel Birthday stamp set, the coordinating DSP, Cupcakes & Carousels is so cute, I thought it would be fun to offer it at all of my May 2, May 4, and May 6, 2017 classes, (the stamp set and DSP are retiring on May 31, 2017, and the glimmer paper is no longer available, however; there is a technique to make glimmer paper any color you want.  I know it's true because I saw it on YouTube😇). 
I saw this card on Pinterest and traced it to Amy Koenders blog, Stamp with Amy K.  You can see her card Here, post of December 26, 2016.
The cupcakes are from the Lift Me Up stamp set, and the Up & Away Thinlits Dies, and both of these will be carried over to the 2017-18 catalog.  
When you come to class to make this card, your kit will include the cardstock and paper, all cut to perfection, the cupcakes stamped and cut out, and ready for you to design your own masterpiece.  What could be easier than that? Yeah!!!

Recipe:
  • The base is a 4 1/4 x 11 piece of Bermuda Bay scored at 5 1/2.  
  • Next the layer of Early Espresso is 5 1/4 x 4.
  • The DSP layer is 5 x 3, the Daffodil Delight piece is 5 x 3/4, and the glimmer paper is 4 3/4 x 1/2.
  • The Ferris Wheel is stamped on a 4 1/4 x 3 piece of Very Vanilla with Early Espresso ink.  The words are stamped with Bermuda Bay ink. The Early Espresso piece behind the stamped image is 4 3/8 x 3 1/8.
  • The cupcake tops are stamped with So Saffron ink on So Saffron card stock.  The cupcake bottoms are stamped with Early Espresso ink on Early Espresso card stock.
  • The cupcakes are cut out with my Big Shot and the Up & Away Thinlits Dies and I used dimensionals to make the cupcakes pop.
  • All done, and don't forget to decorate your envelope.
If you have any questions, please let me know. 

I hold adult classes each month.  If you live near my home at 555 Williamsdale Road, Graham, NC 27253, and would like to attend any of my classes, please let me know.  For details, see my class schedule right here on my blog, or on my Stampin' Up! website found Here.

If you would like to place an order, head on over to my Stampin' Up! website Here, and click on the "shop now" tab, or click on the 2016-17 catalog right here on my blog.  

If anyone is in Christ, he is a new creation; the old has gone, the new has come!  2 Corinthians 5:17

Thank you for stopping by, and I hope your day is so totally awesome that yesterday gets jealous!!!
    ~Linda

Saturday, April 15, 2017

Paper Pumpkin Fun

Yesterday those of us who are subscribers to the Paper Pumpkin YouTube Channel got a special treat.  Sara Douglass shared in detail this month's "A Sara Thing" Paper Pumpkin kit.  It was fun to watch as she shared the step-by-step instructions and helpful tips for the cards in this fantastic kit.  If you haven't seen the video yet, here it is! 


Some subscribers received their kits yesterday, so I'm hoping that I won't have too long to wait for mine. There are so many fun elements for making creative alternate projects, and my mind is already spinning! 
If you are not currently a Paper Pumpkin subscriber, and would like to receive a kit every month, click right Here to subscribe, and you too can have a super good time.

I hold adult classes each month.  If you live near my home at 555 Williamsdale Road, Graham, NC 27253, and would like to attend any of my classes, please let me know.  For details, see my class schedule right here on my blog, or on my Stampin' Up! website found Here.

If you would like to place an order, head on over to my Stampin' Up! website Here, and click on the "shop now" tab, or click on the 2016-17 catalog right here on my blog.  


The Lord your God is with you, He is mighty to save.  He will take great delight in you, He will quiet you with His love. Zephaniah 3:17

Thank you for stopping by, and I hope your day is so totally awesome that yesterday gets jealous!!!
    ~Linda

Thursday, April 13, 2017

Happy Happenings Stamp Set, and Playful Palette DSP 
Such a pretty card for my May 2017 classes, don't you think?  I saw this design on Mary Alice Bellis's blog, Marvelous Possibilities, post of February 19, 2017, and you can see her card Here.  To get the stitching on all

three sides of the triangle, cut squares using the 1 3/4" Stitched Framelits die. Next, cut the squares diagonally, and if using a directional print be sure to pay attention to which way you cut your diagonal piece.  Then take the largest stitched square framelit, and with the cut edge facing up, place the edge of the cardstock/DSP against the edge of the square, so that you will get the stitches, not the cut edge. You might need a post-it to hold the stitched triangle in place when you run it through the Big Shot. . 
For my card I used the Happy Happenings stamp set, Playful Palette designer series paper stack, Blushing Bride glimmer paper, and Sweet Sugarplum Ruched ribbon, all retiring May 31, 2017. 
My trusty assistant, Michelle Wallace and I had fun playing with all, and I mean all, of the different designs in the paper stack.
When you come to class to make this card, your kit will include all of the pieces needed, all cut, stitched, and ready for you to design your own masterpiece.  What could be easier than that? Yeah!!!

Recipe:
  • The base is a 5 1/2 x 8 1/2 piece of Sweet Sugarplum, scored at 4 1/4.  
  • Next the layer of Basic Black is 5 1/4 x 4.
  • The Very Vanilla layer is 3 1/2 x 3 5/8.
  • My pinwheel is made from the dsp and Blushing Bride card stock.
  • I used Blushing Bride glimmer paper and Layering Circle Framelits for the card front.
  • The words are stamped with Tuxedo Memento ink.
  • All done, and don't forget to decorate your envelope.
If you have any questions, please let me know. 

I hold adult classes each month.  If you live near my home at 555 Williamsdale Road, Graham, NC 27253, and would like to attend any of my classes, please let me know.  For details, see my class schedule right here on my blog, or on my Stampin' Up! website found Here.

If you would like to place an order, head on over to my Stampin' Up! website Here, and click on the "shop now" tab, or click on the 2016-17 catalog right here on my blog.  

I will sing the Lord's praise, because He has been so good to me. Psalm 13:6

Thank you for stopping by, and I hope your day is so totally awesome that yesterday gets jealous!!!
    ~Linda

Saturday, April 8, 2017

Best Birds & Swirly Bird Stamp Sets,
Swirly Scribbles Framelits & Birds & 
Blooms Thinlits Dies
I used Best Birds and Swirly Bird stamp sets for this wonderful all occasion card.  See all the details below. 
Recipe:
  • The base is a 5 1/2 x 8 1/2" piece of Basic Black scored at 4 1/4".
  • Next is a 5 1/4 x 4" piece of Calypso Coral.
  • Next I adhered a strip of 5 x 1/2" piece of Foxy Friends DSP stack to the back of a 5 x 3 3/4" piece of Whisper White.  Then I adhered a 5 x 1/2" piece of Smoky Slate to the DSP.  Before I glued all to the Calypso Coral with snail, I wrapped a piece of Smoky Slate 1/8" ribbon around this combination, and applied my bow with a glue dot.
  • The Swirly Scribbles little circles and flower were stamped with Calypso Coral and Pool Party ink on Whisper White card stock and cut out with Swirly Scribbles Thinlits Dies, and adhered to the card with snail and dimensionals.
  • The bird was stamped on Whisper White card stock with Black Memento ink, sponged with Calypso Coral ink, cut out with the Birds & Blooms Thinlits dies, and adhered to the card with dimensionals.
  • The sentiment is from a very old set, Sincere Salutations.  I was in a somewhat hurry to finish my card, so I grabbed the closest get well greeting at hand.  
  • Remember to decorate your envelope, can't leave the house naked, right? 
If you have any questions, please let me know.
    I hold adult classes each month.  If you live near my home at 555 Williamsdale Road, Graham, NC 27253, and would like to attend any of my classes, please let me know.  For details, see my class schedule right here on my blog, or on my Stampin' Up! website found Here

    If you would like to place an order, head on over to my Stampin' Up! website Hereand and click on the "shop now" tab, or click on the 2016-17 catalog right here on my blog.

    "But God demonstrates his own love for us in this:  While we were still sinners, Christ died for us." Romans 5:8

    Thank you for stopping by, and have a great day,
      ~Linda

    Friday, April 7, 2017

    Perfectly Wrapped
    There are many ways to use the Perfectly Wrapped stamp set, and I liked Bonnie O'Neill's card (from Pinterest) so much, I CASEd it and changed up the colors a little.
    This happy set of 17 Photopolymer stamps is a fantastic deal at only $17.00, and has words for lots of occasions, as well as the flowers you see on this card.  

    I hold Creative Paper Therapy classes in my home each month, and my schedule for May 2017 is: May 2,  May 4, and May 6, 2017.  Click on anyone of these dates for more information and details.

    Recipe:
    • The base is a 11 x 4 1/4 piece of Dapper Denim scored at 5 1/2.
    • Next is a 5 1/4 x 4 piece of Flirty Flamingo.
    • The Whisper White piece on which I stamped my designs is 5 x 3 3/4, and I used Dapper Denim and Flirty Flamingo classic ink.
    • The piece on which I stamped Thanks is 2 x 4, and I trimmed it with my Paper Snips after I glued it to my Whisper White piece.
    • I attached a bow made with Dapper Denim 3/8" Ruched Ribbon with a glue dot. 
    • All done, and remember to decorate your envelope. 
    If you have any questions, please let me know.
      I hold adult classes each month.  If you live near my home at 555 Williamsdale Road, Graham, NC 27253, and would like to attend any of my classes, please let me know.  For details, see my class schedule right here on my blog, or on my Stampin' Up! website found Here.

      If you would like to place an order, head on over to my Stampin' Up! website Hereand and click on the "shop now" tab, or click on the 2016-17 catalog right here on my blog.

      But may the righteous be glad and rejoice before God; may they be happy and joyful.  Psalm 68:3

      Thank you for stopping by, and have a great day,
        ~Linda

      Sunday, April 2, 2017

      Custom Tee and T-shirt Builder Framelits Dies 
      for my April 2017 Classes
       
      I used the Blooms & Bliss DSP, identical colors card stock and ink to make this dual purpose card for all of my April 2017 classes.  I had designing assistance from Sande Parcell and Michelle Wallace, and when we were finally satisfied with the end result, we all did a happy dance.
      Please plan to attend my next set of Creative Paper Therapy classes on either April 4, April 6, and April 8, 2017, or come to all three to make this card. All the cutting has been done for you, just stamp, and glue. What can be easier, right?  
      Recipe:
      • The base is a 5 1/2 x 8 1/2 piece of Mint Macaron scored at 4 1/4.  
      • Next the piece of Island Indigo is 5 1/4 x 4.  
      • The Whisper White layer is 5 x 3 3/4.
      • The DSP and the Mint Macaron on the card front is 2 3/8 x 3 1/8, and the Mint Macaron under the DSP and the Island Indigo is 2 1/2 x 3 1/4.
      • The masculine t-shirt is stamped on Whisper White and the ladies t-shirt is stamped on Blooms and Bliss DSP, both with Tuxedo Memento black ink and cut out with the Big Shot and T-shirt Framelits Dies.
      • The stars are punched from Dazzling Diamonds Glimmer paper, and the flowers are from Mint Macaron Glimmer paper, (both punches are retired).
      • All done, and don't forget to decorate your envelope.
      If you have any questions, please let me know. 

      I hold adult classes each month.  If you live near my home at 555 Williamsdale Road, Graham, NC 27253, and would like to attend any of my classes, please let me know.  For details, see my class schedule right here on my blog, or on my Stampin' Up! website found Here.

      If you would like to place an order, head on over to my Stampin' Up! website Here, and click on the "shop now" tab, or click on the 2016-17 catalog right here on my blog.  

      There is nothing better for people than to be happy and to do good while they live. Ecclesiastes 3:12  

      Thank you for stopping by, and have a great day,
        ~Linda