html

Hi and welcome to my blog, I hope you enjoy your experience with me today. Linda Fisher

Sunday, October 29, 2017

Painted Autumn 
This is another card I made when I participated in our bi-monthly Shoe Box Swap (SBS) a few weeks ago.  Wendie Jamison designed this one, and she did an extremely wonderful job.  It amazes me all the designs that can be made with Painted Harvest. 
At a SBS everyone brings card kits to our gathering, then we make each others cards, have fun, eat some goodies, fellowship, and arrive home with lots of new ideas.  You do not need to be a SU Demonstrator to participate, however; you do need to use all current SU products when designing.  If you are interested in learning more about the SBS, please let me know.  Our next get-together is January 6, 2018. 

Recipe:
  • The base is 8 1/2 x 5 1/2  piece of Basic Black, scored at 4 1/4. 
  • The Basic Gray layer is 5 1/4 x 4.
  • The Whisper White layer on which I stamped my images from Painted Harvest is 5 x 3 3/4 .
  • The Basic Black smaller layer is 3 x 1, and I stamped my words in Basic Gray on a 2 7/8 x 7/8 piece of Whisper White.
  • My flowers and leaves are stamped with Smoky Slate and Basic Gray ink. 
  • Don't forget to decorate your envelope.
  • All done!!!
If you have any questions, please let me know. 

I hold adult classes each month.  If you live near my home at 555 Williamsdale Road, Graham, NC 27253, and would like to attend any of my classes, please let me know.  For details, see my class schedule right here on my blog, or on my Stampin' Up! website found Here.

If you would like to place an order, head on over to my Stampin' Up! website Here, and click on the "shop now" tab, or click on the 2017-18 catalog right here on my blog. 

Whether you turn to the right or to the left, your ears will hear a voice behind you, saying, "This is the way; walk in it."  Isaiah 30:21 

Thank you for stopping by, and have a great day,
    ~Linda

Friday, October 27, 2017

Dryer Sheet Technique and Furry of Wishes for a October 2017 Hostess Club Project
This is the second of the two cards my wonderful Hostess Club ladies made when we met on October 26, 2017.  Everyone used a dryer sheet over their stamped images.  Of course, a big thank you, again and again, to my wonderful assistant, Michelle Wallace.  
The instructions for this technique are all over YouTube, however, I liked Diane Dimich's video, and you can find it Here.  She used a Stampin' Up! glue stick, however; any glue stick you have on hand will work just fine, especially since SU does not carry glue sticks anymore.

Recipe:
  • The base is 8 1/2 x 5 1/2  piece of Dapper Denim, scored at 4 1/4. 
  • The Smoky Slate layer is 5 1/4 x 4.
  • The Whisper White layer is 5 x 3 3/4, and the images are stamped with Dapper Denim and Smoky Slate ink.
  • The small piece of Dapper Denim cardstock on the front of the card is 5 x 1, and embossed with the Softly Falling embossing folder.
  • The Silver Glimmer circle is cut from the Layering Circle Framelits dies, and the Whisper White circle, on which the words are stamped (in Dapper Denim ink), is punched from a 2 1/4" circle punch. 
  • A bow was made with the 1/8" Silver ribbon and a glue dot was used to make it stick to the circle.  (Good use of English, don't you think?)
  • Dazzling Diamonds was used over the dryer sheet to make it more glittery.  
  • Don't forget to decorate your envelope.
  • All done!!!
If you have any questions, please let me know. 

I hold adult classes each month.  If you live near my home at 555 Williamsdale Road, Graham, NC 27253, and would like to attend any of my classes, please let me know.  For details, see my class schedule right here on my blog, or on my Stampin' Up! website found Here.

If you would like to place an order, head on over to my Stampin' Up! website Here, and click on the "shop now" tab, or click on the 2017-18 catalog right here on my blog.                                                             

"For the ways of the Lord are right, and the righteous will walk in them."  Hosea 14:9

Thank you for stopping by, and have a great day,
    ~Linda

Wednesday, October 25, 2017

Hello Friend for a October 2017 Hostess Club Project

This is one of the two cards my wonderful Hostess Club ladies will make when we meet on October 26, 2017.  The technique is called Polished Stone, and it is so much fun.  I am very excited (what else is there) to share what I have learned.  Of course, a big thank you to my wonderful assistant, Michelle Wallace, for her patience.  I must have changed up the design a gazillion times.  Well, not a gazillion, but more than a half-dozen times, and I am blessed to have such a talented lady to help me.   The instructions for this technique is all over YouTube, however, the one I found to be most user-friendly can be found Here, by Dawn Griffith.

Recipe:
  • The base is 8 1/2 x 5 1/2  piece of Pear Pizzazz, scored at 4 1/4. 
  • The Basic Black layer is 5 1/4 x 4.
  • The Glossy White layer is 5 x 3 3/4, though it doesn't look white, because the Polished Stone was created on this piece.  I also cut a 2 x 2 square of Glossy White to color for my words.  I used Pear Pizzazz, Sahara Sand, and Pink Pirouette reinkers for this project.
  • The strip of Basic Black is 3 3/4 x 1 1/8, and the small piece of DSP is 3 3/4 x 1
  • I wanted to used the new Calypso Coral 1/4" Ombre Ribbon, (it is on my wish list), and since I didn't have it, I resorted to using come retired Calypso Coral Seam Binding.
  • The wreath is stamped with Black Stazon directly on the Glossy White piece. 
  • The circle punches used are:  a 1 1/2" for the Basic Black piece, 1 3/8 for the Calypso Coral piece, and the 1 1/4 punch for the piece with the words.  
  • The little flowers came from the Sprinkles of Life stamp set.  I stamped on Calypso Coral cardstock with Calypso Coral ink,  then punched out the flowers with the Tree Builder punch.  I applied them to the card with glue dots, and put a small pearl in the middle of each flower.
  • Don't forget to decorate your envelope.
  • All done!!!
If you have any questions, please let me know. 

I hold adult classes each month.  If you live near my home at 555 Williamsdale Road, Graham, NC 27253, and would like to attend any of my classes, please let me know.  For details, see my class schedule right here on my blog, or on my Stampin' Up! website found Here.

If you would like to place an order, head on over to my Stampin' Up! website Here, and click on the "shop now" tab, or click on the 2017-18 catalog right here on my blog.                                                             

This is the confidence we have in approaching God:  that if we ask anything according to his will, he hears us.  1 John 5:14

Thank you for stopping by, and have a great day,
    ~Linda

Sunday, October 22, 2017

Painted Harvest & Colorful Seasons
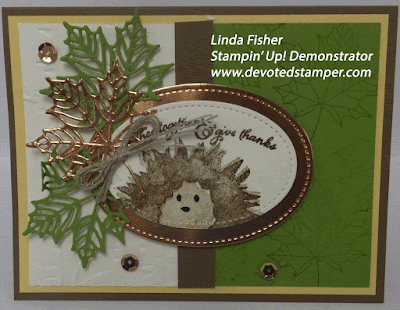
Looks like a little hedgehog, doesn't it?  So cute. This is one of the cards I made last Saturday when I participated in our bi-monthly Shoe Box Swap (SBS).  Michelle Wallace designed this one, and she went over the top.  Lots of layers and detail.  Wonderful!!!
At a SBS everyone brings card kits to our gathering, then we make each others cards, have fun, eat some goodies, fellowship, and arrive home with lots of new ideas.
You do not need to be a SU Demonstrator to participate, however; you do need to use all current SU products when designing.
If you are interested in learning more about the SBS, please let me know.  Our next get-together is January 6, 2018.       

Recipe:
  • The base is 8 1/2 x 5 1/2  piece of Soft Suede, scored at 4 1/4.  
  • The So Saffron layer is 5 1/4 x 4.
  • The Old Olive layer is 3 3/4 x 2 1/2, and the leaves are stamped with Old Olive ink.  The Whisper White layer is 3 3/4 x 2 1/2, and dry embossed with the Woodland embossing folder.  The skinny strip of Soft Suede that connects these two pieces is 3 3/4 x 1/2.
  • The stitched ovals are Copper Foil, and White.
  • The leaves are cut out with the Seasonal Layers framelits, Old Olive Cardstock, and Copper Foil.  I made a bow with Linen Thread and attached it to the leaf with a glue dot.
  • The design is stamped in Soft Suede and Crumb Cake.  I made the eyes and mouth with a Basic Black marker.  If you don't have one, I'm certain a black ink pen would work.
  • The three sparkly thingies are sequins.  Gotta have some bling, right?
  • Don't forget to decorate your envelope.
  • All done!!!
If you have any questions, please let me know. 

I hold adult classes each month.  If you live near my home at 555 Williamsdale Road, Graham, NC 27253, and would like to attend any of my classes, please let me know.  For details, see my class schedule right here on my blog, or on my Stampin' Up! website found Here.

If you would like to place an order, head on over to my Stampin' Up! website Here, and click on the "shop now" tab, or click on the 2017-18 catalog right here on my blog.  

"The Lord your God is with you, the Mighty Warrior who saves.  He will take great delight in you; in his love he will no longer rebuke you, but will rejoice over you with singing." Zephaniah 3:17

Thank you for stopping by, and have a great day,
    ~Linda
Wednesday, October 18, 2017

Count My Blessings, and Painted Autumn DSP
I am finding many uses for the 12 piece pack of Painted Autumn Designer Series Paper (DSP).  This is another creation my assistant, Michelle Wallace, and I have made.  We work so well together, and I am blessed to have such a talented lady to help me. 
Look for this card to be offered at all of my November 7, November 9, and November 11, 2017 Creative Therapy card classes.     

Recipe:
  • The base is 8 1/2 x 5 1/2  piece of Early Espresso, scored at 4 1/4.  
  • The Old Olive layer is 5 1/4 x 4.
  • The smaller Early Espresso layer is 4 3/4 x 3 1/2, and the Crumb Cake layer (on which I stamped an image with Crumb Cake ink) is 4 5/8 x 3 3/8.
  • The horizontal layer of Early Espresso is 4 1/4 x 2 3/8, and the piece of DSP is 4 1/8 x 2 1/4.
  • The scalloped oval is, what else, Early Espresso, and the Very Vanilla non-scalloped oval is from the Layering Oval Framelits Dies.
  • The acorns and leaves are stamped in Early Espresso ink on Very Vanilla and cut out with my Paper Snips.  I made a bow with Linen Thread and attached it to this combo with a glue dot.
  • Don't forget to decorate your envelope.
  • All done!!!
If you have any questions, please let me know. 

I hold adult classes each month.  If you live near my home at 555 Williamsdale Road, Graham, NC 27253, and would like to attend any of my classes, please let me know.  For details, see my class schedule right here on my blog, or on my Stampin' Up! website found Here.

If you would like to place an order, head on over to my Stampin' Up! website Here, and click on the "shop now" tab, or click on the 2017-18 catalog right here on my blog.  

The Lord is my strength and my song.  Exodus 15:2

Thank you for stopping by, and have a great day,
    ~Linda

Monday, October 16, 2017

Hearts Come Home Set & Hometown Greetings Edgelits
This is the card I offered my wonderful stamping friends at our Shoe Box Swap this past Saturday.  I saw it on Rachel Woollard's blog, and just knew I wanted to CASE it.  (Copy And Share Everything).  Click Here, to see her card, post of October 12, 2017.
The paper behind the set of silver houses is the Year of Cheer DSP, and I used Night of Navy ink and a sponge brayer to give the card a "night time" affect.   
In addition to the bi-monthly SBS's in which I participate, I offer classes in my home every month.  My next set of classes is 
November 7,  November 9, and November 11, 2017.  If you would like to attend anyone of the classes, or maybe all three, please let me know.  We always have fun!!!!

Recipe:
  • The base is an 8 1/2 x 5 1/2  piece of Cherry Cobbler, scored at 4 1/4. 
  • The Whisper White layer is 5 3/8 x 4 1/8.
  • The Night of Navy layer is 5 1/4 x 4.
  • The DSP is 4 x 3 7/8.
  • The houses are cut out with Silver Foil, Dazzling Diamonds Glimmer paper, and Night of Navy.
  • The 2 x 3 7/8 piece of Shimmery White is stamped with Cherry Cobbler ink, and the top is torn before being glued it to the card.
  • I stamped Santa and his sleigh with Tuxedo Memento Black ink, and added a little star punched from Silver Glimmer paper.
  • Don't forget to decorate your envelope.
  • All done!!!

If you have any questions, please let me know. 

I hold adult classes each month.  If you live near my home at 555 Williamsdale Road, Graham, NC 27253, and would like to attend any of my classes, please let me know.  For details, see my class schedule right here on my blog, or on my Stampin' Up! website found Here.

If you would like to place an order, head on over to my Stampin' Up! website Here, and click on the "shop now" tab, or click on the 2017-18 catalog right here on my blog.  

The joy of the Lord is your strength.  Nehemiah 8:10

Thank you for stopping by, and have a great day,
    ~Linda

Friday, October 13, 2017

Tranquil Tulips, Banners for You and
Color Theory DSP Pack
Tranquil Tulips is a 22 piece photopolymer Hostess stamp set that you can buy for only $10.00 when you place an order for $150.00 or more.  And the Color Theory  Paper Pack is gorgeous.  There are 48  6 x 6 sheets of double sided paper that coordinates with Berry Burst, Old Olive, Crushed Curry, Dapper Denim and Whisper White cardstock, and all for only $10.00.  What a deal, right?  And this paper is part of the buy 3 packs of DSP and you get one free.  The DSP sale ends October 31, 2017, and to place an order, click Here.  See how easy I made it for you, and I'm pretty sure you won't be disappointed.  

Recipe:
  • The base is 8 1/2 x 5 1/2  piece of Berry Burst, scored at 4 1/4. 
  • The Whisper White layer is 5 1/4 x 4.
  • The piece of Color Theory is 5 x 3 3/4.
  • The Lemon Lime Twist layer is 4 x 3 and the Whisper White piece on which the tulips are stamped is 3 7/8 x 2 7/8.  
  • I used Berry Burst, Lemon Lime Twist, Island Indigo and Tuxedo Memento inks to stamp the tulips, stems and little flowers.  
  • The words are stamped in Island Indigo from the Banners for You set on Whisper White and cut out with a framelit from Bunch of Banners.
  • I colored some bling with Sharpie markers.
  • Don't forget to decorate your envelope.
  • All done!!!
If you have any questions, please let me know. 

I hold adult classes each month.  If you live near my home at 555 Williamsdale Road, Graham, NC 27253, and would like to attend any of my classes, please let me know.  For details, see my class schedule right here on my blog, or on my Stampin' Up! website found Here.

If you would like to place an order, head on over to my Stampin' Up! website Here, and click on the "shop now" tab, or click on the 2017-18 catalog right here on my blog.  

Let's not get tired of doing what is good.  At just the right time we will reap a harvest of blessing if we don't give up.  Galatians 6:9

Thank you for stopping by, and have a great day,
    ~Linda

Tuesday, October 10, 2017

Spooky Cat Stamp Set and Spooky Night DSP 
Another fun Halloween card made with the Spooky Cat stamp set and the Spooky Night Designer Series Paper.  I love how the paper makes card making so quick and easy, and this card uses very few products, because the DSP does all the work for you.  Well, kinda-sorta, just sayin'.
I offered this card at all of my October 3, October 5, and October 7, 2017 Creative Therapy card classes, and I'm happy to say it was a big hit.  To see my November 2017 schedule, click Here

Recipe:

  • The base is 8 1/2 x 5 1/2  piece of Basic Black, scored at 4 1/4. 
  • The Very Vanilla layer is 5 1/4 x 4 and I stamped the words  with Tuxedo Memento Black ink, then I dry embossed it with the Woodland Embossing Folder.
  • The strip of DSP is 1 1/4 x 5 1/8.
  • The piece of DSP is 3 x 3 and the Basic Black square under it is 3 1/8 x 3 1/8.
  • The owl is stamped with Basic Gray Archival ink and the words on the owl's tummy is stamped with Tuxedo Memento Black ink.
  • The hat is cut from the DSP (this paper is so much fun, and therapeutic too), and popped up with a dimensional.  Just for fun I added a little bling to the center of the hat.
  • Don't forget to decorate your envelope.
  • All done!!!
If you have any questions, please let me know. 

I hold adult classes each month.  If you live near my home at 555 Williamsdale Road, Graham, NC 27253, and would like to attend any of my classes, please let me know.  For details, see my class schedule right here on my blog, or on my Stampin' Up! website found Here.

If you would like to place an order, head on over to my Stampin' Up! website Here, and click on the "shop now" tab, or click on the 2017-18 catalog right here on my blog.  

Every weakness you have is an opportunity for God to show His strength in your life.  2 Corinthians 12:9

Thank you for stopping by, and have a great day,
    ~Linda

Saturday, October 7, 2017

Colorful Seasons
and High Tide
Once again Dorriea outdid herself with this all occasion card.  She used Colorful Seasons and High Tide to complete her masterpiece.  I say masterpiece because aren't designs made with paper, ink, and stamps like magic?  So much fun!!!  
Colorful Seasons is a 24 piece photopolymer stamp set, and is so versatile that it can be used for way more than seven occasions.  
High Tide is a 16 piece photopolymer stamp set and is so perfect to have on hand, period.
Dorriea made the background by inking a clear block with Soft Sky and stamping directly on the Very Vanilla card stock.  The chair and words are from Colorful Seasons, and the birds, sand and grass are from High Tide.  Very creative, wouldn't you say.

Recipe
  • The base is 8 1/2 x 5 1/2  piece of Soft Suede, scored at 4 1/4.  
  • The Bermuda Bay layer is 5 1/4 x 4.
  • The Very Vanilla layer is 5 x 3 3/4.
  • The chair is stamped with Early Espresso and Bermuda Bay ink. The sand and words with Soft Suede, the grass with Old Olive and the birds with Tuxedo Memento Black ink.
  • Don't forget to decorate your envelope.
  • All done!!!
If you have any questions, please let me know. 

I hold adult classes each month.  If you live near my home at 555 Williamsdale Road, Graham, NC 27253, and would like to attend any of my classes, please let me know.  For details, see my class schedule right here on my blog, or on my Stampin' Up! website found Here.

If you would like to place an order, head on over to my Stampin' Up! website Here, and click on the "shop now" tab, or click on the 2017-18 catalog right here on my blog.  

Anxiety in a man's heart weighs it down, but a good word makes it glad. Proverbs 12:25

Thank you for stopping by, and have a great day,
    ~Linda

Wednesday, October 4, 2017

Christmas Pines, Merry Music DSP and Foil Snowflakes
The card was made with the beautiful foil snowflakes that are in the 2017-18 Holiday Mini by Stampin' Up!  I used the reverse side of the doily, Real Red ink, and a Sponge Brayer to change the color.  
I CASEd (Copy And Share Everything) this card from Jan Musselman, and you can see her card Here, post of August 18, 2017.  
I am offering this card at all of my October 3, October 5, and October 7, 2017 Creative Therapy card classes, and if you would like to attend, please let me know.  I would enjoy having you.   

Recipe:
  • The base is 8 1/2 x 5 1/2  piece of Real Red, scored at 4 1/4.  
  • The Silver or Gold Foil layer is 5 1/4 x 4.
  • The Merry Music layer is  5 x 3 3/4 and the piece of Vellum paper is 4 7/8 x 3 5/8.
  • I punched out the foil circle with a 2 1/4" circle punch from the silver or gold foil layer before I glued it to my base.  A little tip to save paper.  The Whisper White circle is cut out with a 2" circle punch.
  • The words are from Christmas Pines and stamped with Real Red ink.
  • Don't forget to decorate your envelope.
  • All done!!!
If you have any questions, please let me know. 

I hold adult classes each month.  If you live near my home at 555 Williamsdale Road, Graham, NC 27253, and would like to attend any of my classes, please let me know.  For details, see my class schedule right here on my blog, or on my Stampin' Up! website found Here.

If you would like to place an order, head on over to my Stampin' Up! website Here, and click on the "shop now" tab, or click on the 2017-18 catalog right here on my blog.  

My dear brothers and sisters, take note of this:  Everyone should be quick to listen, slow to speak and slow to become angry. James 1:19

Thank you for stopping by, and have a great day,
    ~Linda

Sunday, October 1, 2017

A Few Upcoming Promotions From Stampin' Up!:

Buy 3, Get 1 Free Designer Series Paper Sale - Oct 1-31!


By popular demand, Stampin' Up! is bringing back an incredible offer on Designer Series Paper.  You can buy three packages of select Designer Series Paper and get one FREE during October!  This sale includes Designer Series Paper from both the annual and holiday catalogs.  And they’re even including select Specialty and Designer Series Paper Stacks on sale!
Here are the details:
  • Sale period: October 1–31, 2017
  • All order types qualify for this promotion.
  • There is no limit to how many times participants can buy three packages of Designer Series Paper and get one free during this sale.
  • Participants can choose which three packages of Designer Series Paper they will order from the sale items and which package to receive for free.
  • Designer Series Paper purchased as part of a Starter Kit does not qualify for this sale.
  • Designer Series Paper ordered with Stampin’ Rewards does not qualify for this sale.
  • Promotion Ends:  October 31, 2017, by 11:50 PM (MT)
Here is the list of paper included in the sale:
World Card Making Day Sale - 15% Off Select Items Oct 1-10!
World Card Making Day is a day dedicated to doing what you love most—making handmade cards! It celebrates the creativity and personal connection handmade cards create between loved ones.
This year the world celebrates the day on October 7, but one day wasn’t enough for Stampin' Up!.  For ten days (October 1–10), you get 15% off Notecards & Envelopes and select stamp sets.  Also, when you buy Fast Fuse Adhesive, you’ll get two refills for FREE!  These items will help you celebrate the best hobby of all—cardmaking!

Plus, buy Fast Fuse Adhesive (item 129026) and get TWO Fast Fuse Adhesive Refills for FREE!
Click here to see/print a larger flyer will all of the sale items listed.

Merry Patterns Stamp Set – Host Exclusive Available Sept 1-Oct 31!

Stampin’ Up! has an awesome host exclusive stamp set that will be available to for free for anyone who places an order or hosts a party totaling $300 or greater between September 1 and October 31!  This beautiful stamp set is called Merry Patterns and it’s a two-step stamp set!  
Here are the details:
  • Promotion period: September 1–October 31
  • The Merry Patterns Stamp Set is exclusive to the host promotion and will not be available after October 31
  • In order to qualify, the event merchandise total must reach $300 (before shipping and handling)
  • There is no limit to the number of times the Merry Patterns Stamp Set may be earned, but only one set can be redeemed per qualifying order
  • Customer, workshop, and online orders all qualify for this great stamp set!
  • Orders must be closed by 11:50 PM (MT) on October 31
  • The Merry Patterns Stamp Set is in addition to the regular Stampin’ Rewards that you earn with an order or party totaling $300+!
  • The Merry Patterns Stamp Set may not be exchanged for another stamp set

I hold adult classes each month.  If you live near my home at 555 Williamsdale Road, Graham, NC 27253, and would like to attend any of my classes, please let me know.  For details, see my class schedule right here on my blog, or on my Stampin' Up! website found Here.

If you would like to place an order, head on over to my Stampin' Up! website Here, and click on the "shop now" tab, or click on the 2017-18 catalog right here on my blog.  

The Lord will watch over you coming and going.  Psalm 121:8

Thank you for stopping by, and have a great day,
    ~Linda