Tuesday, November 28, 2017

Star of Light and Eastern Beauty for Christmas
I saw this card on Cindy Elam's blog, Heart's Delight Cards, post of November 5, 2017, and you can see her card Here.  It was changed up some to make it my own, of course, right!!!  I am so pleased with the way it turned out, and most of the credit for that goes to my faithful assistant, Michelle Wallace.  Thank you Michelle.      

Recipe:
  • The base is a 8 1/2 x 5 1/2  piece of Cherry Cobbler, scored at 4 1/4. 
  • The Gold Foil layer is 5 1/4 x 4.
  • The Very Vanilla layer is 5 x 3 3/4, and is dry embossed with the Softly Falling embossing folder..
  • The Cherry Cobbler piece behind the Eastern Palace DSP is 2 1/4 x 5, and the dsp is 2 1/8 x 5.
  • The scalloped circle is Cherry Cobbler, and the Stitched Framelit circle is Very Vanilla.  
  • The two medallions are cut out with Real Red, and the little sprigs are Garden Green.  By-the-way the sprigs are from a non-SU punch, just in case you're wondering.😓
  • Don't forget to decorate your envelope.
  • All done!!!
If you have any questions, please let me know. 

I hold adult classes each month. My next set of Creative Therapy card classes are:  December 5, December 7, and December 9, 2017  If you live near my home at 555 Williamsdale Road, Graham, NC 27253, and would like to attend any of my classes, please let me know.  For details, see my class schedule right here on my blog, or on my Stampin' Up! website found Here.

If you would like to place an order, head on over to my Stampin' Up! website Here, and click on the "shop now" tab, or click on the 2017-18 catalog right here on my blog.                                                             

Jesus said "Your heart will always where be your riches are."  Matthew 6:21

Thank you for stopping by, and have a great day,
    ~Linda

Monday, November 27, 2017


Get out those wish lists because this is HUGE.  Stampin’ Up! is offering FREE STANDARD SHIPPING on ALL orders (any size – NO LIMITS) – ALL DAY Cyber Monday November 27th.
Shop from 12:00 a.m. to 11:59 p.m. (mountain time)
No Minimum order amount
Order as often as you wish – ALL DAY – Shipping is totally FREE!
Send gifts directly to friends (love that feature – just change the shipping address to their address)
Earn FREE PRODUCTS with Stampin Rewards (on orders $150. and higher before tax)
Order from the Holiday Catalog – the Annual Catalog and the Clearance Rack
Save an on all these BUNDLED products


I hold adult classes each month.  If you live near my home at 555 Williamsdale Road, Graham, NC 27253, and would like to attend any of my classes, please let me know.  For details, see my class schedule right here on my blog, or on my Stampin' Up! website found Here.

If you would like to place an order, head on over to my Stampin' Up! website Here, and click on the "shop now" tab, or click on the 2016-17 catalog right here on my blog. 

"How great you are, O Sovereign LORD!  There is no one like you.  We have never even heard of another God like you!"  11 Samuel 7:22 NLT


Thank you for stopping by, and have a great day,

    ~Linda

Saturday, November 25, 2017

Seasonal Bells
I've always liked the stamp set, Seasonal Bells, and realized I haven't used it this season😢.  This card is so easy, and I put it together in minutes.  

Recipe:
  • The base is a 8 1/2 x 5 1/2  piece of Cherry Cobbler, scored at 4 1/4. 
  • The Garden Green layer is 5 1/4 x 4 1/4.
  • The piece of Be Merry DSP is 5 x 3 3/4.
  • The piece of Cherry Cobbler is 1 5/8 x 4 7/8, and the piece of Be Merry dsp is 1 1/2 x 4 5/8.  I punched the tales with the Triple Banner Punch.
  • The Gold Glimmer, Garden Green, and Whisper White circles are cut from the Layering Circle Framelits dies.  I stamped the words in Cherry Cobbler from the stamp set, Star of Light.  Because Star of Light is photopolymer I was able to curve it on the acrylic block.  
  • The bells are punched from Cherry Cobbler and Garden Green cardstock.  The star on the Cherry Cobbler bell is cut from the Starlight Framelits Dies.  The little Gold Glimmer stars are punched from a retired SU punch, and I put them on the card with the new Mini Stampin' Dimensionals.  They are awesome, and your get 720 of them for just $4.00.
  • I stamped the inside with two bells, as well as my envelope and that's it.  
  • Don't forget to decorate your envelope.
  • All done!!!
If you have any questions, please let me know. 

I hold adult classes each month.  If you live near my home at 555 Williamsdale Road, Graham, NC 27253, and would like to attend any of my classes, please let me know.  For details, see my class schedule right here on my blog, or on my Stampin' Up! website found Here.

If you would like to place an order, head on over to my Stampin' Up! website Here, and click on the "shop now" tab, or click on the 2017-18 catalog right here on my blog.  

"My soul finds rest in God along; my salvation comes from Him." Psalm 62:1

Thank you for stopping by, and have a great day,
    ~Linda

Wednesday, November 22, 2017

Christmas Pines and Card Front Builder Thinlits Dies
I this card on Pinterest, of course I did, right! and decided it would be make an great addition to my Christmas card line-up for my December 5, December 7, and December 9, 2017 Creative Therapy card classes.  This card is so easy, peasy, you won't believe it.  The Card Front Builder Thinlits add so much character to this "masterpiece" don't you think?  

Recipe:
  • The base is a 8 1/2 x 5 1/2  piece of Cherry Cobbler, scored at 4 1/4. 
  • The Whisper White layer is 5 1/4 x 4 1/4.
  • The Cherry Cobbler Scalloped Square and the Silver Glimmer paper layer is cut with the Layering Squares dies.
  • The piece of Be Merry dsp is 2 1/8 square.
  • The Noel is embossed with Silver embossing powder and cut with my paper snips.  (Have had them babies for 8-10 years, never get dull, just sayin'). 
  • The stars are from the cutouts of the thinlits and I put them on the card with the new Mini Stampin' Dimensionals.  They are awesome, and your get 720 of them for just $4.00.
  • I added a doily under the Cherry Cobbler Scalloped Square combo.
  • Stamped the inside with words from the Christmas Pines stamp set with Cherry Cobbler ink, and that's it.  
  • Don't forget to decorate your envelope.
  • All done!!!
If you have any questions, please let me know. 

I hold adult classes each month.  If you live near my home at 555 Williamsdale Road, Graham, NC 27253, and would like to attend any of my classes, please let me know.  For details, see my class schedule right here on my blog, or on my Stampin' Up! website found Here.

If you would like to place an order, head on over to my Stampin' Up! website Here, and click on the "shop now" tab, or click on the 2017-18 catalog right here on my blog.  

"Have I not commanded you?  Be strong and courageous.  Do not be afraid; do not be discouraged, for the Lord your God will be with you wherever you go."  Joshua 1:9

Thank you for stopping by, and have a great day,
    ~Linda

Sunday, November 19, 2017

Musical Season and Musical Instruments Framelits 
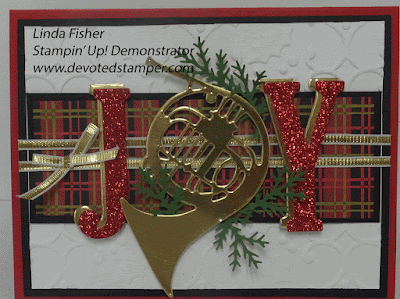
This beautiful card is another offering at all of my December 5, December 7, and December 9, 2017 Creative Therapy card classes.  Just like the card I posted on November 16, 2017, all the measuring, cutting, and even the letters and instrument will be cut out for you.  What could be easier than that, right?

This design came from Leena Girsa, and you can see her card Here. though, you are not going to find any differences.  I decided her card is perfect, so no reason to change a thing.  That's my story and I'm sticking to it!!!,   Besides, Barney (you know the big purple dinosaur said it is okay to copy). 😇 

Recipe:
  • The base is a 8 1/2 x 5 1/2  piece of Real Red, scored at 4 1/4. 
  • The Basic Black layer is 5 1/4 x 4. 
  • The Whisper White layer is 5 x 3 3/4, and is dry embossed with the Holly Embossing Folder.  
  • The Basic Black layer on which the DSP is under is 5 x 1 7/8, and the DSP is 4 7/8 x 1 5/8.
  • The letters are cut from both Red Glimmer paper and Gold Foil, and the instrument is cut from Gold Foil.  
  • The little sprigs are cut from Garden Green card stock with a non SU punch (say it isn't so, right?).  I wanted to use the die from Ready for Christmas, couldn't though, I don't own that set yet. 
  • Don't forget to decorate your envelope.
  • All done!!!
If you have any questions, please let me know. 

I hold adult classes each month.  If you live near my home at 555 Williamsdale Road, Graham, NC 27253, and would like to attend any of my classes, please let me know.  For details, see my class schedule right here on my blog, or on my Stampin' Up! website found Here.

If you would like to place an order, head on over to my Stampin' Up! website Here, and click on the "shop now" tab, or click on the 2017-18 catalog right here on my blog.                           

"David was greatly distressed because the men were talking of stoning him; each one was bitter in spirit.  But David found strength in the Lord his God."  1 Samuel 30:6

Thank you for stopping by, and have a great day,
    ~Linda

Thursday, November 16, 2017

Star of Light &
Night in Bethlehem 
I am excited to share one of the cards I am offering at all of my December 5, December 7, and December 9, 2017 Creative Therapy card classes.   Know what's so wonderful about making this card at my class?  All the measuring and cutting is done for you.  Just stamp and glue.  What could be easier than that, right?
This design is by Lyssa Griffin Zwolanek, and she titles it the Layered Slash Layout.  I would try to explain the cutting measurements, however, it would be much easier if you were to visit her blog, Songofmyheartstampers.com Here.  Her Cheat Sheet Collections are very affordable and Lyssa's directions are easy to follow.

Recipe:
  • The base is a 8 1/2 x 5 1/2  piece of Cherry Cobbler, scored at 4 1/4. 
  • The Night of Navy layer was 5 1/4 x 4 1/4, that is until I started slicing it to pieces.😊
  • The Whisper White layer is 5 1/4 x 3 3/4.  I stamped my words and image with Night of Navy ink directly on this piece.
  • The images from Star of Night are heat embossed with Silver Embossing Powder.
  • The two pieces of Silver Foil is 1/2" wide by 5 1/2.  
  • The star was cut out with Silver Foil paper and the Starlight Thinlets Dies. 
  • Don't forget to decorate your envelope.
  • All done!!!
If you have any questions, please let me know. 

I hold adult classes each month.  If you live near my home at 555 Williamsdale Road, Graham, NC 27253, and would like to attend any of my classes, please let me know.  For details, see my class schedule right here on my blog, or on my Stampin' Up! website found Here.

If you would like to place an order, head on over to my Stampin' Up! website Here, and click on the "shop now" tab, or click on the 2017-18 catalog right here on my blog.                                                             

Honor God by accepting each other, as Christ has accepted you.  Romans 15:7

Thank you for stopping by, and have a great day,
    ~Linda


Tuesday, November 14, 2017

Introducing The Stamparatus by Stampin' Up!

I am so honored to have had a small part in the design of this new tool from Stampin' Up! The Stamparatus is an indispensable positioning tool that allows you perfect placement EVERY time. Input from thousands of demonstrators resulted in a product with all of the very best features and none of the drawbacks of other positioners--with a sleek and sturdy design and some WOW new developments, to boot.
  • Multi-step stamping? Bring it on! You'll never waste cardstock trying to line things up again.
  • Multiples of the same card? No problem! Set it up once and stamp as many as you want.
  • Partially-stamp an image? Never fear! You can stamp again in precisely the same spot.
  • Here's just a few features of this awesome new workhorse... it's going to change everything you know about stamping!
    • Compatible with both red rubber cling-mount and clear photopolymer stamps
    • Built-in rulers and gridlines for quick measuring and placement
    • 2 open sides so you can stamp on larger paper, but not take up tons of space
    • 2 clear grid reversible hinged plates: a total of 4 surfaces to work with without having to change stamps!
    • 2 strong bar magnets to hold the paper in place (less finger-pinching than round magnets)
    • Magnet storage areas built into the bottom of the worksurface--never lose them!
    • Foam mat to use with photopolymer stamps included, for best impressions
    • Easily wipes clean with baby wipes or tissue
    • At $49, compares very favorably to other positioner tools on the market ($60-$100+)
    Ready to see more? Watch this short video that covers the basics of what the Stamparatus does, why it has multiple plates, how to use it for regular stamping and making multiples, and storage and cleaning tips. Five Things You Need to Know About the Stamparatus.

Isn't that SOOO exciting? I'm so pumped to get my hands on the finished project that our special leadership team has been working on for over a year now! Of course, the rush to order this new tool is expected to be pretty intense. Stampin' Up hates to disappoint anyone with backordered items, so they are offering three special "reservation periods" to help space out the shipments, since the manufacturers can only produce so many at one time.
The special preorder reservation periods are as follows:

  • November 16-30th, 2017 (for delivery around Feb 1st, 2018)
  • December 5-30th, 2017 (for delivery approx March 15th, 2018)
  • January 15-30th, 2018 (for delivery about April 15th, 2018)

I can't wait to share in this fun, one-of-a-kind preorder with you. Watch for a special announcement on Thursday with another reason you're going to want to click on Shop with Linda and reserve your Stamparatus today!

Honor God by accepting each other, as Christ has accepted you.  Romans 15:7

Thank you for stopping by, and have a great day,
    ~Linda

Saturday, November 11, 2017

Father Christmas and Nature Sings
I have had both of these stamp sets on my wish list ever since the Stampin' Up! catalog came out this past June 2017. When I finally bought them, I enticed my very talented assistant, Michelle Wallace, to help me design this card.  Pretty, isn't it!!! 
I offered this one at all of my  November 7, November 9, and November 11, 2017 Creative Therapy card classes, and it was quite popular.      
Recipe:
  • The base is a 8 1/2 x 5 1/2  piece of Cherry Cobbler, scored at 4 1/4. 
  • The Crumb Cake layer is 5 1/4 x 4.
  • The Very Vanilla layer is 5 x 3 3/4.
  • The  Layering Circle framelits dies were used for the Crumb Cake and Cherry Cobbler circles, and a 2" circle punch was used for the Very Vanilla layer.
  • The images are stamped in Crumb Cake and Cherry Cobbler ink, and the Santa and tree is colored with SU's coloring pencils and a blender pen.  
  • I wrapped Linen Thread around Very Vanilla/Crumb Cake layer before I put my Santa circles on the card front using dimensionals.  
  • Don't forget to decorate your envelope.
  • All done!!!
If you have any questions, please let me know. 

I hold adult classes each month.  If you live near my home at 555 Williamsdale Road, Graham, NC 27253, and would like to attend any of my classes, please let me know.  For details, see my class schedule right here on my blog, or on my Stampin' Up! website found Here.

If you would like to place an order, head on over to my Stampin' Up! website Here, and click on the "shop now" tab, or click on the 2017-18 catalog right here on my blog.                                                             

Teach us to number our days, so that we may present to You a heart of wisdom.  Psalm 90:12

Thank you for stopping by, and have a great day,
    ~Linda

Wednesday, November 8, 2017

Background Bits and Sorry for Everything
I offer six cards from which to choose at my monthly classes, and of those, I pick one that anyone attending can make for free.  This is the one I've chosen for my November 7, November 9, and November 11, 2017 Creative Therapy card classes, and it's super easy.

Recipe:
  • The base is an 8 1/2 x 5 1/2 piece of Early Espresso, scored at 4 1/4. 
  • The Pear Pizzazz layer is 5 1/4 x 4.
  • The small rectangle layer of Early Espresso is 3 1/2 x 2 7/8.
  • The Garden Green layer is 3 3/8 x 2 3/4, and the Very Vanilla layer is 3 1/4 x 2 5/8.
  • The flower stamp is colored with a Garden Green and Early Espresso marker, and the border across the bottom of the flower is stamped with Early Espresso.  
  • Three little pearls are added in the upper right corner of the Very Vanilla piece.
  • Don't forget to decorate your envelope. 
  • All done!!!
If you have any questions, please let me know. 

I hold adult classes each month.  If you live near my home at 555 Williamsdale Road, Graham, NC 27253, and would like to attend any of my classes, please let me know.  For details, see my class schedule right here on my blog, or on my Stampin' Up! website found Here.

If you would like to place an order, head on over to my Stampin' Up! website Here, and click on the "shop now" tab, or click on the 2017-18 catalog right here on my blog.  

God satisfies your desires with good things.  Psalm103:5

Thank you for stopping by, and have a great day,
    ~Linda

Sunday, November 5, 2017

Snowflake Sentiments & Swirly Snowflakes Thinlits Dies for my November 2017 Classes
I combined Sweet Sugarplum and Rich Razzleberry and ended up with this beautiful Christmas card.  I think, maybe it is the silver foil sheet behind the Shimmery White that makes this card pop.  Whatever it is, I am pleased as can be.  This is another one I am offering at all of my  November 7, November 9, and November 11, 2017 Creative Therapy card classes.      
Recipe:
  • The base is a 8 1/2 x 5 1/2  piece of Rich Razzleberry, scored at 4 1/4. 
  • The Silver Foil layer is 5 1/4 x 4.
  • The Shimmery White layer is 5 x 3 3/4.
  • The snowflakes are cut from Shimmery White card stock, and glued to the Sweet Sugarplum thinlits diecut with Tombow liquid glue.
  • The two snowflakes are stamped with Rich Razzleberry ink.
  • I stamped the words with Rich Razzleberry ink on Shimmery White and punched them out with the Everyday Label Punch.  I punched another one out of Rich Razzleberry, cut it in half, on the long side, and glued it to the back of the white piece. 
  • Don't forget to decorate your envelope.
  • All done!!!
If you have any questions, please let me know. 

I hold adult classes each month.  If you live near my home at 555 Williamsdale Road, Graham, NC 27253, and would like to attend any of my classes, please let me know.  For details, see my class schedule right here on my blog, or on my Stampin' Up! website found Here.

If you would like to place an order, head on over to my Stampin' Up! website Here, and click on the "shop now" tab, or click on the 2017-18 catalog right here on my blog.                                                             

This is the confidence we have in approaching God:  that if we ask anything according to his will, he hears us.  1 John 5:14

Thank you for stopping by, and have a great day,
    ~Linda

Friday, November 3, 2017

Merry Patterns and Happy Birthday Gorgeous

OK, so here's the deal--I know Merry Patterns is not available right now, (hope it gets carried over). I think the sketch is fun, and most any stamp that fits in the oval will work and you can still have an awesome birthday card.
I am offering these at all of my  November 7, November 9, and November 11, 2017 Creative Therapy card classes.      

Recipe:
  • The base is 8 1/2 x 5 1/2  piece of Pacific Point, scored at 4 1/4
  • Daffodil Delight layer is 5 1/4 x 4.
  • The Birthday Memories DSP is 5 x 3 3/4, 
  • The scalloped oval is cut with Pumpkin Pie.  
  • I candles are stamped with Tuxedo Black ink on Whisper White cardstock, and the colors on the candles are Pacific Point, Pumpkin pie, and Daffodil Delight.  The 1/4" Pacific Point ribbon is new in this years catalog, and coordinates so well with this card, don't you think?   A great deal at only $7.00 for 10 yards, and comes in three other colors. 
  • Don't forget to decorate your envelope.
  • All done!!!
If you have any questions, please let me know. 

I hold adult classes each month.  If you live near my home at 555 Williamsdale Road, Graham, NC 27253, and would like to attend any of my classes, please let me know.  For details, see my class schedule right here on my blog, or on my Stampin' Up! website found Here.

If you would like to place an order, head on over to my Stampin' Up! website Here, and click on the "shop now" tab, or click on the 2017-18 catalog right here on my blog.                                                             

Lord, tell me your ways.  Show me how to live. Guide me in your truth.  Psalm 25:4-5

Thank you for stopping by, and have a great day,
    ~Linda

Wednesday, November 1, 2017

Birthday Banners
I received the Classic Label punch as a gift from my sweet friend, Wendie Jamison, and knew it would make a fantastic piano card.  So, here it is. 
I liked the results so much, I decided to offer it at all of my  November 7, November 9, and November 11, 2017 Creative Therapy card classes.     

Recipe:
  • The base is 8 1/2 x 5 1/2  piece of Basic Black, scored at 4 1/4. 
  • The Gold Foil layer is 5 1/4 x 4.
  • The Basic Black layer (on which I glued my piano keys) is 5 x 3 3/4.
  • The Whisper White piano keys are 2 1/2 x 1/2, and I glued them directly to the 5 x 3 3/4 piece of Basic Black.  
  • The six black keys are punched with the Classic Label punch and adhered to the white keys with snail.
  • The Basic Black piece over the keys is 5 x 1 3/4 and glued to the keys with snail.
  • The words are from the stamp set, Birthday Banners, and embossed with Gold embossing powder.
  • The Real Red ribbon is the perfect accent, don't you think?  It is retired, however; any 1/2" or 5/8" ribbon will work.
  • Don't forget to decorate your envelope.
  • All done!!!
If you have any questions, please let me know. 

I hold adult classes each month.  If you live near my home at 555 Williamsdale Road, Graham, NC 27253, and would like to attend any of my classes, please let me know.  For details, see my class schedule right here on my blog, or on my Stampin' Up! website found Here.

If you would like to place an order, head on over to my Stampin' Up! website Here, and click on the "shop now" tab, or click on the 2017-18 catalog right here on my blog.  

Grace to you and peace from God our Father and the Lord Jesus Christ" Philippians 1:2

Thank you for stopping by, and have a great day,
    ~Linda