Friday, March 31, 2017

Falling Flowers stamp set and May Flowers Framelits Dies
I CASEd (Copy And Share Everything) this lovely card from Amy O'Neill's Blog, and you can see her card Here, post of August 21, 2016.  I do like to offer all-occasion cards at my classes, and this one is so perfect for that.
Please plan to attend my next set of Creative Paper Therapy classes on either April 4, April 6, and April 8, 2017, or come to all three to make this card. All the cutting has been done for you, just stamp and color, and glue.  What can be easier, right?  

Recipe:
  • The base is a 5 1/2 x 8 1/2 piece of Chocolate Chip scored at 4 1/4.  
  • Next the piece of Pool Party is 5 1/4 x 4.  I used the stamp from Falling Flowers and Pool Party ink to make my own background.
  • I used one of the Lots of Labels Framelits and Whisper White cardstock to cut the piece on which I stamped my words with Memento Tuxedo ink. Before I glued this to my Pool Party piece, I added 1/2 of a Delicate White Doily to the back of the label piece.
  • The flowers are stamped on Whisper White with Calypso Coral, Daffodil Delight and Peekaboo Peach ink, then colored with the coordinating markers.  The leaves are Garden Green card stock, and I used the May Flowers Framelits Dies to cut out all the flowers and leaves.
  • I put White Perfect Accents in the centers of the flowers. 
  • All done, and don't forget to decorate your envelope.
If you have any questions, please let me know. 

I hold adult classes each month.  If you live near my home at 555 Williamsdale Road, Graham, NC 27253, and would like to attend any of my classes, please let me know.  For details, see my class schedule right here on my blog, or on my Stampin' Up! website found Here.

If you would like to place an order, head on over to my Stampin' Up! website Here, and click on the "shop now" tab, or click on the 2016-17 catalog right here on my blog.  

This is the message we have heard from Him and declare to you:  God is light; in Him there is no darkness. I John 1:5

Thank you for stopping by, and have a great day,
    ~Linda

Wednesday, March 29, 2017

Easter Message and Copper Foil 
I combined a piece of Copper Foil and the beautiful Easter Message stamp set to make this card, and I am offering it at all of my Creative Paper Therapy classes on April 4, April 6, and April 8, 2017 Click on anyone of these dates to see additional information.

Recipe:
  • The base is a 5 1/2 x 8 1/2 piece of Elegant Eggplant, scored at 4 1/4.  
  • Next the piece of Wisteria Wonder is 5 1/4 x 4.
  • The Very Vanilla layer on which I made my own background is 5 x 3 3/4.
  • The foil piece is 3 1/2 x 2 1/4, and the Very Vanilla piece on which I stamped the cross is 3 3/8 x 2 1/8.
  • I stamped the background and cross in Crumb Cake ink, and the words in Elegant Eggplant.
  • I used a Crumb Cake marker to color the center of the cross, and punched a 1/4" circle from the Copper Foil and added it to the cross with a glue dot.
  • The burlap ribbon piece at the bottom of the cross is adhered with snail, and I colored a White Perfect Accent with a Sharpe.
  • All done, and don't forget to decorate your envelope.
If you have any questions, please let me know. 

I hold adult classes each month.  If you live near my home at 555 Williamsdale Road, Graham, NC 27253, and would like to attend any of my classes, please let me know.  For details, see my class schedule right here on my blog, or on my Stampin' Up! website found Here.

If you would like to place an order, head on over to my Stampin' Up! website Here, and click on the "shop now" tab, or click on the 2016-17 catalog right here on my blog. 

"Love the Lord your God with all your heart and with all your soul and with all your mind." Matthew 22:37

Thank you for stopping by, and have a great day,
    ~Linda

Sunday, March 26, 2017

Marquee Messages
Another fun card designed by Dorriea Murphy. She offered this beautiful card at our last Shoe Box Swap (SBS) on March 18, 2017, and I was so pleased to have had the pleasure of making it. This set of 16 photopolymer stamps has 10 word stamps, covering birthdays, invitations, thank you, and more.  It's a great bargain for just $21.00.
If you live near me in Graham, NC, and would like to participate in our next SBS to be held on May 20, 2017, please let me know. 

In addition to the bi-monthly Shoe Box Swaps in which I participate, I also hold Creative Paper Therapy classes each month.  My next set of classes is April 4, April 6, and April 8, 2017 Click on anyone of these dates to see additional information.

Recipe:
  • The base is a 5 1/2 x 8 1/2 piece of Emerald Envy scored at 4 1/4.  
  • Next the piece of Moroccan DSP is 5 x 3 1/2.
  • The Very Vanilla layer on which I stamped the focal point (with Emerald Envy ink) is 4 1/2 x 3 3/8.
  • I stamped my focal point image a second time on a scrap piece of Very Vanilla, (with Emerald Envy ink) to get the arrow, and cut it out with my paper snips. I used dimensionals to pop up this piece.
  • I colored the word "It's Your" with a Marina Mist marker, stamped the word "Birthday" in Delightful Dijon ink, and used Moroccan Designer Washi Tape across the bottom.
  • Added Basic Rhinestone Jewels to the end of my arrow.
  • All done, and don't forget to decorate your envelope.
If you have any questions, please let me know. 

I hold adult classes each month.  If you live near my home at 555 Williamsdale Road, Graham, NC 27253, and would like to attend any of my classes, please let me know.  For details, see my class schedule right here on my blog, or on my Stampin' Up! website found Here.

If you would like to place an order, head on over to my Stampin' Up! website Here, and click on the "shop now" tab, or click on the 2016-17 catalog right here on my blog.  

Blessed are the pure in heart, for they will see God.  Matthew 5:8

Thank you for stopping by, and have a great day,
    ~Linda

Thursday, March 23, 2017

Stylized Birthday and Bokeh Background Technique
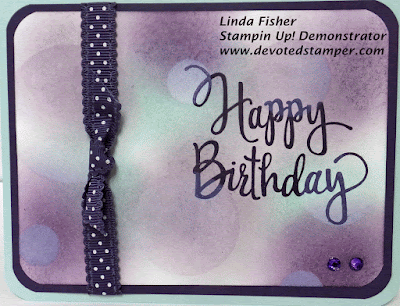
All of my wonderful ladies made this card as one of their two projects at our hostess club meeting this past Thursday, 3/23/17.  It is called the Bokeh Background Technique, and I was so excited to share.  
This month's hostess, Retha Fulp, and I worked on this card together, after we watched Dawn Griffith's video on her YouTube channel, and you can see her video Here.  
In addition to my monthly hostess club meetings, I also hold paper therapy classes each month.  My next set of classes are April 4, April 6, and April 8, 2017 Click on anyone of these dates to see additional information.

Recipe:
  • The base is a 5 1/2 x 8 1/2 piece of Soft Sky scored at 4 1/4.  
  • Next the Elegant Eggplant piece is 5 1/4 x 4.
  • The Whisper White layer is 5 x 3 3/4.
  • A Project Life corner rounder is used to round the corners.
  • Ink colors used are Elegant Eggplant, Perfect Plum, Soft Sky, and Craft Whisper White.
  • The ink for the words is Elegant Eggplant.
  • The ribbon is Elegant Eggplant Scallop Dots (retired), though, almost any dark ribbon will work.
  • All done, and don't forget to decorate your envelope.
If you have any questions, please let me know. 

I hold adult classes each month.  If you live near my home at 555 Williamsdale Road, Graham, NC 27253, and would like to attend any of my classes, please let me know.  For details, see my class schedule right here on my blog, or on my Stampin' Up! website found Here.

If you would like to place an order, head on over to my Stampin' Up! website Here, and click on the "shop now" tab, or click on the 2016-17 catalog right here on my blog.  .

Blessed are those who hunger and thirst for righteousness, for they will be filled. Matthew 5:6

Thank you for stopping by, and have a great day,
    ~Linda
Butterfly Basics, Rubber bands and Clear Blocks
I saw this technique on Tina Zinck's YouTube channel, and thought what a wonderful technique to share with my hostess club ladies. Everyone will be making this card when we meet tonight, 3/23/17, for our regular meeting, and you can see Tina's video Here.
In addition to my monthly hostess club meetings, I also hold Creative Paper Therapy classes each month.  My next set of classes are April 4, April 6, and April 8, 2017.  Click on anyone of these dates to see additional information.

Recipe:
  • The base is a 5 1/2 x 8 1/2 piece of Marina Mist scored at 4 1/4.  
  • Next the Wild Wasabi piece is 5 1/4 x 4.
  • The Whisper White layer is 5 x 3 3/4.
  • The markers used are Marina Mist, Wild Wasabi, and Early Espresso, and Black Archival ink pad.
  • The words are from the Designer Tee stamp set.
  • Don't forget to decorate your envelope.
If you have any questions, please let me know. 

I hold adult classes each month.  If you live near my home at 555 Williamsdale Road, Graham, NC 27253, and would like to attend any of my classes, please let me know.  For details, see my class schedule right here on my blog, or on my Stampin' Up! website found Here.

If you would like to place an order, head on over to my Stampin' Up! website Here, and click on the "shop now" tab, or click on the 2016-17 catalog right here on my blog.  

Blessed are the merciful, for they will be shown mercy. Matthew 5:7

Thank you for stopping by, and have a great day,
    ~Linda

Tuesday, March 21, 2017

Layering Love and Playful Palette DSP
This adorable card was made with the Playful Palette Designer Series Paper stack, and the Layering Love stamp set.  The stamp set has three other wonderful word stamps, "Live, laugh, love"; "enjoy the little things"; and "I am much more me when I'm with You". I could definitely use this set for seven different occasions.  (my criteria when purchasing a set, except for specific holidays).
I am excited because all of my ladies who will attending my April 4, April 6, and April 8, 2017, classes will have the opportunity to make this wonderful card.

Recipe:
  • The base is a 5 1/2 x 8 1/2 piece of Sweet Sugarplum scored at 4 1/4.  
  • Next the Very Vanilla piece is 5 1/4 x 4.
  • The Basic Black layer is 5 x 3 3/4.
  • The strip of Basic Black under the ribbon is 4 3/4 x 1.
  • The DSP is 4 3/4 x 1 1/2 and 4 3/4 x 2 1/4.
  • The Basic Black base for the words is 2 7/8 x 2 1/4.
  • I stamped the words with Basic Black Archival ink on a 2 3/4 x 2 1/8 piece of Very Vanilla.
  • The ribbon is Peekaboo Peach.
  • All done, and don't forget to decorate your envelope.
If you have any questions, please let me know. 

I hold adult classes each month.  If you live near my home at 555 Williamsdale Road, Graham, NC 27253, and would like to attend any of my classes, please let me know.  For details, see my class schedule right here on my blog, or on my Stampin' Up! website found Here.

If you would like to place an order, head on over to my Stampin' Up! website Here, and click on the "shop now" tab, or click on the 2016-17 catalog right here on my blog.  

A cheerful heart is good medicine, but a broken spirit dries up the bones. Proverbs 17:22

Thank you for stopping by, and have a great day,
    ~Linda
Sunday, March 19, 2017

One Big Meaning, Detailed Floral Thinlits Dies, and 
 Affectionaly Yours Speciality DSP
This card was so easy to make, because combining the Detailed Floral Thinlits with any color card stock, and coordinating DSP works great.  Then add your choice of words, and it ends up an "anything you want it to be card", don't you think?
Great news, purchase the thinlits, and card stock, and you have just earned a free item from the Sale-a-Bration catalog.  See my link below to place an order.  

Recipe:
  • The base is a 4 1/4 x 11 piece of Tip Top Taupe, scored at 5 1/2.  
  • Next the Watermelon Wonder piece is 5 3/8 x 4 1/8.
  • The DSP piece is 4 x 4.    
  • I cut the floral thinlit from a 5 x 4 piece of Very Vanilla, positioning the die about 1" from the top of the card stock. 
  • The pieces for the words are: 
    • Tip Top Taupe: 3 1/8 x 1 1/4
    • Watermelon Wonder: 3 x 1 1/8
    • Very Vanilla:  2 7/8 x 1
  • The ribbon is some retired Watermelon Wonder striped satin ribbon I have lying around, and the words are stamped Tip Top Taupe ink.
  • All done.
If you have any questions, please let me know. 

I hold adult classes each month.  If you live near my home at 555 Williamsdale Road, Graham, NC 27253, and would like to attend any of my classes, please let me know.  For details, see my class schedule right here on my blog, or on my Stampin' Up! website found Here.

If you would like to place an order, head on over to my Stampin' Up! website Here, and click on the "shop now" tab, or click on the 2016-17 catalog right here on my blog.  

Faith comes from hearing the message, and the message is heard through the word about Christ. Romans 10:17 

Thank you for stopping by, and have a great day,
    ~Linda

Thursday, March 16, 2017

Carousel Birthday & Bermuda Bay Glimmer Paper
I combined the Carousel Birthday Stamp set, the coordinating designer series paper stack, and the Free glimmer paper I received from Stampin' Up! for placing a $50.00 order, to make a combination card, you know, a little of this, and a little of that.  
If you would like to purchase some of the products to make this card, please see my link below to place an order.  

Recipe:
  • The base is a 5 1/2 x 8 1/2 piece of Bermuda Bay, scored at 4 1/4.  
  • Next the piece of So Saffron is 5 3/8 x 4 1/8.
  • The Early Espresso piece is 5 1/4 x 4.    
  • I used the big top stamp from the set and Bermuda Bay ink and stamped directly on the 5 1/8 x 3 7/8 piece of Cupcakes & Carousel DSP.  I also used a birthday stamp from Confetti Celebration and Early Espresso ink to stamp the sentiment on the DSP.
  • The Bermuda Bay glimmer paper is 4 7/8 x 1 3/4, and it is glued to a 5 x 1 7/8 piece of Early Espresso.
  • The horse is stamped on a 2 1/4 x 2 1/4 piece of Very Vanilla with Early Espresso ink.  I colored it with my Watercolor pencils and my blender pen.  I mounted this to a piece of Early Espresso card stock that I cut out with the Layering Squares Framelits and my Big Shot. 
  • The added a bow made with the 1/8" stitched Bermuda Bay ribbon.  I also added a Bermuda Bay sequin and a Rhinestone Basic Jewel that I colored with a Sharpie, to the top of the pole. 
  • All done.
If you have any questions, please let me know. 

I hold adult classes each month.  If you live near my home at 555 Williamsdale Road, Graham, NC 27253, and would like to attend any of my classes, please let me know.  For details, see my class schedule right here on my blog, or on my Stampin' Up! website found Here.

If you would like to place an order, head on over to my Stampin' Up! website Here, and click on the "shop now" tab, or click on the 2016-17 catalog right here on my blog.  

Out of the heart, the mouth speaks.  Luke 6:45 

Thank you for stopping by, and have a great day,
    ~Linda

Tuesday, March 14, 2017

Carousel Birthday, Up & Away Thinlits Dies, and 
Carried Away DSP
The Carousel Birthday stamp set in the 2017 Occasions Mini is just adorable.  Not only does it have a Ferris wheel, it has a stamp of a circus tent, carousel horse, and two cute word stamps.  I count this set as a keeper, both for my grandchildren's birthdays, and my adult friends as well, because, let's face it, we are all kids at heart, aren't we?  
I CASEd (Copy And Share Everything) this card from Robyn Cardon's blog, My Pink Stamper, and you can see her YouTube video Here.

Recipe:
  • The base is a 4 1/4 x 11 piece of Peekaboo Peach scored at 5 1/2.  
  • Next the Watermelon Wonder piece is 5 1/4 x 4.  I stamped the greeting with Early Espresso Ink.
  • The Ferris Wheel is stamped onto a 3 x 3 1/2 piece of Crumb Cake with Early Espresso ink, and cut out with the largest circle from the Stitched Framelits dies. I used my Big Shot to cut out six toppers for the cupcakes with Dazzling Diamonds Glimmer paper and the small cloud die from the Up & Away Thinlits Dies.  I applied these with Mini Glue Dots.  I used one of the 2016-18 In-Color Enamel Shapes for center.
  • I stamped a 4 x 2 piece of DSP with the bottom part of the Ferris Wheel and glued it directly on the Watermelon Wonder piece with snail.
  • Once I had glued all of my cupcake toppers to the wheel, I used three dimensionals, and glued it to the card base careful to line up the circle with the stamped image on my DSP.
  • All done.
If you have any questions, please let me know. 

I hold adult classes each month.  If you live near my home at 555 Williamsdale Road, Graham, NC 27253, and would like to attend any of my classes, please let me know.  For details, see my class schedule right here on my blog, or on my Stampin' Up! website found Here.

If you would like to place an order, head on over to my Stampin' Up! website Here, and click on the "shop now" tab, or click on the 2016-17 catalog right here on my blog.
  
Consider the blameless, observe the upright; a future awaits those who seek peace. Psalm 37:37

Thank you for stopping by, and have a great day,
    ~Linda

Friday, March 10, 2017

Inside the Lines and Detailed DragonFly Thinlits Dies
I received this designer series paper (dsp) from Stampin' Up! when I placed an order for $50.00.  Wasn't quite sure I would like it, but let me say, it is Wonderful, with a capital W.  Yes, it is!!! 
Sponging is just one option.  You can brayer this paper, color it with your markers, or coloring pencils and a blender pen, and more.  So much to do, so little time!!
I am excited for all of my ladies who will attending my March 7, March 9, and March 11, 2017 classes, because they will have the opportunity to make this card.

Recipe:
  • The base is a 5 1/2 x 8 1/2 piece of Basic Black scored at 4 1/4.  
  • Next the Pacific Point piece is 5 1/4 x 4.
  • The Inside the Lines dsp layer is 3 5/8 x 2 7/8.  I sponged the flowers with Daffodil Delight, Old Olive, and Pacific Point ink.  I layered this onto a 3 7/8 x 3 piece of Basic Black, and layered this combination onto a 4 x 3 1/8 piece of Old Olive.
  • I cut a dragonfly with Basic Black card stock using the Detailed Dragonfly Thinlits Dies and the Big Shot.
  • I used a Fine Tip Glue Pen to put the dragonfly on my card, and added a few pearls.   
  • The words are from One Big Meaning, stamped with Basic Black Archival Ink.
  • I stamped a bumble bee from the Dragonfly Dreams stamp set on the inside of my card.
  • Easy, and elegant.
If you have any questions, please let me know. 

I hold adult classes each month.  If you live near my home at 555 Williamsdale Road, Graham, NC 27253, and would like to attend any of my classes, please let me know.  For details, see my class schedule right here on my blog, or on my Stampin' Up! website found Here.

If you would like to place an order, head on over to my Stampin' Up! website Here, and click on the "shop now" tab, or click on the 2016-17 catalog right here on my blog.  

Strength is letting go when you want to hold on.  Courage is moving forward when you fear what's ahead.  Wisdom is listening when you want to be heard.  Phyllis Arnett 

Thank you for stopping by, and have a great day,
    ~Linda

Monday, March 6, 2017


Come One, Come All, to my 
March 2017 Paper Therapy 
and Card-Making classes

Please join me and have fun, relax and fellowship with others who have the same interest, by coming to one of my classes to made beautiful greeting cards.

I design and prepare kits for five/six different cards, and you decide which ones you would like to make.  It's that easy.  I supply everything, just bring yourself, and get set to have fun.

My classes are for men and women of all ages who enjoy crafting. This class will teach you how to create beautiful hand crafted greeting cards with personal instruction, guidance and inspiration. You’ll have access to all the latest card making tools, embellishments and supplies. The joy of giving is priceless.

Schedule is as follows:
TUESDAY, the 7th, from 9:30 a.m. to 12:00 p.m.. and again on
THURSDAY, the 9th, from 6:00 p.m. to 9:00 p.m. and again on
SATURDAY, the 11th,  9:30 a.m. to 12:00 p.m

The cost of the class is just: $2.50 per card, no additional class fee, and the fun and fellowship is free.  

All classes are held in my home at:  555 Williamsdale Road, Graham, NC 27253.

An RSVP at your earliest convenience is greatly appreciated either by email or phone. Phone is: 336-538-4996 , text, 336-260-2173, or email: angelsofjoy@gmail.com  or directly from my Stampin' Up! website at:  www.lindafisher.stampinup.net


Instruction does much, and Encouragement everything. Johann Wolfgang Von Goethe

Thank you for stopping by, and have a great day,

~Linda

Friday, March 3, 2017

Snow Place Penguin for St. Patty's Day
Look at how much fun this little penguin is having with his pot of gold.  This cutie is a joint effort between my wonderful assistant, Michelle Wallace and myself.  
I am excited for all of my ladies who will attending my March 7, March 9, and March 11, 2017 classes, because they will have the opportunity to make one of these.

Recipe:
  • The base is a 5 1/2 x 8 1/2 piece of Cucumber Crush scored at 4 1/4.  
  • Next the Basic Black piece is 5 1/4 x 4.
  • The Whisper White layer is 5 x 2 3/4.
  • Card Front:
    • The Basic Black circle is a 2" circle punch, and I cut off the top to make a straight edge.  I used this straight edge piece to make the feet of the cauldron. 
    • I cut a 2 3/8 x 1/2 piece of card stock, and corner rounded the edges for the top of the cauldron.  
    • The gold coins are from a 1/2" circle punch and gold foil paper.  
    • The clover is made with the heart die from the Gift Card Envelope & Trims Thinlits. and the stem is hand cut.  
    • Mr. Penguin's hat is stamped with Cucumber Crush ink, his body with basic black ink, both on Whisper White card stock. I cut a small piece of black glimmer paper to glue on his hat. 
    • The happy is cut from the Hello You Thinlits dies with gold foil paper, and applied to the card with a Fine Tip Glue Pen.  
    • The words are from Teeny Tiny Wishes and stamped using a Basic Black Archival Stampin' Pad on a scrap piece of Whisper White card stock and hand cut.
If you have any questions, please let me know. 

I hold adult classes each month.  If you live near my home at 555 Williamsdale Road, Graham, NC 27253, and would like to attend any of my classes, please let me know.  For details, see my class schedule right here on my blog, or on my Stampin' Up! website found Here.

If you would like to place an order, head on over to my Stampin' Up! website Here, and click on the "shop now" tab, or click on the 2016-17 catalog right here on my blog.  

God is my strength and my power:  He makes my way perfect.  2 Samuel. 22:33

Thank you for stopping by, and have a great day,
    ~Linda

Wednesday, March 1, 2017

Balloon Adventures
The front of the cards.
The inside of the cards.
The back of the card.
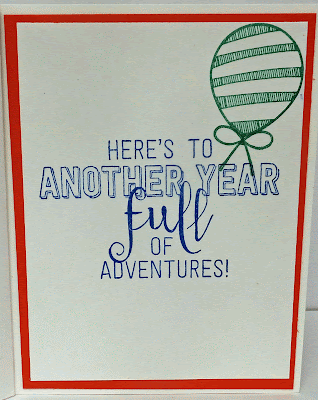
I used the Balloon Adventures Suite to make this fun Double Pocket Fold Card, and all of my hostess club ladies made one as well.  
Inside the double pockets is a book mark and a card on which to write a little message.  
If you would like to make one like this, just search YouTube for a Stampin' Up! Double Pocket Fold card. 

If you have any questions, please let me know. 

I hold adult classes each month.  If you live near my home at 555 Williamsdale Road, Graham, NC 27253, and would like to attend any of my classes, please let me know.  For details, see my class schedule right here on my blog, or on my Stampin' Up! website found Here.

If you would like to place an order, head on over to my Stampin' Up! website Here, and click on the "shop now" tab, or click on the 2016-17 catalog right here on my blog.  

Be Strong, Be Brave, Be Fearless.  You are never alone.  Joshua 1:9


Thank you for stopping by, and have a great day,
~Linda