Tuesday, September 29, 2020

 Peaceful Nativity


I sure wish I could take credit for this card, cannot, though I had to make one of my own, and it was so much fun.  I saw this card on Tina Shaw's August 25, 2020 video on YouTube Here.

Recipe:
  • The base is an 8 1/2 x 5 1/2 piece of Crumb Cake, scored at 4 1/4.
  • The Misty Moonlight is layer is 5 1/4 x 3 and sponged with Misty Moonlight ink. 
  • The next 5 x 2 1/4 Crumb Cake is also cut out with a Nativity Die and sponged with Soft Suede ink.
  • The palm trees, and crèche are cut out with Soft Suede and sponged with Soft Suede ink.
  • Joseph, Mary, baby Jesus, the donkey, lamb and the front of the crèche are stamped with Soft Suede ink on Crumb Cake card stock and sponged with Soft Suede ink.
  • The word Rejoice is stamped with Misty Moonlight ink on Whisper White, and cut out with the Nativity dies.
  • The star is cut out with Whisper White, a Nativity Dies, and brushed with Wink of Stella.
  • Don't forget to decorate your envelope.
  • All done!!!
Should you want to order any of the supplies I used to make these cards, please just click Right Here to place your order in my on-line store, or you can click on the 2020-21 catalog right here on my blog. 
I hold monthly adult card-making classes in my home at 555 Williamsdale Road, Graham, NC 27253, and if you would like to attend, please let me know.
For details, see my class schedule right here on my blog or on my Stampin' Up! website, found Here.
Thank you for stopping by, and have a great day,
    ~Linda

Sunday, September 27, 2020

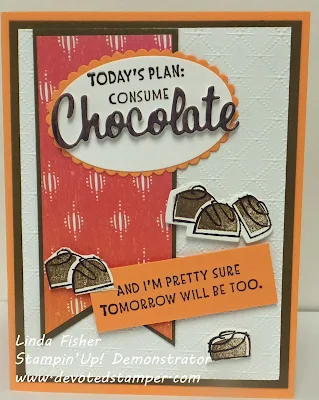
         Nothing's Better Than

This is the card I designed for my bi-monthly card swap for our last Hostess Club Meeting.  Nothing's Better Than is a fun stamp set, for sure.

Recipe:

  • The base is an 8 1/2 x 5 1/2 piece of Mango Melody, scored at 4 1/4.
  • The Soft Suede layer is 5 1/4 x 4.
  • The Whisper White is 5 x 3 3/4 and is embossed with the Dainty Folder.
  • The 2 x 4 1/2 piece of Soft Suede is the base for the 1 7/8 x 4 1/4 piece of Artistry Blooms, and both pieces are punched with the Triple Banner Punch (to make the flags on the bottom of both pieces).
  • The Mango Melody Layering Scalloped Oval is the base for the Whisper White oval.  The words are stamped with Early Espresso ink.
  • The word Chocolate is cut out with some In Good Taste DSP, and Foam Adhesive Sheets.
  • The chocolate candy is stamped with Early Espresso ink for the outline, and Soft Suede ink for the solid part on white, and cut out with the Love You More Than Dies.
  • The 7/8 x 2 5/8 piece of Mango Melody is stamped with Early Espresso ink.
  • All done, and don't forget to decorate your envelope.
Should you want to order any of the supplies I used to make this card, I would be honored to be chosen as your demonstrator.  Click Here to place your order in my on-line store.  Or, you can click on the 2020-21 catalog right here on my blog. 
I truly appreciate your support.  Please do not hesitate to contact me with any questions you may have, as I am here to help you. 
I hold adult classes in my home at 555 Williamsdale Road, Graham, NC 27253.  If you would like to attend, please let me know.  For details, see my class schedule right here on my blog, or on my Stampin' Up! website, found  Here.
Thank you for stopping by, and have a great day,
    ~Linda

Friday, September 25, 2020

 Forever Fern & 
Forever Gold Laser-Cut Specialty Paper
The Forever Gold Laser-Cut specialty paper is absolutely beautiful.  There are 6 sheets: 3 each of 2 single sided designs.  One side is gold and the other is white.  They are precut card fronts and greenery accents to create a card quickly, or to easily accent your cards and projects.

Recipe:
  • The base is an 8 1/2 x 5 1/2  piece of Thick Very Vanilla, scored at 4 1/4.
  • The next Gold Foil layer is 5 1/4 x 4. 
  • The Blushing Bride layer is 5 x 3 3/4.
  • The next is a Forever Gold Laser Cut layer.
  • The words, from Forever Fern, are stamped with Blushing Bride ink on a piece of Very Vanilla that has been cut out with a Stitched Rectangle Die.  (Before I adhered this piece to the card with dimensionals, I wrapped some Wonder of the Season gold cord around the piece twice.)
  • Don't forget to decorate your envelope.
  • All done!!!  
Should you want to order or any of the supplies I used to make this card, please just click Right Here to place your order in my on-line store. Or, you can click on the 2020-21 catalog right here on my blog.
I truly appreciate your support.  Please do not hesitate to contact me with any questions you may have, as I am here to help you.

I hold adult classes in my home at 555 Williamsdale Road, Graham, NC 27253, and if you would like to attend, please let me know.  For details, see my class schedule right here on my blog, or on my Stampin' Up! website found Here.

Thank you for stopping by, and have a great day,
    ~Linda

Wednesday, September 23, 2020

 Path of Petals for my October, 2020 Creative Therapy Card Classes

A super easy card that everyone will have the opportunity to make at my October 6th and 10th, 2020 Creative Therapy classes.  

Everything will be cut out for you, just design as you like, because we are all creative in our own way.  Then adhere everything together, and there you have it.  Done!!

Recipe:
  • The base is an 8 1/2 x 5 1/2 piece of Terracotta Tile, scored at 4 1/4.
  • The Crumb Cake layer is 5 1/4 x 4. 
  • The Old Olive layer is 5 x 3 3/4, and is stamped with Old Olive ink.
  • The Crushed Curry and Whisper White pieces are cut out with the Stitched Nested Dies.
  • The words are stamped with Early Espresso ink, and the leaves & flowers are stamped with Old Olive, Crushed Curry, and Terracotta Tile inks.
  • Three Gilded Gems are added once all the stamping is done.
  • Don't forget to decorate your envelope.
  • All done!!!  
Should you want to order or any of the supplies I used to make this card, please just click Right Here to place your order in my on-line store. Or, you can click on the 2020-21 catalog right here on my blog.
I truly appreciate your support.  Please do not hesitate to contact me with any questions you may have, as I am here to help you.

I hold adult classes in my home at 555 Williamsdale Road, Graham, NC 27253, and if you would like to attend, please let me know.  For details, see my class schedule right here on my blog, or on my Stampin' Up! website found Here.
Thank you for stopping by, and have a great day,
    ~Linda

Saturday, September 19, 2020

 Rustic Retreat

A quick and easy card created with several Stampin' Up! products.  The sketch came from my very creative friend, Retha. 

Recipe: (building from base)
  • The base is an 8 1/2 x 5 1/2 piece of Shaded Spruce, scored at 4 1/4.
  • The Green Foil layer is 5 1/4 x 4. 
  • The Mint Macaron layer is 5 x 3 3/4, and is embossed with the Winter Snow folder.
  • The 3 Green Foil & the 2 Toile Tidings DSP pieces are punched with the Rectangle Postage Punch.  
  • The Very Vanilla is stamped with Shaded Spruce ink, the Rustic Retreat stamp set, and punched with the Rectangle Postage Punch.
  • Five gems from Flowers for Every Season are added.
  • All done and remember to decorate your envelope.
Should you want to purchase any of the supplies I used to make this card, I would be honored if you chose me as your demonstrator, and placed your order in my on-line store, HERE. Or, you can click on the 2020-21 catalog right here on my blog.
I hold adult classes in my home at 555 Williamsdale Road, Graham, NC 27253, and if you would like to attend, please let me know.  For details, see my class schedule right here on my blog, or HERE on my Stampin' Up! website.
Thank you for stopping by, and have a great day,
    ~Linda

    Thursday, September 17, 2020

      So Much Happy Bundle for my October, 2020 Creative Therapy Card Classes

    I am excited to offer this fun "Happy" card at my October Creative Therapy classes.  
    This card is not hard at all.   Cut out the happy with the dies, and sponge the card to make your own clouds.  
    I saw this card on Cindy Brambaugh's blog, Cindyleebeedesigns.com, and you can see her card Here, post of 8/12/2020.  

    Recipe:
    • The base is an 11 x 4 1/4 piece of Poppy Parade scored at 5 1/2.
    • The Balmy Blue layer is 5 1/4 x 4. 
    • The Thick Whisper White is 5 x 3 3/4, and the happy is cut out 1 1/4" from the bottom.
    • I used an oversized post-it note, one of the Happy Dies, and cut out a template to make clouds, using a sponge and Balmy Blue ink.
    • The larger balloon and the "so very" is stamped with Granny Apple Green, and the smaller balloon, and second set of words is stamped with Poppy Parade.  Both are cut out with the Happy Dies.
    • I used the Foam Adhesive Strips to pop up the entire white card front.  Made it so easy.
    • The balloons are attached with dimensionals.
    • The balloon tails are attached with Multipurpose Liquid Glue.
    • Don't forget to decorate your envelope.
    • All done!!!  
    Should you want to order or any of the supplies I used to make this card, please just click Right Here to place your order in my on-line store. Or, you can click on the 2020-21 catalog right here on my blog.
    I truly appreciate your support.  Please do not hesitate to contact me with any questions you may have, as I am here to help you.

    I hold adult classes in my home at 555 Williamsdale Road, Graham, NC 27253, and if you would like to attend, please let me know.  For details, see my class schedule right here on my blog, or on my Stampin' Up! website found Here.
    Thank you for stopping by, and have a great day,
      ~Linda

    Tuesday, September 15, 2020

    Poinsettia Petals &
    Dove of Hope
    I have been playing around with some of my new goodies, and wanted to share my latest creation.
    I used some of the new Red Velvet paper, Green Foil, and more. 

    Recipe: (building from base)
    • The base is an 8 1/2 x 5 1/2 piece of Real Red, scored at 4 1/4.
    • The Silver Foil layer is 5 1/4 x 4.
    • The Garden Green layer is 5 x 3 3/4 and is embossed with the Greenery Embossing Folder.
    • The 3 x 3 square of 'Tis the Season DSP, is cut at a diagonal from corner to corner.
    • The Green Foil and the Red Velvet poinsettia are cut out with the Poinsettia Dies.
    • A Beaded Pearl is added to the center of the Poinsettia.  These pearls are beautiful.  Really, they are.
    • The words from Dove of Hope are stamped on a 3 x 5/8 piece of Whisper White with Mossy Meadow ink, and the edges are sponged with the same ink.
    • All done and remember to decorate your envelope.
    Should you want to purchase any of the supplies I used to make this card, I would be honored if you chose me as your demonstrator, and placed your order in my on-line store, HERE. Or, you can click on the 2020-21 catalog right here on my blog.
    I hold adult classes in my home at 555 Williamsdale Road, Graham, NC 27253, and if you would like to attend, please let me know.  For details, see my class schedule right here on my blog, or HERE on my Stampin' Up! website.
    Thank you for stopping by, and have a great day,
      ~Linda

      Sunday, September 13, 2020

      Flight of Fancy, 
      Dove of Hope & Snowflake Splendor DSP
      The Flight of Fancy stamp set is new in the 2020-21 Holiday Mini by Stampin' Up!  So cute.  

      Recipe: (building from base)
      • The base is an 8 1/2 x 5 1/2 piece of Balmy Blue, scored at 4 1/4.
      • The Highland Heather layer is 5 1/4 x 4.
      • The Snowflake Splendor DSP is 5 x 3 3/4.
      • The Night of Navy is 3 5/8 x 2 1/2 and is cut out with the Stitched So Sweetly Dies.
      • The Shimmery White, on which my image is stamped with Tuxedo Memento Black ink is 3 1/4 x 2 1/8.  The little angel is colored with Stampin' Blends.
      • The words (from Dove of Hope), and the snowflakes (from Snowflake Wishes), are stamped with Versamark, and heat embossed with Silver embossing powder.
      • All done and remember to decorate your envelope.
      Should you want to purchase any of the supplies I used to make this card, I would be honored if you chose me as your demonstrator, and placed your order in my on-line store, HERE. Or, you can click on the 2020-21 catalog right here on my blog.
      I hold adult classes in my home at 555 Williamsdale Road, Graham, NC 27253, and if you would like to attend, please let me know.  For details, see my class schedule right here on my blog, or HERE on my Stampin' Up! website.
      Thank you for stopping by, and have a great day,
        ~Linda

        Friday, September 11, 2020

        Ridiculously Awesome
        This card focuses on the stamp set, Ridiculously Awesome, and the Basic Pattern Decorative Masks.  My sweet friend, Wendie, created this card, and I think this color combination is very pretty.
        This is a similar technique I used to make the cards on my post of 8/21/2020.

        Recipe: (building from base)
        • The base is an 8 1/2 x 5 1/2 piece of Balmy Blue, scored at 4 1/4.
        • The Basic Gray layer is 5 1/4 x 4.
        • The Whisper White layer is 5 x 3 3/4.
        • Wendie laid one of the Basic Pattern masks on the cardstock, and sponged the cardstock with Balmy Blue.  Beautiful effect. 
        • The Stitched So Sweetly Dies are used to cut out the Basic Gray and the Whisper White pieces on which the words are stamped with Tuxedo Memento Black ink.
        • These two pieces are popped up with dimensionals.
        • The three beautiful gems are from the Blue Adhesive-Backed Gems pack. (page 37 of the 2020 Holiday mini).
        • All done and remember to decorate your envelope.
        Should you want to purchase any of the supplies I used to make this card, I would be honored if you chose me as your demonstrator, and placed your order in my on-line store, HERE. Or, you can click on the 2020-21 catalog right here on my blog.
        I hold adult classes in my home at 555 Williamsdale Road, Graham, NC 27253, and if you would like to attend, please let me know.  For details, see my class schedule right here on my blog, or HERE on my Stampin' Up! website.
        Thank you for stopping by, and have a great day,
          ~Linda

          Wednesday, September 9, 2020

          Hallows Night Magic & Life is Beautiful
          I CASEd (Copy And Share Everything) this card from a fellow stamper, Tina Wardell.  It was an interesting process, and fun.
          To see Tina's card, please visit her blog, Tinascraftyinkspot.com, Here, post of August 24, 2020.

          Recipe: (building from base)
          • The base is an 8 1/2 x 5 1/2 piece of Bumble Bee, scored at 4 1/4.
          • The Cajun Craze layer is 5 1/4 x 4. 
          • The Magic in this Night DSP is 5 x 3 3/4.
          • The Black Glitter paper is 4 1/8 x 3 1/8.
          • The Basic Black is 4 x 3.  
          • The So Saffron is 3 7/8 x 2 7/8.  I added the smallest circle from the Layering Circle Dies, to make a moon, then began sponging. It is first sponged with Pumpkin Pie ink, and next with Tuxedo Black Memento ink.
          • The Life is Beautiful tree and words from Hallow Nights Magic are stamped with Tuxedo Black Memento ink.
          • Two of the bats are cut out with Black Glimmer paper, and one is Basic Black cardstock, using the Halloween Magic Dies.
          • All done and remember to decorate your envelope.
          Should you want to purchase any of the supplies I used to make this card, I would be honored if you chose me as your demonstrator, and placed your order in my on-line store, HERE. Or, you can click on the 2020-21 catalog right here on my blog.
          I hold adult classes in my home at 555 Williamsdale Road, Graham, NC 27253, and if you would like to attend, please let me know.  For details, see my class schedule right here on my blog, or HERE on my Stampin' Up! website.
          Thank you for stopping by, and have a great day,
            ~Linda