Sunday, February 27, 2022

Seas the Day and
Gentle Waves for my
March 2022 Classes

I am excited to offer this fun card at both of my March 8th and March 12th, 2022, classes.  Registration is open to February 28, 2022, and I have a couple of openings for both days.  For more details and to register see HERE.

Recipe:
  • The base is an 8 1/2 x 5 1/2 piece of Gorgeous Grape, scored at 4 1/4.
  • The Basic White layer is 5 x 3 3/4 and stamped with the Gentle Waves stamp and Pool Party ink.
  • The 5 1/4 x 4 Balmy Blue layer is cut out with one of the Sea Dies and added to the Gentle Waves layer with Dimensionals.
  • The octopus is stamped with Gorgeous Grape ink and the fish is stamped with Calypso Coral ink, both on Basic White, and cut out with the Sea Dies.  Both of these pieces are added to the card with dimensionals.  
  • The fishes' bubbles are added with Tuxedo Memento Black ink.
  • The words are stamped on a 2 1/4 x 1 1/4 piece of Basic White with Tuxedo Memento Black ink and sponged with Pool Party ink.  I cut the flag with my handy-dandy SU Paper Snip Scissors and popped this piece up with dimensionals.  
  • All done! Remember to decorate envelope!!
Should you want to order any of the supplies I used to make this card, please just click Right Here to place your in my on-line store, or you can click on the 2021-22 catalog right here on my blog.
I hold monthly adult card-making classes in my home at 555 Williamsdale Road, Graham, NC 27253, and if you would like to attend, please let me know.
For details, see my class schedule right here on my blog or on my Stampin' Up! website, found Here.
Thank you for stopping by and have a great day.
~Linda
<

Friday, February 25, 2022

Tulip Fields Bundle &
Eden's Garden

http://
Playing with the Tulip Fields Bundle is easier than I thought, and combining the stamp set with the Flowering Fields Designer Series Paper is so much fun.  

Recipe:
  • The base is an 8 1/2 x 5 1/2 piece of Sahara Sand, scored at 4 1/4.
  • The 5 1/4 x 4 Calypso Coral layer is cut out with a Rectangle Stitched Die. 
  • I cut the Basic White layer at 5 x 3 1/2 and used a Sponge Dauber and Daffodil Delight ink to make a sun.
  • Then I layered a 3 1/2 x 2 1/2 piece of the Flowering Fields DSP to the white.
  • On a scrap of Basic White, I stamped the windmill with Early Espresso, colored it with Crumb Cake Blends and cut it out with one of the Windmill Fields Dies.  I adhered the windmill with dimensionals to the Basic White layer, just above the DSP.
  • I cut out the fence pieces with another one of the Windmill Fields Dies and Crumb Cake Cardstock and adhered the fence pieces where I thought looked best. 
  • To adhere the fence pieces, I put some liquid glue on a Silicone Craft Sheet and used a dauber or sponge to "spread" the glue, then dabbed the fence pieces gently in the glue.
  • I then used a Rectangle Stitched Die to trim the completed piece, so my finished layer is 4 3/4 x 3 3/8.
  • I cut out the bicycle with Early Espresso cardstock and one of the Windmill Fields Dies and added the bicycle in the same manner as the fence pieces.
  • I stamped the words from Eden's Garden with Early Espresso ink on Basic White and cut them out with a Potted Succulent die and adhered to the card with Mini-Dimensionals.
  • All done!!  Now, how easy is that.  And remember to decorate your envelope.
Should you want to order any of the supplies I used to make this card, please just click Right Here to place your in my on-line store, or you can click on the 2021-22 catalog right here on my blog.
I hold monthly adult card-making classes in my home at 555 Williamsdale Road, Graham, NC 27253.  My next set of classes are March 8 and 12, 2022 and if you would like to attend, see my class schedule right here on my blog or on my Stampin' Up! website, found Here.
Thank you for stopping by and have a great day.
~Linda

Wednesday, February 23, 2022

 Natural Textures and 
Peaceful Moments

Lots of heat embossing for a wedding card.

Recipe:
  • The base is an 8 1/2 x 5 1/2 piece of Blushing Bride, scored at 4 1/4.
  • The Gold Foil layer is 5 1/4 x 4.
  • The 4 Blushing Bride rectangles are cut to the following dimensions and heat embossed with Metallic Gold Embossing Powder:
    • 2 1/2 x 2
    • 2 3/8 x 2
    • 2 x 1 3/4
    • 2 3/4 x 1 3/4
  • The 4 x 1 1/2 piece of Very Vanilla is heat embossed with Gold Embossing Powder and the words from Peaceful Moments and the flags are cut with my handy-dandy Paper Snip Scissors. I used Stampin' Dimensionals to pop up this piece.
  • I added some Basic Pearls to the Very Vanilla piece.
  • All done!!  And remember to decorate your envelope.
Should you want to order any of the supplies I used to make this card, please just click Right Here to place your in my on-line store, or you can click on the 2021-22 catalog right here on my blog.
I hold monthly adult card-making classes in my home at 555 Williamsdale Road, Graham, NC 27253.  My next set of classes are March 8 and 12, 2022 and if you would like to attend, see my class schedule right here on my blog or on my Stampin' Up! website, found Here.
Thank you for stopping by and have a great day.
~Linda

Monday, February 21, 2022

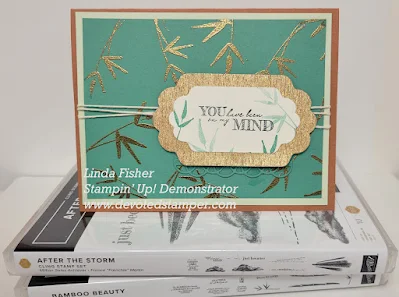
 Bamboo Beauty &
After the Storm

I CASEd (Copy And Share Everything) this card from Stampin' Up's 2021-22 Annual Catalog.  So easy when the Concept Designers from Stampin' Up! do all the work.    

Recipe:
  • The base is an 8 1/2 x 5 1/2 piece of Cinnamon Cider, scored at 4 1/4.
  • The Soft Sea Foam layer is 5 1/4 x 4.
  • The Just Jade layer is 5 x 3 3/4 and is embossed with the leaves from Bamboo Beauty with Metallic Gold Embossing Powder.
  • Next, I wrapped some Very Vanilla Bakers Twine around the embossed Just Jade and the Soft Sea Foam layers and adhered these layers to the Cinnamon Cider base.
  • I cut out the Gold & Rose Gold Paper with one of the Seasonal Labels Dies.
  • The Basic White, on which my words are stamped with Tuxedo Memento Black ink is also cut out with a Seasonal Labels Die and I glued this to the Gold and Rose Gold cut out.
  • I added a Painted Label Die with Just Jade cardstock by adhering it under the Gold Seasonal Label Die.
  • I added the label combo with dimensionals, being careful to put the dimensionals only on the top and bottom of the die cuts, so not to cover the baker's twine.
  • All done!!  Now, how easy is that.  And remember to decorate your envelope.
Should you want to order any of the supplies I used to make this card, please just click Right Here to place your in my on-line store, or you can click on the 2021-22 catalog right here on my blog.
I hold monthly adult card-making classes in my home at 555 Williamsdale Road, Graham, NC 27253.  My next set of classes are March 8 and 12, 2022 and if you would like to attend, see my class schedule right here on my blog or on my Stampin' Up! website, found Here.
Thank you for stopping by and have a great day.
~Linda

Saturday, February 19, 2022

Calming Camellia, Scalloped Contour Dies & the whitewash technique

 
I came across a video on YouTube by Lisa Freeman using the Calming Camellia stamp set and the whitewash technique.  I actually CASEd her card and enjoyed the technique a lot.  You can see her video Here.  
This set is offered for FREE from Stampin' Up! with a purchase of $300.00 until February 28, 2022.  You can enjoy this stamp set for FREE by hosting your very own workshop or all by yourself.  See below to place your order in my on-line store. I appreciate all orders, big or small I love them all.

Recipe:
  • The base is an 8 1/2 x 5 1/2 piece of Misty Moonlight, scored at 4 1/4.
  • The Basic White layer is 5 1/4 x 4.
  • The next Misty Moonlight layer is 5 x 3 3/4 and is stamped with Misty Moonlight ink and a stamp from Calming Camellia, then painted with a Blender Pen and White ink.
  • The 4 x 3 piece of Basic White is cut with a  Scalloped Contours die.
  • The White Crinkled Seam Binding Ribbon is stamped with a Calming Camellia stamp and Misty Moonlight ink and wrapped around the Scalloped Contours Die.
  • The 2 1/2 x 2 piece of Misty Moonlight is also stamped with a flower from Calming Camellia and colored with white ink and adhered to the Basic White Scalloped Contour die with Multipurpose Liquid Glue.
  • The words are stamped with Misty Moonlight on a 3 x 5/8 piece of Basic White.
  • All done and remember to stamp your envelope.
Should you want to order any of the supplies I used to make this card, please just click Right Here to place your in my on-line store, or you can click on the 2021-22 catalog right here on my blog.
I hold monthly adult card-making classes in my home at 555 Williamsdale Road, Graham, NC 27253. My March 2022 classes are the 8th and the 12th, and if you would like to attend, see my class schedule and get all the details right here on my blog or on my Stampin' Up! website, found Here.
Thank you for stopping by and have a great day.
~Linda

Thursday, February 17, 2022

Awesome Otters

Such a cute stamp set offered for FREE from Stampin' Up! with a purchase of $50.00 or more until February 28, 2022. Yep, I said FREE. (See below to place your order in my on-line store). 
I appreciate all orders, big or small I love them all.

Recipe:
  • The base is an 8 1/2 5 1/2 piece of Night of Navy, scored at 4 1/4.
  • The Soft Suede layer is 5 1/4 x 4.
  • The Basic White layer is 5 x 3 3/4.
  • The Simply Marbleous DSP layer is 4 7/8 x 3 5/8.  FYI:  This fun paper is FREE with an order of $50.00 until February 28, 2022.  See below to place your order in my on-line store.
  • The cute little otters are stamped with Tuxedo Memento Black ink on Basic White cardstock and colored with Stampin' Blends.  The swimming otter is cut out with a Layering Circle Die, and the floating otter is cut out with my handy-dandy Paper Snip Scissors.  Both otters are popped up with dimensionals.
  • The words are stamped with black ink and cut out with the smallest of one of the Tailor Made Tags.  I threaded some Bakers Twine thru the hole in the tag after I popped up the stamped tag with dimensionals.
  • All done and remember to decorate your envelope.
Should you want to order any of the supplies I used to make this card, please just click Right Here to place your in my on-line store, or you can click on the 2021-22 catalog right here on my blog.
I hold monthly adult card-making classes in my home at 555 Williamsdale Road, Graham, NC 27253. My March 2022 classes are the 8th and the 12th, and if you would like to attend, see my class schedule and get all the details right here on my blog or on my Stampin' Up! website, found Here.
Thank you for stopping by and have a great day.
~Linda

Tuesday, February 15, 2022

After the Storm &
Catching Butterflies 

Such a cute stamp set offered for FREE from Stampin' Up! with a purchase of $50.00 or more until February 28, 2022.  Yep, I said FREE.  
See below to place your order in my on-line store.  I appreciate all orders, big or small I love them all.

Recipe:
  • The base is an 8 1/2 x 5 1/2 piece of Blushing Bride, scored at 4 1/4.
  • The Sahara Sand layer is 5 1/4 x 4.
  • The Hand Penned DSP layer is 5 x 3 3/4.
  • The Misty Moonlight layer is cut out with the 2nd to the largest Scalloped Contours Dies.
  • The images on the 4 x 2 3/4 piece of Basic White are stamped with Tuxedo Memento Black ink and the grass is stamped with Mint Macaron ink and a stamp from After the Storm.
  • My sweet little girl, Lila and her butterflies are colored with Stampin' Blends.
  • The words, from Catching Butterflies, are stamped with Tuxedo Memento Black ink on Basic White cardstock and cut out with a Layering Circle die.
  • The Blushing Bride scalloped circle base (under the word circle) is also cut with a Layering Circle die.  
  • All done! Remember to decorate envelope!!
Should you want to order any of the supplies I used to make this card, please just click Right Here to place your in my on-line store, or you can click on the 2021-22 catalog right here on my blog.
I hold monthly adult card-making classes in my home at 555 Williamsdale Road, Graham, NC 27253. My March 2022 classes are the 8th and the 12th, and if you would like to attend, see my class schedule and get all the details right here on my blog or on my Stampin' Up! website, found Here.
Thank you for stopping by and have a great day.
~Linda
Friday, February 11, 2022

 Friendly Hello for my
February 2022 Classes

Friendly Hello & **Calming Camelia Stamps, Pale Papaya, Basic Black & Basic White Cardstock, Friendly Hello DSP
Friendly Hello Stamps, Pool Party,
Basic Black & Basic White Cardstock,
Friendly Hello DSP

Friendly Hello & Special Moments Stamps,
Pool Party, Basic Black & Basic White
Cardstock, Friendly Hello DSP

I am very excited to offer these cards at my February 8 and 12, 2022 classes. Each one who attends will have the opportunity to make one of each color and may select a bird or flowers as her focal point. **The Calming Camelia stamp set is a host only set for purchases of $300.00+.  

Recipe:
  • The bases are 8 1/2 x 5 1/2.
  • The next layers are 5 1/4 x 4.
  • The Friendly Hello DSP layers are 5 x 3 3/4.
  • The Encircled in Beauty die is cut out with Basic Black cardstock.
  • The circles are cut out with the Layering Circle Dies.
  • The focal point and the words are stamped on Basic White with Tuxedo Memento Black ink.
  • The focal point on each is colored with Stampin' Blends.
  • All done!!  Now, how easy is that.  And remember to decorate your envelope.
Should you want to order any of the supplies I used to make these cards, please just click Right Here to place your in my on-line store, or you can click on the 2021-22 catalog right here on my blog.
I hold monthly adult card-making classes in my home at 555 Williamsdale Road, Graham, NC 27253. My March 2022 classes are the 8th and the 12th, and if you would like to attend, see my class schedule and get all the details right here on my blog or on my Stampin' Up! website, found Here.
Thank you for stopping by and have a great day.
~Linda

Tuesday, February 8, 2022

Free as Bird &
Sweet Symmetry DSP 

Shaded Spruce, Pale Papaya Cardstock
Night of Navy, Petal Pink Cardstock
Bumblebee, Old Olive Cardstock
http://

I am very excited to offer these cards at my February 8 and 12, 2022 classes.  Each one who attends will have the opportunity to select her color choice.  Everything will be cut out, and basically stamping and coloring is about all you will need to do.   
Recipe:
  • The bases are 8 1/2 x 5 1/2.
  • The next layers are 5 1/4 x 4.
  • The Sweet Symmetry DSP layers are 5 x 3 3/4.
  • I first lined up the 4 1/4 x 2 piece of the Basic White piece over the DSP and trimmed the white piece at an angle.  Then I stamped my birds on the white piece with Tuxedo Memento Black ink and colored the images with Stampin Blends.  
  • The scallops are cut out with the Penned Flowers Dies. I adhered both scallops to the back of the white with Multipurpose Glue and trimmed the scallops to line up with the white piece and DSP.  I added all to my card front with dimensionals.
  • All done!!  Now, how easy is that.  And remember to decorate your envelope.
Should you want to order any of the supplies I used to make these cards, please just click Right Here to place your in my on-line store, or you can click on the 2021-22 catalog right here on my blog.
I hold monthly adult card-making classes in my home at 555 Williamsdale Road, Graham, NC 27253. My March 2022 classes are the 8th and the 12th, and if you would like to attend, see my class schedule and get all the details right here on my blog or on my Stampin' Up! website, found Here.
Thank you for stopping by and have a great day.
~Linda

Sunday, February 6, 2022

  Sweet as a Peach Stamps &
Expressions in Ink DSP

Pale Papaya, Garden Green &
Basic White cardstock

Shaded Spruce, and Basic White Cardstock
& Gilded Gems


Polished Pink, Basic Black &
Basic White cardstock &
 2021-23 In-Color Jewels

I am offering these beautiful cards at my February 8th and 12th, 2022 Creative Therapy classes.  All three cards use the beautiful Expressions in Ink Designer Series Paper, and just look how different each card looks, just by changing the cardstock colors.  
Recipe:
  • The bases are 8 1/2 x 5 1/2.
  • The next layers of the Pale Papaya and Polished Pink cards are 5 1/4 x 4.
  • The Expressions in Ink DSP layers are 5 x 3 5/8.
  • The lace is cut out with the Potted Succulent Dies.
  • The 3/8 wide Basic White frame over the DSP is made by layering and cutting the largest and the third from the largest Rectangle Stitched Dies together.  I used Foam Adhesive Strips on the back of the frame instead of dimensionals.  More economical and was much quicker to use.
  • The words are embossed with Gold Metallic Powder on a piece of 4 x 3/4 piece of Basic White.
  • The ribbon is added with glue dots. (See below for the list of all the different ribbons I used).
  • All done!!  And remember to decorate your envelope.
Should you want to order any of the supplies I used to make these cards, please just click Right Here to place your in my on-line store, or you can click on the 2021-22 catalog right here on my blog.
I hold monthly adult card-making classes in my home at 555 Williamsdale Road, Graham, NC 27253. My March 2022 classes are the 8th and the 12th, and if you would like to attend, see my class schedule and get all the details right here on my blog or on my Stampin' Up! website, found Here.
Thank you for stopping by and have a great day.
~Linda

Thursday, February 3, 2022

 Another way to use 
Eden's Garden and the Double Heart Punch Pack 


I really am enjoying using the Sweet Talk Designer Series Papers by Stampin' Up!  So bright and cheery and can be used for more than Valentine's Day.  This paper is in the 2022 Spring Mini catalog, and is available until June 2022, or while supplies last.
Recipe:
  • The base is an 8 1/2 x 5 1/2 piece of Highland Heather, scored at 4 1/4.
  • The Real Red layer is 5 1/4 x 4.
  • The two pieces of Sweet Talk DSP are 4 x 3 3/4 and 1 x 3 3/4.
  • The 3 1/8 x 1 7/8 rectangle is cut out with a piece of Abstract Beauty DSP and a Rectangle Stitched Die.
  • The two hearts are punched with the Double Heart Punch, Highland Heather & Basic White Cardstock and Sweet Talk DSP.   
  • The Highland Heather ribbon is wrapped around the top two layers before adhering all to the base.
  • All done!!  Now, how easy is that.  And remember to decorate your envelope.
Should you want to order any of the supplies I used to make this card, please just click Right Here to place your in my on-line store, or you can click on the 2021-22 catalog right here on my blog.
I hold monthly adult card-making classes in my home at 555 Williamsdale Road, Graham, NC 27253, and if you would like to attend, and the deadline to register has not passed, please let me know.
For details, see my class schedule right here on my blog or on my Stampin' Up! website, found Here.
Thank you for stopping by and have a great day.

Tuesday, February 1, 2022

   In the Moment

Magenta Madness, & Basic White Cardstock, 
Abstract Beauty DSP, Stripes & Splatters Embossing Folder, 
Scalloped Contours Dies, Stitched So Sweetly Dies.
http://

Fresh Fresia, Gorgeous Grape, & Basic White Cardstock,
Heart & Home DSP, Macrame Embossing Folder, 
Scalloped Contours Dies, Stitched So Sweetly Dies.  
http://

Garden Green & Daffodil Delight Cardstock, Heart & Home DSP, 
Meadow Moments Embossing Folder, 
Scalloped Contours Dies, Stitched So Sweetly Dies. 
http://
Relaxing with In the Moments, a stamp set in the 2022 Spring Mini catalog.

Recipe:
  • The bases are 8 1/2 x 5 1/2, scored at 4 1/4.
  • The next layers are 5 1/4 x 4.
  • The next DSP layers are cut out with the second to the largest Scallops Contours dies.
  • The images are stamped with Tuxedo Memento Black ink on Basic White and colored with Watercolor Pencils and Blender Pens.  Then cut out with the largest of the Stitched so Sweetly dies.
  • I adhered the largest scalloped DSP piece to the card front with Multipurpose Liquid Glue and popped up the stamped image with dimensionals.
  • All done!! Now, how easy is that. And remember to decorate your envelope.
Should you want to order any of the supplies I used to make these cards, please just click Right Here to place your in my on-line store, or you can click on the 2021-22 catalog right here on my blog.
I hold monthly adult card-making classes in my home at 555 Williamsdale Road, Graham, NC 27253, and my next set of classes are March 8th and 12, 2022.  If you would like to attend, please let me know before the registration deadline of February 27, 2022.
For details, see my class schedule right here on my blog or on my Stampin' Up! website, found Here.
Thank you for stopping by and have a great day.
~Linda