Monday, August 31, 2020

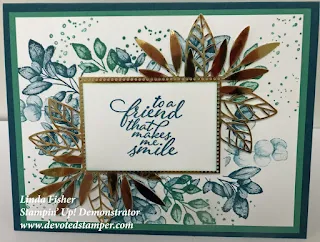
Forever Fern & 
Forever Gold Laser 
Cut Foil
When I received my order of the beautiful Forever Gold Laser Cut Specialty Foil from Stampin' Up!, I said to myself, "My sweet friend Wendie and I just have to make something with it".  So, we put our heads together and came up with this surprisingly easy and quick card.

Recipe: (building from base)
  • The base is an 8 1/2 x 5 1/2 piece of Pretty Peacock, scored at 4 1/4.
  • The Just Jade layer is 5 1/4 x 4.
  • The Whisper White layer is 5 x 3 3/4, and is stamped with Pretty Peacock & Just Jade ink.
  • The foil cutouts is the base for the 2 3/8 x 1 5/8 Whisper White rectangle, on which my words are stamped with Pretty Peacock ink.  The Shimmery White circle is cut out with the Stitched Shapes Dies.
  • All done and remember to decorate your envelope.
Should you want to purchase any of the supplies I used to make this card, I would be honored if you chose me as your demonstrator, and placed your order in my on-line store, HERE. Or, you can click on the 2020-21 catalog right here on my blog.
I hold adult classes in my home at 555 Williamsdale Road, Graham, NC 27253, and if you would like to attend, please let me know.  For details, see my class schedule right here on my blog, or HERE on my Stampin' Up! website.
Thank you for stopping by, and have a great day,
    ~Linda

    Saturday, August 29, 2020

    Poinsettia Petals & Winter Woods for my September, 2020 Classes
    This is a faux diagonal fold card, both easy and fun.
    I am going to offer it to all of my wonderful ladies at my September 1st and 5th, 2020 Creative Therapy cardmaking classes.

    Recipe: (building from base)
    • The base is an 11 x 4 1/4 piece of Garden Green, scored at 5 1/2.
    • The next Real Red layer is 5 1/4 x 4.
    • The next piece of Toile Tidings DSP is 5 x 3 3/4, and cut diagonally and adhered to the Real Red.
    • The Real Red scalloped oval is the base for the Very Vanilla oval that has been embossed with the Winter Snow embossing folder.  Both of these ovals have been cut out with the Layering Oval Dies.
    • The tree is stamped with Shaded Spruce ink on Shaded Spruce cardstock, and cut out with one of the dies from Winter Woods.
    • The deer is cut out with Brass foil, and a North Pole Wonder die. 
    • The words, from Poinsettia Petals, is stamped with Shaded Spruce ink on a 3 1/4 x 7/8 piece of Very Vanilla and backed with a 3 3/8 x 1 piece of Shaded Spruce cardstock. 
    • I added a total of 6 Red Rhinestone Basic Jewels.
    • All done and remember to decorate your envelope.
    Should you want to purchase any of the supplies I used to make this card, I would be honored if you chose me as your demonstrator, and placed your order in my on-line store, HERE. Or, you can click on the 2020-21 catalog right here on my blog.
    I hold adult classes in my home at 555 Williamsdale Road, Graham, NC 27253, and if you would like to attend, please let me know.  For details, see my class schedule right here on my blog, or HERE on my Stampin' Up! website.
    Thank you for stopping by, and have a great day,
      ~Linda
      Thursday, August 27, 2020

      Posted for You for my 
      September, 2020 Classes
      I am offering this card at my September 1st & 5th, 2020 classes, and am excited to share.
      Actually, I offered a similar card in August, and received such positive feedback, I decided to offer this one, different, and the same.

      Recipe: (building from base)
      • The base is an 8 1/2 x 5 1/2 piece of Old Olive, scored at 4 1/4.
      • The Very Vanilla layer is 5 1/4 x 4.
      • The Cajun Craze layer is 5 x 3 3/4 and embossed with the Subtle 3D folder.
      • The two strips of Gold Foil adhered under the 5 x 2 3/4 Gilded Autumn DSP are 5 x 1/4.
      • The 3 pieces of Very Vanilla are punched with the Rectangular Postage Punch, and are the bases for the 3 pieces of 1 3/4 x 1 3/16 Very Vanilla on which the flowers are stamped with Tuxedo Memento Black ink.
      • The leaves and birds are colored with Old Olive and Cajun Craze Blends.
      • The word, Hello, from Itty Bitty Greetings, is stamped with Tuxedo Memento Black ink on Very Vanilla, and cut out with one of the Tasteful Label dies.
      • The Gold Foil under the Hello is 2 3/4 x 5/8 and the tails are cut with my handy-dandy Paper Snips.
      • All done and remember to decorate your envelope.
      Should you want to purchase any of the supplies I used to make this card, I would be honored if you chose me as your demonstrator, and placed your order in my on-line store, HERE. Or, you can click on the 2020-21 catalog right here on my blog.
      I hold adult classes in my home at 555 Williamsdale Road, Graham, NC 27253, and if you would like to attend, please let me know.  For details, see my class schedule right here on my blog, or HERE on my Stampin' Up! website.

      Thank you for stopping by, and have a great day,
        ~Linda

        Tuesday, August 25, 2020

        Doggone Amazing 

        When I saw this card on Elizabeth Price's blog, Seeing Inkspots, I knew I wanted to CASE it.  Isn't it darling!
        You can see her card Here, post of August 14, 2020.  
        It did take a little time, and nowadays, that is what I have the most, time.

        Recipe: (building from base)
        • The base is an 8 1/2 x 5 1/2 piece of Flirty Flamingo, scored at 4 1/4.
        • The Crumb Cake layer is 5 1/4 x 4.
        • The Watercolor Paper layer is 5 x 3 3/4.
        • I used my new Water Painters to color the cardstock with Flirty Flamingo, and Crumb cake ink.
        • I cut out one of the dogs with a die from Pets and the Playful Pets DSP, and I cut the other two the my handy-dandy Paper Snips and the same DSP. I adhered them to my card with dimensionals.
        • The Playful Alphabet Dies are cut out with Gray Granite and the new Foam Adhesive Sheets.  It is so easy to use the foam adhesive sheets.  Measure the alphabet dies, adhere a piece of cardstock to a foam adhesive sheet, and cut out your letters with a die cutting machine.  They are already "dimensionaled" and ready to adhere to your card.  Easy, peasy.
        • I stamped with words from Ornate Thanks on Petal Pink with Early Espresso ink. 
        • Added a few Artistry Sequins, and spritzed the entire card with Frost White Shimmer Paint/Alcohol combination.  The little spritzer bottles from SU are wonderful for this purpose
        • All done and remember to decorate your envelope.
        Should you want to purchase any of the supplies I used to make this card, I would be honored if you chose me as your demonstrator, and placed your order in my on-line store, HERE. Or, you can click on the 2020-21 catalog right here on my blog.
        I hold adult classes in my home at 555 Williamsdale Road, Graham, NC 27253, and if you would like to attend, please let me know.  For details, see my class schedule right here on my blog, or HERE on my Stampin' Up! website.
        Thank you for stopping by, and have a great day,
          ~Linda

          Sunday, August 23, 2020


          Whale Done

          If you have ever bought anything on a whim, well then, you probably know how I felt when I hit the "send" button on my computer and bought the Whale Done Bundle.
          I really didn't think I would like the whales and fishes, and boy, was I wrong.  So much fun. 
          I actually CASEd this from page 94 of the Stampin' Up! 2020-21 catalog.  

          Recipe: (building from base)
          • The base is an 8 1/2 x 5 1/2 piece of Pool Party, scored at 4 1/4.
          • The next Pretty Peacock layer is 5 1/4 x 4.
          • The next piece of Whale of a Time DSP is 5 x 3 3/4.
          • The piece of Petal Pink is 2 1/2 x 4 1/2 and I used my handy-dandy Paper Snips to cut the flag at the bottom.
          • The Calypso Coral piece is 2 3/4 x 1 1/4, and is heat embossed with VersaMark and White Embossing Powder.
          • The whale and his fin are punched with the Whale punch and Pretty Peacock cardstock.  The pretend water coming out of his blowhole and on his belly are cut out with the Whale Punch and Pool Party cardstock.
          • The Petal Pink piece and the Whale are stamped with Pretty Peacock ink and the Whale Done stamps. 
          • All done and remember to decorate your envelope.
          Should you want to purchase any of the supplies I used to make this card, I would be honored if you chose me as your demonstrator, and placed your order in my on-line store, HERE. Or, you can click on the 2020-21 catalog right here on my blog.
          I hold adult classes in my home at 555 Williamsdale Road, Graham, NC 27253, and if you would like to attend, please let me know.  For details, see my class schedule right here on my blog, or HERE on my Stampin' Up! website.

          Thank you for stopping by, and have a great day,
            ~Linda

            Friday, August 21, 2020

            Autumn Goodness for my September, 2020 Classes
            A friend sent a birthday card to me and she made it using the Diagonal Cut Technique.  (I realized when I was making this card that a trimmer works way better for this technique than a guillotine cutter).
            Well, I said to myself, (because no one else was with me), "Linda, this technique would be awesome to share with my ladies when they attend my September, 2020 classes".  
            So, with the aid of my lovely assistant, Michelle, we designed the card you see.  
            It is so easy, and includes a little coloring-therapy.  No need to purchase adult coloring books, come to one of my classes instead.

            Recipe: (building from base)
            • The base is an 8 1/2 x 11 piece of Pretty Peacock, scored at 4 1/4 & 5 1/2, and cut diagonally. 
            • The Mango Melody layer is 5 1/4 x 4 cut diagonally from corner to corner.
            • The Plaid Tidings layer is 5 x 3 3/4, also cut diagonally.
            • The 3 1/2 x 2 1/4 piece of Whisper White is cut out with a Stitched Rectangle die.
            • The wheelbarrow and flowers are stamped with Early Espresso ink on white.  The flowers are colored with blends, and both are cut out with the Autumn Wheelbarrow Dies, then popped up with dimensionals.
            • The 3 3/4 x 1 piece of Mango Melody is the base for the 3 1/2 x 7/8 piece of Whisper White and the ends of both are punched with the Lovely Label Pick a Punch.
            • The words are stamped with Early Espresso ink.
            • All done and remember to decorate your envelope.
            Should you want to purchase any of the supplies I used to make this card, I would be honored if you chose me as your demonstrator, and placed your order in my on-line store, HERE. Or, you can click on the 2020-21 catalog right here on my blog.
            I hold adult classes in my home at 555 Williamsdale Road, Graham, NC 27253, and if you would like to attend, please let me know.  For details, see my class schedule right here on my blog, or HERE on my Stampin' Up! website.

            Thank you for stopping by, and have a great day,
              ~Linda

              Wednesday, August 19, 2020

              Reverse Rainbow Stenciling for my August, 2020 Hostess Club Projects
               
              My Hostess Club Ladies are the best, and I enjoy sharing techniques and projects with them each time we meet, and we always have food, and that's a plus.
              I saw this reverse stenciling technique on Gina K's Stamp TV on YouTube, and you can see her video Here.  
              I am excited to share all the "how to's" with my special Hostess Club ladies when we meet this Saturday.  Even a mask cannot stop us from having fun.  For sure.
              All the supplies I used to make these cards are listed at the end of this post.  Click on anything you wish, and you will be taken to my SU store.

              Recipe: (building from base)
              • The bases are 8 1/2 x 5 1/2 pieces of Cajun Craze or Mango Melody, scored at 4 1/4.
              • The next layers of Basic Black are 5 1/4 x 4.
              • The Whisper White layers are 5 x 3 3/4.
              • For the top two cards, I used Bermuda Bay, Mango Melody, Magenta Madness, Granny Apple Green, Tuxedo Memento Black inks, and one of the Basic Pattern Decorative Masks.
              • The narrow piece of black is 4 1/2 x 1.
              • Black Glitter paper is used to cut out the large circles under the Rainbow Glimmer paper, which are cut out with the Painted Labels Dies.
              • The white circle in the center of the Rainbow dies are cut out with the Layering Circle Dies and stamped with Tuxedo Memento Black ink and the Positive Thoughts and Framed for You stamp sets.
              • For the bottom two cards I used Cajun Craze, Pumpkin Pie, Crushed Curry, Tuxedo Memento Black inks and one of the Basic Pattern Decorative Masks. 
              • The Cajun Craze and Whisper White pieces are cut out with the Stitched Nested Dies.
              • The images and words are stamped with Tuxedo Memento Black ink. The kitty's collar and eyes are colored with a Granny Apple Green Blend.
              • The 6" piece of 3/8" Glittered Organdy Black Ribbon is folded over and glued to the end of the labels dies.
              • All done and remember to decorate your envelope.
              Should you want to purchase any of the supplies I used to make this card, I would be honored if you chose me as your demonstrator, and placed your order in my on-line store, HERE. Or, you can click on the 2020-21 catalog right here on my blog.
              I hold adult classes in my home at 555 Williamsdale Road, Graham, NC 27253, and if you would like to attend, please let me know.  For details, see my class schedule right here on my blog, or HERE on my Stampin' Up! website.

              Thank you for stopping by, and have a great day,
                ~Linda

                Monday, August 17, 2020

                Swirly Frames & 
                Framed for You for my 
                September, 2020 Classes
                Some stamp sets in the Stampin' Up! Catalog call my name.  Swirly Frames is one that I thought was different, and thought I would give it a “swirl”.
                I am offering this card at both of my September, 2020 classes.  
                So much fun, and lots of time!!!

                Recipe: (building from base)
                • The base is an 8 1/2 x 5 1/2 piece of Misty Moonlight, scored at 4 1/4.
                • The Magenta Madness layer is 5 1/4 x 4.
                • The Whisper White layer is 5 x 3 3/4.
                • The circles are stamped on the white card stock with Magenta Madness and Crushed Curry ink.
                • A 3 1/4 x 1 piece of Flowers for Every Season Paper Pack is adhered to the white before adding the card stock circles.
                • The cut-out Misty Moonlight and Magenta Madness 1 7/8 and 1 5/8 circles are made with the Layering Circle dies.  The 1 1/2 Crushed Curry circle is made with the 1 1/2 circle punch.  
                • The words from Framed for You are stamped on the Crushed Curry circle with Tuxedo Memento Black ink.
                • The Jewel Rhinestones are colored with a sharpie.
                • All done and remember to decorate your envelope.
                Should you want to purchase any of the supplies I used to make this card, I would be honored if you chose me as your demonstrator, and placed your order in my on-line store, HERE. Or, you can click on the 2020-21 catalog right here on my blog.
                I hold adult classes in my home at 555 Williamsdale Road, Graham, NC 27253, and if you would like to attend, please let me know.  For details, see my class schedule right here on my blog, or HERE on my Stampin' Up! website.
                Thank you for stopping by, and have a great day,
                  ~Linda